When space is tight, particularly in a fitted kitchen you might not want to use up valuable wall space with a traditional radiator. This is where a clever idea like a plinth or skirting board heater can be used to great effect.
What is a Plinth or Kickboard Heater?
These heaters that fitted into the plinth or kickboard under your kitchen units, but they can be fitted in other rooms also. There are low voltage versions that can be used in bathrooms or they can be fitted in the skirting in other rooms, so long as there is room for the heating unit.
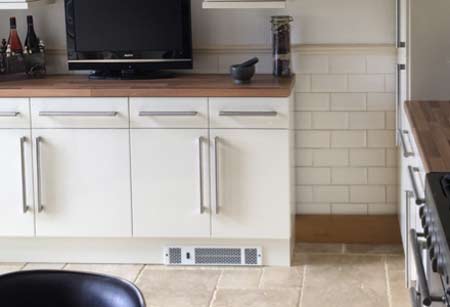
A plinth or kick board heater fitted under kitchen units – Image courtesy of kitchenheaters.co.uk
The big benefit is that they allow you to dispense with the need for a traditional radiator, and all the wall space that they take up, so you can have more kitchen units and not compromise on the heating.
They are connected to the mains electricity to power a fan that blows the heated air into the room. In the next section we explain about the different types, however the disadvantages of a plinth heater tends to be the noise cause by the fan and, particularly after long periods on not being used, dust can collect in the heater which burns and smells on first use.
All manufacturers quote the noise levels, but they are certainly no more than that of an electric oven. The burning dust smells is typically of electric fan heaters when they have not been used for a long time and is not dangerous or long lasting.
Other than the space that they save they are considerably cheaper, certainly than retrofitting, under-floor heating which is the other great space saving heating solution. And you can’t deny getting your toes warmed while washing up on a cold winters evening is not a blessing!
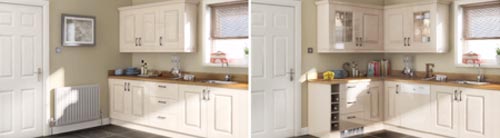
You can save space by removing a traditional radiator and fitting a plinth heater – Image courtesy of Smiths
The Different Types of Plinth or Kick Board Heater
There are effectively 3 types of Plinth or Kick board Heater:
- Electric
- Hydronic
- Dual or Duo
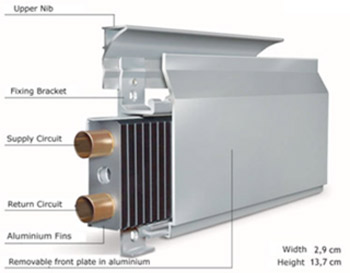
These types refer to the heating element. The electric types are plinth mounted electric fan heaters, where as the Hydronic heaters generate heat from the central heating system through a heat exchanger. As if a radiator with a fan, the heater is connected to the central heating pipes over which the electric fan blows air, warming it before blowing it into the room.
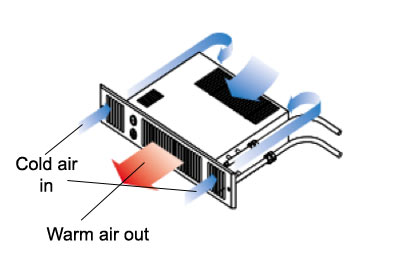
How a Plinth Heater Works – Image courtesy of Smiths
A Dual or Duo plinth heater has both a hydronic heating element and electric heater. This means that if the hydronic heater needs a boost to provide a little more heat, the electric heater can be used to provide even more hot air. This might be important when sizing your plinth heater for the room space to be heated (see more below).
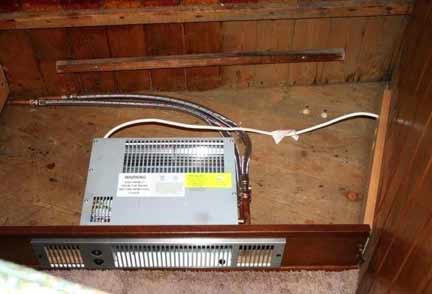
A Hydronic Plinth Heater in Situ – Image courtesy of huetour.club
We have described the commercially available plinth or kick board heaters, however there are variations on these which are worth considering.
Heated Skirting Boards
This is where either an electrical element or the central heating pipes are run along behind the skirting. Unlike the plinth heaters we have described, they rely on convection (the natural movement of air caused by hot air rising) to spread the heat from the skirting board into the room.
There are a few features of commercially available heated skirtings that make them work more effectively that a simple system we just described.
There are vents to allow the cold air to enter at the bottom of the skirting and the warm air to rise out of the top. The pipes inside the skirting are often oval so that they take up less space meaning that the skirting boards are no thicker than normal boards, or at least not noticeably thicker.
The “boards” are often made of metal, particularly aluminium, as this conducts heat more effectively, or have metal fins inside to heat the air passing through them.
A heated Skirting Board – Image courtesy of skirtingboardheating.co.uk
By understanding the principles of how these heated skirting board work and convection it is possible to make a DIY heated skirting or even a plinth heater by routing the central heating pipes behind the skirting and leaving suitable air gaps.
They issue is sizing you solution correctly to adequately heat the room and controlling the heating element ideally theromstatically, which is why it is generally better to purchase the right size solution, whether a plinth heater or heated skirting.
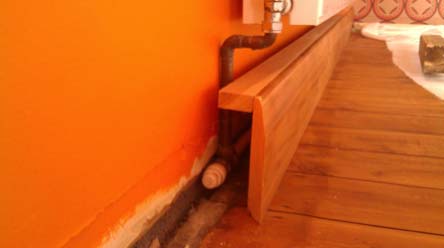
DIY Heated Skirting Boards – Image courtesy of Singletrack Magazine
How to Choose the Right Size Plinth Heater?
You work out what size (and type) plinth heater in exactly the same way as you calculate what size radiator you need for a particular room. You need to work out the required BTU’s or Watts and then install the right amount and sizes of heaters to meet this requirement.
This calculation is actually quite complex and based on a number of factors including the desired temperature of the room, the heat loss for the room and it’s size. The easiest way to work this out is to use a BTU or Watt calculator for radiators like ours here.
Once you have this information is it is relatively straight forward to choose the right size plinth heater for your needs, Most manufacturers publish specification sheets for their range of plinth heaters which show the output, although some complicate things further by showing different output values for different central heating system temperatures.
The final thing to consider is whether it be possible to install one of these heaters n the location you would like to. They will need power, and on most cases access to the central heating system, if it not just an electric heater.
If these cannot be routed to the desired location easily you might have to consider other options. Low voltage model are available for use in bathrooms or areas of high humidity.
The power drawn by the unit is something you need to consider as if it is under 2kW you could plug in, although this is not recommended. From 2kW to 3kW you would need to use a FCU (fused connection unit) and it should be on a dedicated circuit but would depend on what is already in use. Over 3kW there is no option but to use a dedicated circuit like used for cooker or shower.
This leads us neatly on to the installation of plinth heaters.
How to Install a Plinth Heater
Frustratingly this is not something that you will typically be able to do all yourself as most plinth heaters tend to be installed in kitchens, and sometimes in bathrooms.
As we cover in our project about electrical safety, you should not work on electrics in a bathroom or kitchen unless you are a competent person, ie an electrician.
Clearly if you use a system that does not require a fan such as heated skirting boards you will not be subject to this constraint.
Generally you will need a 3A spur to connect the heater, but follow the manufacturer’s specific guidelines. Plinth heaters are classified as fixed appliances and the electrical connection should be connected via a double pole 3A fused spur with a minimum contact gap of 3mm. The appliance must be earthed.
Many models of plinth heaters will not work with micro bore central heating pipes so this is something to check before purchasing if you have a micro bore central heating system.
Connect the heater flow and return pipes as instructed by the manufacturer, if you have a Hydronic or Dual system. It is recommended that you fit an isolation valve on both so that the unit can be removed for repair or servicing. Most units are supplied with a flexible hose to make connecting easier, but ensure that they are not kinked once connected.
The heater should be installed on a flat, even surface behind the plinth. The instructions will confirm the size of the opening needed for the heater and the required air gap around it. It is not recommended to position the heater on a carpeted surface if possible. Once fitted there should not be access to the unit, except through the grill in front of the plinth.
There will be a commission process which is specific the every heater, but this will include bleeding any air out of the system. Follow the instructions to do this.
Installing a plinth heater is a relatively easy job, and with the exception of the electrical work, it is a project most DIY enthusiasts could readily tackle. Plinth or kick board heaters are a great space saving idea to replace traditional radiators and should be considered as an excellent alternative.