Sometimes, in order to carryout maintenance, move a radiator or another similar job, it’s necessary to turn off your heating system and drain it down.
These instructions apply only to open-vented systems! For sealed systems, consult a qualified plumber.
For any other central heating related requirements, see our other central heating projects for more tips and ideas on our Heating Projects page. If your boiler is over 10 years old, you might be wasting up to 50% of your gas!
Why Do I Need to Drain My Heating System?
Draining a heating system may be required to clean and flush it, remove sludge, or replace a radiator.
Before draining, turn off the boiler. Disconnect the gas or electricity supply, or ensure a back boiler or solid fuel system is completely off.
While draining, consider checking your boiler’s efficiency. This is best done by a qualified plumber though.
The Feed and Expansion Tank
Your loft likely has a feed and expansion tank, identified by a pipe at the top. This pipe allows steam to expand into the tank if the water in your system gets too hot.
The tank is filled from the mains via a ball valve, similar to the one in your toilet cistern (learn more here). As water rises, it lifts a float ball that closes the valve. When the tank is full, the valve shuts off. When water is used, the ball drops, opening the valve to refill the tank.
To prevent water from entering while draining the system, place a piece of timber across the tank, lift the valve arm, and secure it with the timber to close the valve.
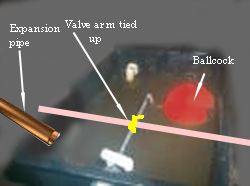
Closing off the valve while draining down your heating system
How to Drain Your Heating System: A Step-by-Step Guide
If you need to drain down your heating system for any reason, work through the steps below:
- Step 1 – Prepare Your Equipment: Gather a hosepipe and an adjustable spanner. Find a suitable location outside where the water can safely drain without freezing or causing accidents. A drain is normally the best solution.
- Step 2 – Set Up for Draining: The first job is to attach the Hosepipe. Connect one end of the hosepipe to the drain valve on your heating system. This is normally part of the pipework below the boiler itself. Ensure the other end is placed in a suitable outdoor drainage area.
- Step 3 – Drain the System: Next, open the drain valve. Use an adjustable spanner or correct sized spanner to slowly open the drain valve and allow the water to flow out through the hosepipe.
- Step 4 – Bleed the Radiators: Open the bleed valves on all radiators to release trapped air and speed up drainage. Start with the radiators on the top floors and move to those on the lower floors.
- Step 5 – Check for Complete Drainage: Monitor the hosepipe closely. When water stops flowing from the hose, check that the system is completely drained. Look for any remaining water or leaks.
- Step 6 – Address Airlocks: To do this, add water to the tank in your loft and loosen the valve arm to add about 6 inches of water to the feed and expansion tank. This should then help restart water flow from the hosepipe. If water still doesn’t flow, there may be an airlock, so connect the hosepipe to a cold tap and briefly send water back into the radiator you’re draining to clear the airlock. Make sure the hosepipe is securely attached to the drain valve.
- Step 7 – Final Steps: To finish up, the next task is to check for leaks. Inspect all connections and valves for leaks, and then close the drain valve. Once the system is fully drained and checked, securely close the drain valve. Once all valves are closed off, radiators connected up and the likes, you will then need to refill your system beofre it can be used.
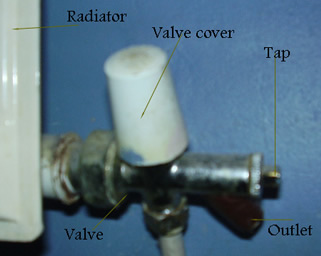
Various parts that make up a radiator valve
Quick Step Checklist for Draining Down
If you just want a quick reference guide for draining your system down, checkout the below:
- Check you have an open-vented heating system. Consult a plumber if unsure.
- Turn off the gas or electricity to your boiler, or ensure solid fuel boilers are out.
- Lock the ball valve in the feed and expansion tank to stop water flow.
- Attach a hosepipe to the drain nozzle on a downstairs radiator and run it outside.
- Open the drain valve to let the water flow out of the system.
- Open bleed valves on upstairs radiators to help speed up the drainage.
- Check for and resolve any airlocks that might be blocking drainage.
- Once the system is fully drained, proceed with your maintenance or repairs.
Refilling Your Heating System After Draining
Once you have successfully drained down your heating system, before it can be used you will first need to refill it:
- Close the drain valve on the radiator and all previously opened bleed valves and any other drainage valves.
- Untie the string in the feed tank to allow water to refill the system. Wait until the tank stops filling.
- Go downstairs and bleed the bottom-level radiators to remove trapped air.
- Repeat the bleeding process on the top-level radiators upstairs to ensure the entire system is filled.
- Consider adding an inhibitor to prevent corrosion and limescale buildup, this is well worth doing. see our adding an inhibitor project here.
- Check that all nuts and fittings are tightened. Turn on the power supply and the boiler.
- As the system heats up, listen for any knocking sounds which may indicate air expanding. You might need to bleed the radiators again.
- Once the system is fully heated and pressurised, inspect for any leaks.
Quick Step Checklist for Refilling Your Heating System
As a quick reference for refilling your heating system, check out the below:
- Close and tighten all radiator drain valves and bleed valves you previously opened.
- Add any necessary inhibitor to your system.
- Open the feed and expansion tank valve in your loft to refill the system.
- When the system is full, bleed the bottom-level radiators first.
- Next, bleed the top-level radiators.
- Check that all valves, joints, and bleed valves are securely tightened.
- Turn on the power supply and relight the boiler.
- Once the system is fully heated, bleed all radiators again.
- Inspect all valves and joints for any leaks.
Although draining down your heating system may seem like a very daunting task, it’s actually fairly straightforward once you have done it and as long as you follow each step outlined above closely, it’s certainly something that can be done by anyone.