Bleeding a radiator is a straightforward process. It entails loosening the radiator bleed valve to release trapped air in the system, which can hinder proper water flow and heating.
This DIY guide teaches you the proper method for bleeding a radiator, ensuring optimal efficiency in your heating system.
Why Radiators Need Bleeding
Air can enter a central heating system, reducing its efficiency. You can detect this by feeling your radiator while the heating is on. If it’s warm at the bottom but cold at the top or has cold spots dotted over its surface, there may be air trapped inside. This often occurs after adding new water or during maintenance.
In some cases, air can be created by the heating pump, leading to airlocks that disrupt water circulation and heat distribution. Bleeding the radiators resolves this issue by releasing trapped air and allowing warm water to circulate properly.
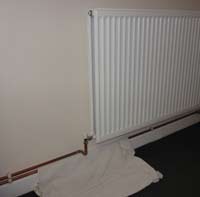
Towels placed around radiator bleed valve to prevent carpet damage
When to Bleed a Radiator
If you’re new to radiators and heating systems, you might not recognise when your system needs bleeding to release trapped air.
Look out for these common telltale signs:
- Cold Spots: When some areas of your radiator feel cold while others are warm, it indicates trapped air hindering proper heating.
- Poor Heating Performance: Poor heating can also be due to the fact that there is air present in the pump.
- Noises: Groaning or banging sounds from your heating system suggest air is present and bleeding is necessary.
Benefits of a Properly Functioning Heating System
Besides addressing cold spots and noise issues, a properly functioning heating system offers numerous advantages:
- Efficiency: Proper water flow ensures optimal heating throughout your home, improving overall efficiency.
- Cost Savings: A more efficient system heats up quicker and uses less energy, saving you money on heating bills.
- Extended Lifespan: A well-operating system prevents strain on components, prolonging the lifespan of your heating system.
Ensuring your heating system works efficiently is crucial. Regularly bleeding air from the system not only saves money on bills but also prevents costly repairs or the need for a new boiler in the long run.
Tools Needed for Bleeding a Radiator
To successfully bleed a radiator you will need the following tools:
How to Bleed a Radiator
Bleeding or draining radiators can be messy. It’s recommended to have old towels, a jug or pot, and kitchen roll or a cloth handy.
Step 1: Protect Flooring While Bleeding Radiators
Place old towels around the drain plug area to catch any spills.
Radiator water can be dirty, potentially staining light-coloured carpets, so it’s best to take precautions.
Step 2: Turn off Your Central Heating
Important: Always bleed radiators with the heating system turned off and all radiators fully cooled down! This prevents hot water from splashing and avoids drawing more air into the system.
Ensure the water supply still remains to the header tank, if you have one, as if it’s not then it can easily draw air in.
Old type radiator bleed valve
Step 3: Which Radiator to Bleed First?
The order in which you bleed radiators depends on your home’s layout. In a two-story house, start with downstairs radiators, beginning with the one farthest from the boiler. Then, proceed upstairs using the same method.
If you live in a single storey or multiple storey property, use the same method, start with the radiator furthest from the boiler and work your way towards it.
Air in radiators typically rises to the top.
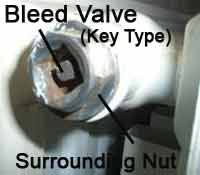
Step 4: Finding the Radiator Bleed Valve
Look for a small square plug on one side of your radiator, normally at the top. The type of bleed screw depends on the age of your radiator.
Older radiators, like the one shown above, require a special key to turn the bleed valve. These keys can be found at most DIY stores.
If you have a newer valve, a bleed valve key or a flat head screwdriver can be used to turn it.

Radiator bleed valve key
Step 5: Loosening the Bleed Valve
If your bleed valve is stubborn and won’t undo, you might need to use a spanner to loosen the large surrounding nut. Be cautious with this method however, use it as a last resort.
Place a cloth beneath the valve to catch any leaks. Turn the key or screwdriver counterclockwise about a quarter turn, very slowly, until you hear a hissing sound as air escapes.
Once the hissing stops all the air has been bled out and water will start to dribble. Close the valve tightly. You’ve successfully bled the radiator.
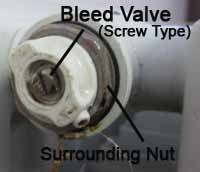
New type radiator bleed valve
Step 6: Top up Your Heating System
If you have a combi boiler or a boiler that requires manual topping up, you might need to add water after bleeding, especially if a significant amount escaped or if there was prolonged hissing before water appeared.
Refer to your boiler’s documentation for specific instructions on how to top up the water level, as methods may vary between manufacturers.
For information on how to top up the water in your boiler, see our project on combo boilers and the section on filling loops.
Radiator Bleeding Troubleshooting
After bleeding your radiators, you may encounter some common issues:
- Remaining Cold Spots: If bleeding doesn’t resolve cold spots, there may be air or sludge buildup in your system, requiring a power flush or professional inspection.
- Leaking Bleed Valve: Tighten the bleed screw further to stop leaks; if unsuccessful, replace the bleed valve.
- Radiators Heating Unevenly: Balance your heating system to ensure even heating across all radiators.
- Continuous Hissing: Persistent hissing indicates substantial air buildup; continue bleeding until resolved.
- No Hissing/Water: If there’s no hissing during bleeding to indicate air presence, consult a qualified heating engineer for further diagnosis.
When Bleeding Radiators Isn’t Enough
If bleeding your radiators doesn’t fix your central heating issue, you may need to remove them and flush and drain them.
Rust and debris in the water supply can create radiator sludge, causing central heating systems to perform poorly. Follow these steps to remove and flush your radiators without mess. Ensure you have the necessary kit ready.
Tools Needed for Removing a Radiator
To successfully remove a radiator you will need the following tools:
When Would you Drain a Radiator?
Besides bleeding, there are occasions when removing a radiator becomes necessary. Typically, this is for redecorating or to clear built-up sludge.
During a room renovation, you’ll likely want to redecorate every corner, including behind radiators, requiring their removal.
Another common reason is to remove accumulated sludge and debris. Over time, water circulation carries rust, dirt, and impurities, resulting in a thick, tar-like sludge that obstructs flow, reducing system efficiency.
To clear this sludge, affected radiators are removed and flushed with high-pressure water. It’s advisable to perform this task outdoors after removing the radiator, due to the mess.
How to Drain a Radiator
Start by removing the radiator from the wall. Locate and fully close the feed and return valves. Loosen the bleed valve to release any pressure, then tighten it once the radiator pressure returns to normal.
Step 1: Protect Your Flooring
This is a messy job, so prevent mess by covering the work area with old towels or sheets. Place a tray below the pipe work and union valve to catch any water.
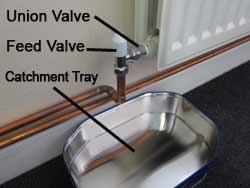
Radiator Feed and Union Valves with catchment tray
Step 2: Loosen the Union Nut
After preparing the area and placing the tray, use a large adjustable or Stilson spanner to grip the valve securely while using another to loosen the union nut on the radiator. NOTE: For detailed instructions, refer to our removing a radiator guide.
Step 3: Drain the Radiator
Water will start to flow, if the flow slows, don’t loosen the union nut further. Instead, partially open the bleed valve to let air in, aiding water flow. Only fully remove the nut or bleed screw when the radiator is totally empty.
You can retighten the union as needed. If the catchment tray fills, stop, empty it, and repeat the draining process.
Step 4: Remove the Radiator
Once the radiator is fully drained, remove it carefully and put it outside. Stand it upright to ensure complete drainage. Consider power flushing the entire heating system if necessary.
Alternatively, you can use products like the Radclamp to disconnect and remove radiators without draining them indoors, minimizing mess and floor damage.
Bleeding a radiator is a very simple and straight forward job and one that pretty much anyone can do with little to no DIY knowledge and considering its benefits, it’s one that you should definitely do if you have radiators in your home.