Polished plastering or Venetian polisted plastering as it’s also know is a type of highly polished plaster finish developed many thousands of years ago and is today regarded as an extremely plush finish for walls and the likes.
In this guide we take a look at polished plaster finishes, how they are applied and everything else you need to know about them.
What is Venetian Polished Plaster?
Venetian Polished Plaster is a sophisticated and luxurious wall finish that has been used for centuries, primarily in Italy.
It’s famously known for its glossy, marble-like appearance, and it adds elegance and depth to both contemporary and classic interiors alike.
This extremely versatile plaster technique is made from a blend of natural lime, marble dust, and pigments, giving it a smooth, polished finish that reflects light beautifully.
Whether you’re renovating an old space or designing a new one, Venetian Plaster can bring timeless beauty and texture to your walls.
Venetian polished plaster dates back thousands of years. Excavations on the Island of Malta have revealed plaster-decor work dating back to 3000 BC.
This is a very special, natural plaster made with lime putty. It has been used extensively by the Ancient Egyptians and Greeks from about 900BC to produce unique wall finishes for public buildings and domestic rooms alike.
Also known as Marmorino, Spatulato, Marble plaster, Italian plaster or Stucco Veneziano, polished plaster really hit the headlines when an Italian architect called Andrea Palladio (1508 – 1580) gave the finish a rebirth in Italy.
The original Venetian polished plaster recipes are very old and are made from lime putty, natural pigments, and marble dust, with no synthetic additives. However, some modern versions may include synthetic materials.
The finish can feature hundreds of colours and a variety of textures, such as smooth, pitted, or distressed. Stencilling and techniques like banding or creating brick/block-work effects can also be applied, offering a high degree of customisation to suit any style.
Applying polished plaster
How do You Get Venetian Plaster Shiny?
Achieving the shiny finish with Venetian plaster is a process that involves careful layered application and them a meticulous polishing process that can take many years to perfect.
The glossy, marble-like effect is one of the key features that make Venetian plaster so desirable, and it’s unique outcome is ultimately the result this multi-layer application and polishing.
Once the initial layering has been completed and has fully cured, the polishing is started. To do so, a steel trowel or special polishing tool is used to perform a process known as burnishing. This is where the polishing trowel or tool is gently and gradually run over the surface, with slightly more pressure applied on each pass, to compress the surface and create the smooth, polished effect.
However, care must be taken not to apply too much pressure as this can damage the finish.
How Expensive is Venetian Plastering?
Due to its specialist application and finish, Venetian plastering can indeed be quite expensive to apply to a surface, but given it’s very appealing and unique appearance and the fact that it is also quite hardwearing, it can be well worth it, depending on the situation.
In terms of actual costing, on average, the cost of Venetian plastering in the UK ranges between £30 and £60 per square metre. Here’s a breakdown of what you can roughly expect:
- DIY Venetian Plastering: If you choose to apply Venetian plaster yourself (although we don’t recommend it due to its specialist nature), the cost of materials typically ranges from £20 to £40 per square metre. However, as we have said, keep in mind that applying Venetian plaster requires patience and great skill, and the time it takes to achieve a professional finish should not be underestimated.
- Professional Venetian Plastering: Hiring a professional plasterer to apply Venetian plaster can usually costs between £40 and £60 per square metre. This price typically includes the cost of materials, labour, and surface preparation. For larger or more intricate projects, such as creating patterns or polished finishes, the price may increase further.
- Additional Costs: If your walls need extensive repairs or if you want a special finish, such as a high-gloss or textured effect, this could raise the overall cost. For instance, applying a wax or sealer for extra shine may add £5 to £10 per square metre or more.
The above are only obviously very rough estimates and costs can vary quite greatly depending on where you are in the UK.
Does Venetian Plaster Crack Easily?
The answer to whether Venetian polished plaster can crack isn’t as straightforward as a simple yes or no, as the durability of Venetian plaster largely depends on how it’s applied, maintained, and the conditions in the space it’s applied in.
Venetian plaster, when properly applied, is generally a durable and long-lasting finish. However, like any material, it can crack under certain conditions. Here are some common reasons Venetian plaster may crack:
- Improper Application: One of the most common causes of cracking is improper application. Venetian plaster must be applied in multiple thin layers, each carefully smoothed and allowed to dry before the next is applied. If these layers are too thick or applied too quickly, the plaster may not adhere correctly, leading to cracks over time.
- Environmental Factors: Changes in temperature and humidity can also cause cracking, as with many other surface finish types. Venetian plaster is a breathable material, meaning it allows moisture to pass through it. However, if the humidity levels in a room fluctuate significantly—like in bathrooms or kitchens—this can cause the plaster to expand and contract, leading to potential cracks.
- Surface Movement: If the underlying surface, such as drywall or plasterboard, shifts or settles over time, it can cause cracks in the plaster. This is especially common in new builds or homes with foundations that are still settling.
- Improper Surface Preparation: If the wall surface isn’t properly prepared before applying Venetian plaster, the plaster may not bond effectively. This can lead to cracking as the plaster fails to adhere correctly to the substrate.
Types of Polished Plaster
There are several different types of polished plaster, each with its own characteristics, here follows some of the most common:
Venetian Plaster
Venetian plaster is a classic Italian finish made by layering lime-based plaster with marble dust, creating a smooth, polished surface that resembles marble. It’s perfect for feature walls in living rooms, kitchens, or bathrooms, offering a luxurious, sophisticated look. You can choose between a high-gloss or matte finish, depending on your style. Its breathable, durable nature makes it especially suitable for older properties needing moisture control.
Marmorino
Marmorino is similar to Venetian plaster but has a softer, more textured finish with a velvety or satin feel. It’s applied in fewer layers and is ideal for a rustic, organic look with a touch of luxury. Marmorino works well in areas needing texture, like hallways or dining rooms, and can range from matte to a subtle sheen, depending on application.
Stucco Veneziano
Stucco Veneziano offers a more textured and less shiny finish than Venetian plaster. It creates a soft, velvety effect with depth of colour and light reflection. This plaster is often used in historical renovations or vintage-inspired spaces. Available in various colours, it’s perfect for achieving a classic, antique look in living rooms or bedrooms.
Spatulato
Spatulato is a textured polished plaster that’s applied with a spatula, creating visible strokes and a raised surface. It’s then polished to a shiny finish, resulting in a bold, artistic effect. Spatulato is ideal for feature walls or modern, industrial interiors where a dramatic, statement look is desired.
Concrete Effect Polished Plaster
Concrete effect polished plaster mimics the look of raw concrete while maintaining the luxurious feel of traditional plaster. It’s perfect for modern homes, lofts, or commercial spaces with a minimalist, industrial aesthetic. The finish is easy to maintain, versatile, and can be used on both walls and ceilings, giving spaces a clean, contemporary look.
Limewash Plaster
Limewash plaster is an eco-friendly option made from natural lime and pigments. It has a soft, matte finish and is highly breathable, making it ideal for older buildings. Limewash creates a subtle, aged look and can be tinted in various colours. It works especially well in spaces with natural light, where the colour and texture subtly shift throughout the day.
Venetian Polished Plaster – Main Advantages
There are several reasons why Venetian Polished Plaster is an excellent choice for both residential and commercial projects:
- Durability: Venetian Plaster is long-lasting and resistant to wear and tear. When properly maintained, it can last for decades without needing significant touch-ups.
- Eco-Friendly: Made from natural lime and marble dust, Venetian Plaster is a sustainable material that allows walls to ‘breathe,’ which helps in controlling humidity and improving air quality indoors.
- Versatility: Available in a wide range of colours and finishes, Venetian Plaster can suit any design style, from modern minimalist to traditional Italian elegance. The final effect can be matte, satin, or high-gloss depending on your preference.
- Easy to Maintain: Venetian Plaster surfaces are relatively easy to clean. Light dusting and occasional wiping with a damp cloth are usually sufficient to keep the walls looking pristine.
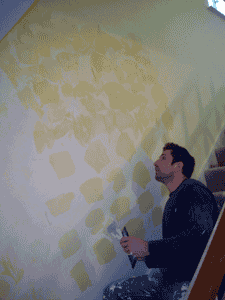
How is Venetian Polished Plaster Applied – The Basic Process
Venetian Plaster is applied in multiple thin layers over a prepared base, typically a masonry or plasterboard surface. The key to achieving the distinctive polished look lies in the application and polishing process. Here’s a simplified breakdown of the process:
Step 1: Apply Multiple Thin Layers
The first step to achieving a glossy finish is applying several thin layers of Venetian plaster. Start by preparing your surface—whether it’s masonry, plasterboard, or another type of wall.
Apply the first layer of plaster using a trowel, and smooth it out as evenly as possible. Allow this layer to dry completely before applying the next one.
Typically, 3 to 4 layers are needed, but the number can vary depending on the desired depth of colour and texture. Each layer should be applied in thin, even coats for the best results.
Step 2: Let the Plaster Cure
Once all the layers are applied, it’s crucial to let the plaster cure. This curing process can take several days, depending on the humidity and temperature in your room.
The plaster needs to dry fully before moving on to the polishing stage. Rushing this step can result in an uneven finish, so be patient and allow enough time for the plaster to harden properly.
Step 3: Polish the Surface
After the plaster has cured, it’s time to start polishing. Polishing is what gives Venetian plaster its signature high-gloss finish.
To do this, use a steel trowel or a special polishing tool. The goal is to burnish the surface by applying pressure and smoothing the plaster at the same time.
Start gently and gradually increase the pressure to achieve the shiny effect. This process compresses the surface, making it smoother and reflective.
Be careful not to over-polish, as too much pressure can damage the finish.
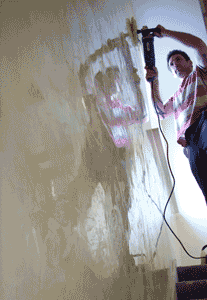
Polishing up plaster finish to get shine effect
Step 4: Use a Wax or Sealer for Extra Shine
For an even shinier, more durable finish, you can apply a wax or sealer to the surface after polishing. This extra layer will not only enhance the shine but also protect the plaster from moisture and dirt.
There are specific waxes designed for use on Venetian plaster that are easy to apply with a soft cloth or sponge.
Rub the wax onto the surface in small circular motions, and buff it to a high shine.
If you prefer a more matte finish, you can skip this step, but waxing is ideal if you’re aiming for maximum gloss.
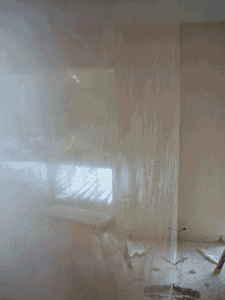
Finished polished plaster layed on to wall
Step 5: Maintain the Shine
Once you’ve achieved the perfect shiny finish, it’s important to maintain it.
Regularly dust the surface with a soft cloth, and avoid using harsh chemicals that can dull the shine.
If the surface starts to lose its gloss over time, a quick touch-up with a polishing tool or wax can restore the shine without needing a full reapplication.
How to Maintain Venetian Polished Plaster?
Maintaining Venetian Polished Plaster is straightforward, but care should be taken to preserve its glossy finish:
- Avoid Abrasive Cleaners: Use a soft, damp cloth to wipe down the surface. Harsh chemicals or abrasive scrubbers can damage the delicate finish.
- Repairing Small Scratches: Minor imperfections can be fixed by applying a small amount of plaster to the area and polishing it to match the surrounding surface.
- Humidity Control: Since Venetian Plaster is highly breathable, it helps to control indoor moisture levels. However, excessive humidity may cause damage over time, so it’s important to maintain a balanced indoor climate.
Polished, or Venetian polished plaster is an extremely high quality and unique finish and will bring longevity and character to any space it’s applied in, however, due to it’s skilled application should only really be attempted by those properly trained.