Building a raised bed for growing vegetables is simple and offers many benefits. Raised beds drain better, preventing soggy soil, and warm up quicker in the spring, allowing for earlier planting. They also look tidier, are easier to weed, and can be easily covered with netting to protect your crops.
Raised beds are especially advantageous in areas with poor soil quality, as they allow you to control the soil composition. You can use various materials to construct a raised bed, but here, we’ll focus on making a straightforward wooden one.
What is a Raised Planting Bed?
A raised planting bed is a gardening setup where the soil is elevated above the ground level, contained within a structure made of wood, stone, metal, or other durable materials. This setup offers numerous advantages for both novice and experienced gardeners, making it a popular choice for growing a variety of plants, including vegetables, herbs, and flowers.
They offer several advantages over traditional ground-level gardening including improved soil quality and drainage and overall nutrient quality of the soil. You also benefit form much improved weed control and also a reduction in troublesome pests and also less strain on yourself through teh reduced need to bend or kneel.
Overall, raised planting beds offer a versatile, efficient, and user-friendly approach to gardening. They enable better control over soil quality, reduce maintenance, and enhance accessibility, making them an excellent choice for anyone looking to cultivate a healthy and productive garden.

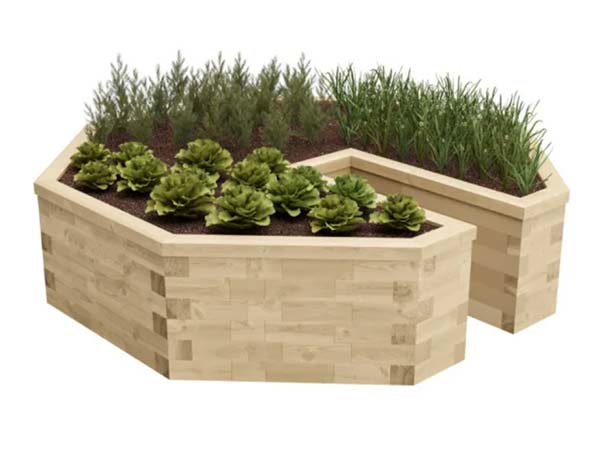
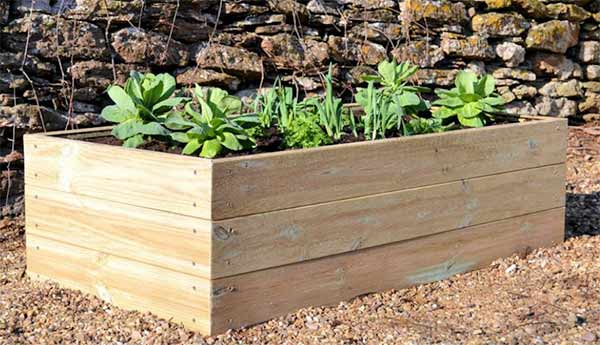
Example of a Raised Planting Bed
What are the Benefits of a Raised Planting Bed?
One of the primary benefits of raised planting beds is improved soil quality. Since you fill the bed with a custom soil mix, you can ensure it has the ideal texture, drainage, and nutrient content for your plants. This is particularly beneficial in areas with poor or compacted soil. Additionally, raised beds warm up faster in the spring, extending your growing season and allowing for earlier planting.
Raised planting beds also provide better weed and pest control. Elevating the soil reduces the likelihood of weeds infiltrating the bed, and you can easily install protective covers or nets to keep pests at bay. The defined edges of a raised bed make it simpler to implement organic weed control methods and monitor for any pest activity.
Accessibility is another key advantage. Raised beds can be built at a height that reduces the need for bending or kneeling, making gardening more comfortable for those with mobility issues or back problems. This accessibility allows more people to enjoy the benefits of gardening without the physical strain associated with traditional ground-level plots.
To summarise the main benefits, these are as follows:
- Much improved soil quality
- Tune soil specifically to what you are growing
- Better drainage
- Faster soil warming extending growing period
- Improved pest control
- Improved weed control
- Ability to cover beds with nets to keep birds out
- Easier to access for less able-bodied individuals
- Less kneeling and bending, reducing knee and back pain
What’s the Best Location for a Raised Bed?
Choosing the best location for your raised bed is crucial to ensure your plants thrive. The ideal spot should receive good amounts of sunlight, have good drainage, and be easily accessible for maintenance.
Sunlight is the absolute key to gardening success! Most vegetables and flowers need at least six to eight hours of direct sunlight each day to grow well. Look at your garden at different times of the day and identify areas that receive the most sunlight. Avoid placing your raised bed in shaded spots near tall trees or buildings that block the sun.
Next, consider the drainage. Raised beds should not sit in areas prone to water-logging. Ensure the ground beneath your raised bed drains well to prevent water from pooling around the roots of your plants. If your yard has poor drainage, you can improve it by adding gravel or sand to the base before filling the bed with soil.
Accessibility is another important factor. Place your raised bed in a location that’s easy to reach. This will make planting, watering, weeding, and harvesting and everything else much easier. If possible, situate your raised bed near a water source to simplify watering.
Finally, think about protection from the elements. While raised beds benefit from ample sunlight, extreme conditions like strong winds can harm your plants. Look for any natural windbreaks like a fence or hedge to shield it from harsh winds. Additionally, consider the proximity to structures that might reflect intense heat during the summer months.
How High Does a Raised Planting Bed Need to be?
In order to reap the benefits of great crops with your raised bed, there are some requirements on how high it needs to be to enable certain plants and vegetables roots to develop correctly. In the majority of cases, there won’t be anything that really needs anything deeper than 18 inches, so this will need to be your minimum depth.
Despite this however it’s best to aim for a bed that’s at least 24 inches or 2 feet high. The main reason for this is the comfort of the user as at this height, it prevents too much stooping over which can lead to very achy knees and backs, which is no fun at all!
Types of Raised Planting Bed
When it comes to raised planting beds, there are several types to choose from, each with its own benefits and best use cases. Understanding these options can help you make the best choice for your garden.
Traditional Raised Beds
Traditional raised beds are simple, elevated garden beds often framed with wood, stone, or brick. These beds are usually about 6 to 18 inches high and are ideal for improving soil drainage and managing soil quality.
They are perfect for growing vegetables, flowers, and herbs, providing better control over soil conditions and reducing soil compaction.
Elevated Raised Beds
Elevated raised beds are similar to traditional ones but are built higher off the ground, typically on legs or a sturdy frame. These beds are excellent for gardeners who have difficulty bending or kneeling, as they bring the garden to a comfortable working height.
Elevated beds also improve drainage and soil aeration, making them suitable for a variety of plants, including vegetables, herbs, and flowers.

Elevated raised planting bed
Keyhole Gardens
Keyhole gardens are a unique type of raised bed that includes a central composting basket. The bed is shaped like a keyhole, allowing easy access to the composting area and the entire garden.
This design promotes efficient use of space and resources, as composting materials provide nutrients directly to the plants.
Keyhole gardens are particularly beneficial in dry climates, as they help retain moisture and reduce water usage.
Keyhole raised planting bed
Hugelkultur Beds
Hugelkultur beds are a type of raised garden bed built on top of decaying wood and other organic materials. This method creates a self-sustaining, nutrient-rich environment as the wood decomposes over time.
Hugelkultur beds are excellent for improving soil fertility and water retention. They are ideal for growing a wide range of plants, from vegetables to perennials.
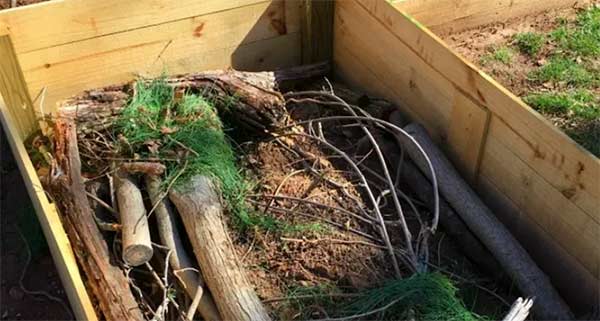
Hugelkultur raised planting bed
Wicking Beds
Wicking beds are a type of self-watering raised bed that includes a water reservoir at the bottom. The soil wicks water up to the plant roots, providing consistent moisture. These beds are particularly useful in areas with limited water supply or for gardeners who want a low-maintenance solution.
Wicking beds can support a variety of plants, including vegetables, herbs, and even some small fruits.
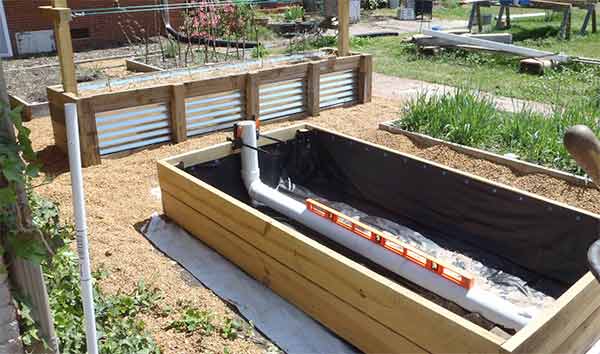
Wicking raised planting bed – Image courtesy of Pinterest
Container Raised Beds
Container raised beds are essentially large pots or containers that act as raised garden beds. They are perfect for small spaces, patios, or urban gardens. These beds can be made from various materials, including plastic, metal, or wood.
Container raised beds offer flexibility and mobility, allowing gardeners to move them as needed to optimise sunlight and space.
They are suitable for growing a wide range of plants, including vegetables, herbs, and ornamental flowers.
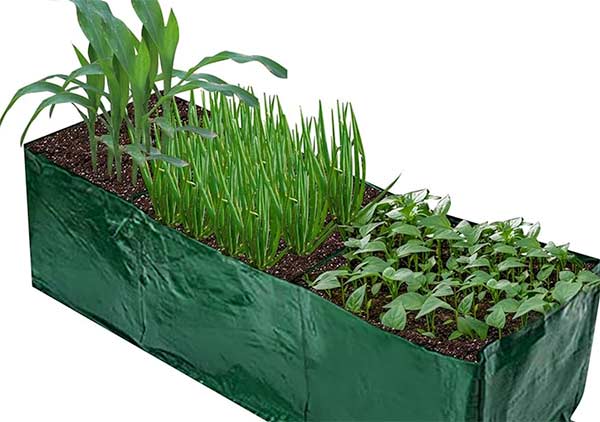
Raised planting container
What Can Be Grown in a Raised Planting Bed?
Due to their versatility, there is a huge amount of plants and vegetables that can be grown in a raised planting bed, some common varieties are as follows:
Vegetables
Raised beds are ideal for growing vegetables, offering excellent drainage and warmer soil. You can grow almost any vegetable, including tomatoes, lettuce, carrots, peppers, and cucumbers. Root vegetables like carrots and radishes benefit particularly well from the loose, well-aerated soil in raised beds.
Leafy greens such as spinach, kale, and lettuce thrive in these controlled environments.
Herbs
Herbs like basil, thyme, rosemary, and parsley grow exceptionally well in raised beds. These plants often require good drainage and can be conveniently located near the kitchen for easy harvesting.
Raised beds allow you to manage soil conditions to suit the needs of each herb, ensuring they receive optimal nutrients and moisture.
Flowers
Many gardeners use raised beds to grow flowers, both annuals and perennials. Flowers like marigolds, petunias, and zinnias can add vibrant colour to your garden. Raised beds also make it easier to create specialised soil conditions for flowers that require specific pH levels or soil types, ensuring healthier and more abundant blooms.
Fruits
Certain fruits, such as strawberries and dwarf varieties of blueberries and raspberries, are well-suited to raised beds. The controlled environment helps protect these plants from pests and diseases. Additionally, the elevated soil warms up quicker, which can extend the growing season for some fruit varieties.
Specialty Crops
Raised beds are perfect for growing specialty crops like garlic, onions, and asparagus. These crops often need specific soil conditions and consistent care, which is easier to provide in a raised bed. The ability to control soil quality and moisture levels makes raised beds an excellent choice for these plants.
What not to Grown in a Raised Bed?
While raised beds are versatile and offer numerous advantages for many plants and vegetables, there are certain plants that aren’t suitable for growing in a raised plansting bed of any type, the most common ones are as follows:
- Large trees and shrubs: Due to their extensive root system requirements
- Invasive plants: Any plants that grow aggressively, mint, bamboo etc.
- Tall Crops: May be exposed to high winds and not enough support
- Perennial plants: Due to their deep roots
- Water-loving plants: Any plants that require constantly damp soil
Preparing for Building a Raised Planting Bed
As with many things in the building industry, the overall success of a given job very much depends on the initial preparation work that is done, and this is no different when constructing a raised planting bed.
First, select the area for your raised bed. As we have stated above, ensure it’s in an area that’s well lit and will receive plenty of sun light to aid with your crops growth. Try to avoid any areas that are shaded by buildings, trees or other tall plants.
Once selected, use a tape measure and square to mark out the area for your raised bed and then use canes or stakes with string wrapped around them to mark the area.
If the area has grass, use a spade to cut it up and remove the turf before proceeding.
Loosen the soil with a garden fork to help crops establish roots and prevent root vegetables from splitting.
Clear out any weeds, and pile the soil in the center, leaving the sides a few inches below ground level.
What You Will Need for Your Raised Planting Bed
In order to successfully construct a basic timber raised planting bed, you will need the following tools and products:
- Required amount of 6 or 8 x 1 inch timber (decking, gravel board etc.) for size of raised bed
- Required amount of 2 x 2 inch timber for supporting posts
- Tape measure
- Handsaw, circular, saw, jigsaw etc.
- Carpenters square
- Pen/pencil
- Lump hammer
- Required amount of number 8x40mm screws
- Drill/driver
- Fork and spade
- Wheelbarrow
- String
- Bean canes
- Work bench or similar solid surface to cut timber on
- Spirit level
- Post level
- Weed fabric
- Stapler
- Good quality soil
- Good quality, well-rotted manure
- Garden rake
There are some concerns over using treated wood in the garden – some people believe that the chemicals used to treat the wood and preserve it can be bad for the soil. This certainly used to be the case, but most treatments are a lot kinder these days, and if you don’t use treated wood then unless you use expensive hardwood it will rot quickly.
How to Build a Basic Timber Raised Planting Bed
Building a basic timber raised planting bed is a straightforward project that offers numerous gardening benefits, that is easy for anyone to achieve. Follow the steps below to build your very own.
Step 1: Prepare Site
As we have laid out above, first select and prepare the area you are going to build your raised bed, ensuring it’s in a well-lit area and that you have cleared it of any existing grass, weeds or the similar.
Once cleared, measure and mark the build location using bean canes, timber stakes or the similar and run string around them to mark the area fully.
Step 2: Cut Timber to Size
First, take you 6 or 8×1 timbers and measure and mark each where it needs to be cut, ensuring that each is cut to the correct size that you require your raised bed. You will need to boards for each side so you get a total of 12 or 16 inches in height, depending on what you require.
When cutting, ensure you use a solid and sturdy surface to rest on. If using power tools, clamp the timber up as you cut it so you have full control over the saw.
Once all your side timbers are cut, next measure and cut all your timber posts. You will need one for each corner and at least 1 to be placed at the centre of the longest side, depending on how long this is. As a rule of thumb, you should have a post at least every metre to ensure the frame is stable.
Also, ensure you cut your posts long enough! They need to extend down into the ground at least 8 inches, ideally 12 inches to provide decent support and hold the frame together.
Finally, cut the base of each post into a spike so that they are easy to hit down into the ground.
Step 3: Assemble the Frame
Starting on one side (up to you which), replace 2 bean canes with 2 of the posts you have prepared. Use the lump hammer and a drift (spare piece of timber) to hit each post down into the ground so you don’t damage the top of the post.
As you hit each in, make sure it is square and totally upright and level. You may find it easy using a second pair of hands to do this. Also ensure they are spaced correctly for the length of boards you have cut for the sides.
Note: When installing the posts, ensure they are placed on what will be the inside of the frame.
With the posts in, take 2 of your boards and screw them to the outside of the posts to form one side. Drill pilot holes before screwing to prevent splitting the timber.
With one side completed, repeat the above steps for the other 2 posts and then screw on your boards to form the full frame of your raised bed.
Step 4: Fill Raised Bed
Take your weed fabric and lay it over the base ensuring it’s fully covered, this will suppress any weed growth. Ensure the fabric runs up the inside of the frame by about 6 inches and staple it in place.
Where the frame is wider than your fabric, overlap it, ensuring the overlap is a good 8 inches or so.
Once the base is lined you can then fill the frame with soil. Use a good quality soil, rich in nutrients. As you fill, mix in some good quality, well-rotted manure with it.
Once full to the top, rake it all over to level it off.
Step 5: Plant up
As your raised bed is now complete and full of good quality, nutrient-rich soil, you can now plant any and all plants or veg required.
Ensure each item is spaced correctly according to its requirements and also ensure you water each and every day and by doing so, you should be guaranteed a full and bountiful crop!
Note: if you add mulch in and around each of your plants then this will help to retain moisture and reduce weed growth.
Completed and planted raised bed
This is a great design for making raised beds and you will get many a plentiful harvest from them, however if you are looking for a slightly bigger project and for raised beds that will last for decades you might consider making them from sleepers.
We have a project all about how to make raised planting beds from railway sleepers here.
Whichever design of raise beds you decide you will be delighted with the results. The raised beds described in this project are quick, easy and relatively cheap to make yourself, so are a great place to start if you are want to get planting quickly.