Taking the time to care for the wildlife that makes its way into your garden is one of the best ways to keep your garden beautiful and full of life.
One way to do this is to have spaces designed for wildlife, examples of other wildlife-friendly projects we have on DIY Doctor include compost heaps and flower beds.
These are just a few of the ways to help the local wildlife thrive in your garden, whilst also having the added bonus of being aesthetically pleasing and/or being beneficial for you and your garden.
For this project, we’ll be looking at bird tables; how to build one, what type of bird table is best suited for your garden, and different designs for your bird table.
There are many different styles to choose from, from the very simple to the very ornate, as well as different materials to choose from.
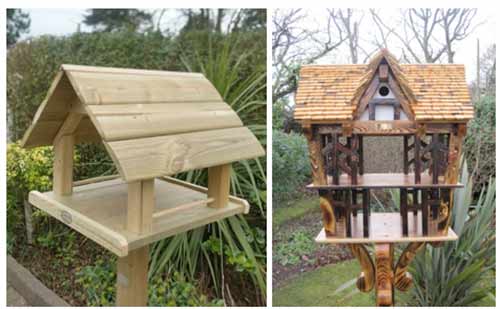
A simple bird table verses an elaborate bird table – Image courtesy of Pinterest
Bird Table Plans
Firstly, before you start thinking about the design of the bird table you first need to consider:
- Size – How big or small you should make your bird table. Too small and you may run the risk of fighting between the birds that come to visit, but too big may overwhelm your garden could invite predators, so you may prefer bird tables for small birds rather than large ones
- Material – What to make your bird table out of. The most common material is wood as it is versatile and easy to work and aesthetically pleasing. However, other materials such as metal, plastics and polycarbonate have become very popular over the last decade or so
- The Table Stand – The table stand not only acts as a way to hold the table up from the ground but also is there to discourage squirrels and cats from getting to the table. The straighter and smoother the post, the harder it will be for these animals to be able to climb up to the table. Alternatively, you may hang the table on a chain from a tree branch or similar, but be aware that squirrels may be able to climb down the chain from wherever you have chosen to hang it from
- Clean Finish – Remember to make sure that there are no sharp edges on which birds could harm themselves, and that the material you end up using – be it wood or metal or something else – has no splinters or rough bits that might get caught on the birds
- Layout – The standard layout is a flat platform with edges and a roof of some sort. This can vary and, as stated above, there are many designs to choose from. A simple layout can be just as effective, if not more, than an extravagant one
Once the above points have been considered and thought through, you can start to think about the design and build for your bird table.
Bird Table Ideas – Choosing a Design for your Bird Table
When it comes to choosing what kind of bird table you want there are a few key points to consider; the number of birds you wish to attract, what kind of birds you often find in your garden or local area, what kind of garden you have and the aesthetic you aspire to, and where you will position the table.
These are important to think about so that the table not only fits in well with you and your garden but also the birds that it caters for.
As mentioned above, the basic layout is a platform with a roof, and most designs are basically an amalgamation of this and other details. Some have walls or pillars to support the roof, some don’t have roofs at all. It really depends on your own preference.

Different designs for bird tables for small birds and incorporating hanging bird feeders – Image courtesy of Pinterest
Some designs include extra feeders that hang below the platform so as to cater to a larger selection of species and some even have additional platforms lower down for birds who prefer to feed closer to the ground.
Some designs incorporate nesting boxes, and whilst these can be cute we think it unwise to encourage birds to feed in another’s nesting territory – it might get a little out of hand.
Birdbaths are also a common addition to a bird table which again, may look attractive, but ultimately will probably end up causing more mess and possibly some cross-contamination between the birds’ bathing water and food source.
For best results in attracting garden birds, and to make sure their food does not become contaminated. You should chose or design a bird table where that food is kept as dry as possible and make sure it is easy to clean.
If you are going to be purchasing a bird table there are many to choose from, ranging from the simple to the ornate.
You can purchase a bird table from most DIY sheds as well as websites such as Amazon and eBay, and if you have the cash for it, there are retailers who sell beautiful bespoke bird tables which are masterful and enchanting in their own right.

Elaborate and complex designs for bird tables – Image courtesy of Pinterest
However, here at DIY Doctor, we encourage you to have a go at making your own bird table. It may seem daunting, but with a little patience and some hard work you can have your own beautiful hand-made bird table to show off to all your friends and family.
Building a Bird Table
Below we will show you two different simple designs for a bird table that even the most novice of DIYers could put together, as well as a list of materials and tools to use.
For these designs, we will be focusing on wooden bird tables as they are the easiest material to start off with.
The most common woods used for bird tables (and houses or boxes) are Cedar, Pine and Walnut this is because they are easier to handle and fair pretty well in outdoor conditions.
Pine is cheaper than most other woods which is why it is so popular.
Other woods that are common include Oak, Mahogany and Cherry due to their sturdiness and their vibrant colour, but these can be significantly more expensive.
Plywood is also often used, specifically for the platform base and the roof, as it is a cheaper alternative but we would recommend using marine ply to give some weather resistance.
Ultimately the type of wood you use depends really on how much you want to spend on the bird table and what you want the finished look to be.
As a rule, whichever wood you use should be pressure treated so as to withstand rot and decay and to extend the lifespan of the wood.
This treatment also helps protect the wood against termites and fungi and affords it some protection against the weather.
The finished bird table can be left untreated because that would be safer for the birds who come to feed there, however, if you wish to seal the wood we recommend using a natural, non-toxic wood preserve such as Tung oil which will help protect the wood and would be safe for wildlife.

Tung Oil made from natural oils and safe for wildlife
Once you have chosen your wood and decided whether to treat it or not, the next step before actually building the table is to decide whether you are going to stand it on a post, or hang it. Both have pros and cons, so the decision is dependent on you.
A stand requires more wood and therefore more money, but a chain can rust or allow squirrels to reach the table.
A hanging table also requires somewhere to hang it from, such as a branch or a wall bracket and it will have to contend with wind which might spin or otherwise unbalance the table.
On the other hand, a post needs to be sturdy and stable so as not fall over and needs to be difficult for pets and squirrels to climb.
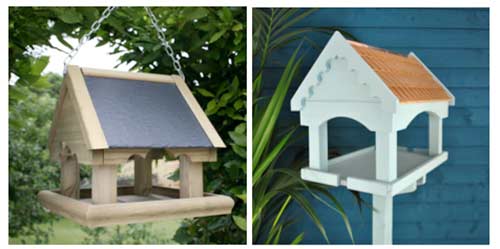
Hanging and Freestanding bird table – Image courtesy of Pinterest
Once all the above have been decided you are almost ready to start building.
The next step before assembling it is to pick a design and cut your wood.
If you have a circular saw, jigsaw or table saw in your possession, this is easily done at home.
Keep in mind safety precautions when using such equipment and use safety goggles and gloves, and as always remember the old builders’ trade tip; measure twice, cut once.
Always double check your measurements before cutting as this will save you a great deal of hassle later on.
We have projects on using a Circular saw and also on how to usea table saw, as well as how to use a regular hand saw and also how to use a mitre saw.
Don’t forget to check out our project on how to prep for woodworking and carpentry to make sure you have all your bases covered.
You could also cut the timber to size using hand tools, but if you are unable to cut your wood at home for whatever reason, most DIY Sheds and retailers offer a wood cutting service for free or sometimes a small fee.
Check beforehand for which ones supply this service and remember to have all your measurements ready.
Building a Bird Table: Method 1
This first bird table design is simple and includes a platform, a roof, four pillars and two dowel rails for the birds to perch on. It is a substantial size which allows for plenty of birds to feed at one time, or for more timid species to have space to feed.

Follow the steps below to build your very own bird table, just like this one
Measure and cut your wood
Using the measurements below, cut your wood to the right size. This design uses a timber of 25mm (one-inch) thickness for a sturdy and robust table.
Remember that one roof panel will overlap the first, so make one panel 25mm longer on the short length to accommodate this.

Cutting plan for our bird table design
- Base: 350mm x 500mm
- Roof 1: 250mm x 500mm
- Roof 2: 275mm x 500mm (includes 25mm overlap)
- Edge (x2): 40mm x 500mm
- Pillars (x4): 25mm x 25mm x 200mm
- Dowel (x2): 12mm x 210mm
Use a mitre saw or mitre jig to cut the correct angle for the pillars. This will make sure that the roof sits flush against the pillars.
The slope of the mitre cut will face outwards from the table and between each pair will be a dowel to form a rail.
Measure up 40mm from the base of the pillar and drill a hole 13mm in diameter into the pillar.
Don’t drill all the way through the post, only halfway through should be enough.
Sand down all the rough edges and splinters that may be left on the wood for a smooth finish.
Assemble the Base
Lay the base on a flat surface and place the two edge panels on either side of the platform.
The edge panels should form a slight lip above the surface of the platform.
This is to stop any seeds and food from being scattered over the edge and gives the birds somewhere to perch when feeding.
To avoid splitting the timber drill pilot holes for the screws first – find out how to drill pilot holes and countersink screws here.
Apply wood glue to each edge panel and use four wood screws on each side, evenly spaced apart, to hold the edge panels to the base. Set aside and allow to dry.
Assemble the Roof
Lay the smaller of the two roof panels on a flat surface and place the other flush against it at a right angle. Use a straight edge to get the correct angle.
Apply wood glue to the joint and use four more wood screws to hold it together. Allow the glue to dry completely before moving it.
For a neat finish countersink the screws so they ae flush with the timber (see link above for how to countersink screws).
Attaching the Pillars and Dowels to the Base
Measure 125mm in from the edge of the platform on the long side (i.e. the side without the side panels).
Mark where the outside of your pillars will sit and drill a hole from under your platform up through to the top.
Apply wood glue to the base of the pillar and place onto the platform with the mitre slope facing outwards.
Drill in a wood screw from underneath to secure the pillar to the base.
Before attaching the adjacent pillar, apply some wood glue to the hole you made earlier and insert the dowel.
Do the same for the other pillar and insert the dowel before screwing the second pillar into place. Do the same for the last two pillars.
Attaching the Roof
Once the wood glue has dried and all the pillars are in place, lay the roof onto the pillars and position it so that the gable end is parallel to the edges of the platform.
The sides of the roof should extend a little way out from the edge. Apply wood glue to the top of the pillars and then screw the roof down securely onto the pillars.

Assembling our bird table after cutting all the components
Building your Bird Table: Method 2
This second design is a little more complex but still easily accomplished.
This bird table design includes a platform, a roof which acts as a lid, and a feeding trough made with clear acrylic.
This allows you to fill the trough with the bird food of your choice and the trough steadily deposits it onto the table.
It’s a very clever design, not only for its simplicity once you break it down, but also for the way it allows for a constant flow of food without being overly messy.
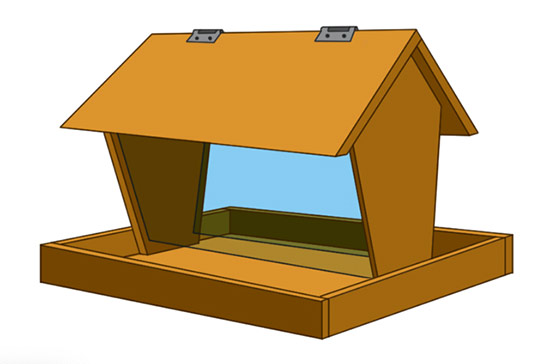
Slightly more complex bird table design featuring a feeding trough
Measure and cut Your Wood
As with the first design, measure out and cut your wood to the right size.
As in the plans above this design also uses 25mm thick timber which allows the table to sustain the weight of the acrylic and the bird food which can become quite weighty once the trough is full.
Once again remember to accommodate the thickness of the timber (25mm) in the overlap that occurs with the roof panels, as in the bird table plan above.
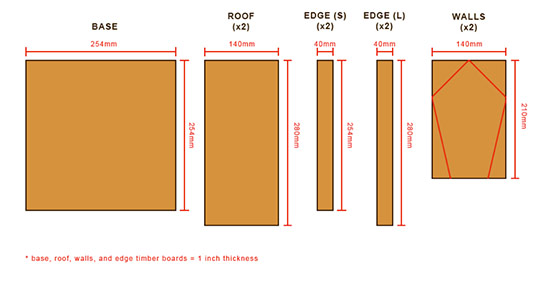
Cutting diagram for bird table with feeding trough
- Base: 254mm x 254mm
- Roof 1:140mm x 280mm
- Roof 2: 165mm x 280mm (includes 25mm overlap)
- Edge (S)(x2): 40mm x 254mm
- Edge (L)(x2): 40mm x 280mm
- Walls (x2): 140mm x 210mm
- Acrylic (x2): 3mm x 229mm x 120mm
The walls of the table will then be cut into an elongated pentagon to form the traditional wide-to-narrow trough shape.
After cutting your wood, sand down the edges to remove any rough bits or splinters that may be left on the wood.
Shaping the Walls
The walls are made up of two shapes; an inverted trapezoid and a right-angled isosceles triangle, one to form the shape of the trough, the other the roof.
There are a few different ways to calculate how to draw out this shape, but the simplest way that we have found is this:
- Find and mark the half and quarter points on your timber for your walls (see the diagrams below)
- Using an angle finder, mark out a 90° angle from your halfway point at the top of the board (lines a and b) to the adjacent edges of the board. Use a straight edge to draw the lines. This will create the right-angle triangle that will support the roof
- With a straight edge, draw a line from the quarter-point at the bottom of the board (lines c and d in the diagram below) to the point where the first two lines (a and b) meet the edge of the board. This will give you the inverted trapezoid shape and the whole shape should look like an elongated pentagon.
- Cut away the excess wood. To make sure that the boards are identical, neatly place one on top of the other and secure with a clamp or double-sided tape and use a circular saw, hand saw or jigsaw to cut both at the same time.
- To create the slot for the acrylic to sit in you can use either a router or a table saw. If you use a table saw, lower the blade to 10mm (so it doesn’t cut all the way through) and set the fence 10mm from the edge of the blade. Most blades are thinner than the acrylic so you may have to run the board over the saw twice right next to each other to create a dado cut and then carefully sand the edges of the cut. If you use a router, use the guard and a straight edge to make sure the dado is straight

Cutting plan for cutting up bird table side panels
Assemble the Base
Lay the base on a flat surface and place the edge panels against the baseboard.
As with the previous design, these edge panels will form a slight lip on the platform to keep the bird food from falling over the edge and to give the birds somewhere to perch.
There are four panels of two different lengths and they must be placed at opposite ends so that the shorter lengths are sandwiched between the longer lengths.
Drill pilot holes for the screws, apply wood glue to the edges of the base, fixing the shorter panels first and using three or four wood screws to attach the panels to the board.
Then fit the longer edges. You can use a corner brace to hold the corners together or use another wood screw to screw in from the longer length into the shorter ones. Set aside and allow to dry.
Assemble the Roof
As with the previous design, the two roof sections will overlap to form the roof, but rather than screwing the two boards together and into the supports, this roof will be hinged to form a lid, allowing you to lift one side to be able to pour food into the trough.
Since the roof panels overlap at the joint you will need a hinge that is longer on one side so as to screw into both boards. Two four-inch tee-hinges (102mm) should do the trick and will be able to support the weight of the wood.
Lay the boards next to each other and place the tee-hinges on top, spaced evenly apart.
The long side of the tee hinge should be on the board that will form the lid, i.e. the board that will be lifted, which is the wider of the two that will overlap its companion.
Screw the hinges to the boards and test to make sure that they open smoothly. Adjust if needed.
Attaching the Walls to the Base
The trough walls will be placed on the inside of the base, attached to the shorter of the two edges.
Measure and mark the middle of the base, and the middle of the walls and align the two, making sure that the dado slots are facing inwards.
Glue and screw the walls, fixing through the platform from underneath and through the outside edges to hold the walls securely in place.
Make sure to space the screws so they don’t accidentally hit each other. Two from underneath and three from the side should work well. Do this for both walls.
To create the gap between the base and the acrylic which allows the food to flow onto the table, cut a piece of spare timber the same length as the base of the walls (approx. 70mm) and approximately 20mm wide and glue flush against the base and walls.
This will give the acrylic something to sit on so it doesn’t slide all the way down. Sand down if needed.
Now you can slide the acrylic panels into place. If they are a little snug sand down the edges until they slide down smoothly.
Make sure that the top of the acrylic is flush with the top of the walls, or sits just slightly under, otherwise the roof will not sit flush to the walls.
There is no need to add glue to hold the acrylic in place as there may come a time where you wish to take it out, either to clean it or to replace it.
Attaching the Roof
Once the platform, walls and acrylic panels are all in place, set the roof onto the walls and adjust so that there is an even amount of overhang on either side.
Use two screws on either side to attach the roof onto the walls. Don’t use glue for this part as again, you may wish to be able to remove the roof to be able to clean or replace the acrylic.

Assembling bird table with feeding trough
These two bird table plans will not only leave you feeling satisfied and accomplished but will afford you countless hours of bird watching from the comfort of your own home.
It’s a great way to get started with woodworking and is very rewarding.
There are plenty of great designs out there from the rustic to the outlandish and plenty of other helpful tutorials and videos.
Why not have a go at building your own beehive using the methods stated in our project or even have a go at building your own bat box if you enjoyed this project.

