Wooden railway sleepers – new or reclaimed – make great rustic garden steps. Sleepers are available from a number of online retailers, and often from reclamation yards and large garden centres. If you are using reclaimed sleepers be aware that they will often be coated with a bitumen-based paint, which can easily mark surfaces.
Railway sleepers come in different sizes, the most popular size being 2.600 m long, 225mm wide and 125mm deep. This is the ideal size for garden steps although sleepers with a width of 300mm and a height of 150mm will do just as well. Lengths go up to 3m.
Care should be taken when lifting sleepers, as a 2.6m sleeper, when wet, can weigh up to 10 stone (63.5kg)!
Refer to our project on building garden steps for information on how to work out the size and number of steps required.
Preparation for Building Sleeper Steps
Cut the sleepers to the width you require, either using a chainsaw or by handsaw. You may need to cut around all four sides if you are using a handsaw. Please see our project on using a chainsaw, for advice on how to use them safely. Paint a wood preserver onto the ends of the timbers, and if you are using new untreated sleepers, paint the whole thing.
Mark out the ground where you are building your steps and dig out the basic step shapes. If you are building wide steps with a sleeper at the front of each step and the back of the step filled in with shingle or chippings, you may want to line the steps with landscaping fabric so that you don’t get too many weeds coming through. Make sure the ground on each step is well-compacted.
Building the Sleeper Steps
There are two basic ways to fix your sleepers into place – you can either concrete them in or drive wooden stakes into the ground and fix the sleepers to the stakes. The best way for you depends on the ground you are building on. If the ground is very soft or stony, then a concrete fixing will be best. If you think a wooden stake will be sufficient to hold the sleeper firmly in place, then you can go ahead and use this method. The stakes should be driven in behind each sleeper.
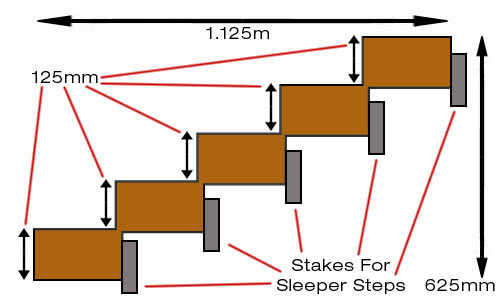
How to work out the depth and height of sleeper steps
If you are using a concrete bed to fix your sleepers into place, dig a trench wide enough so that it extends slightly in front of and a good amount behind the sleeper. The concrete bed needs to be 50mm-100mm (2”-4”) deep, and should be shaped so that it will support the sleeper from underneath and behind. See our mixing concrete project for help with the mixing part.
Lay the concrete underneath the sleeper, position the sleeper in place and add concrete in the space behind it. Use a spirit level to make sure that the sleeper is level and straight. If your steps are deep enough there should be space for you to move on and do the same for the next step up, and so on. If your steps are just the width of the sleeper, you will need to either build them one at a time allowing for the concrete to dry, or use a different fixing method.
If you plan to fix the sleepers into place using wooden stakes, then you need to dig out enough space for the sleeper, the stake and enough space behind the stake to fix it to the sleeper. The length of the stake depends on the ground, but they should be at least 300mm (12”) long.
Position the sleeper and drive a stake into the ground directly behind the sleeper, one at either end, a few centimetres in. Make sure the top of the stake ends up a centimetre or two lower than the sleeper so that it can be covered with shingle or chippings if you are building deep steps. Screw or nail through the stake, into the sleeper.
Repeat for each step. As an alternative you could also drill through the sleepers and use reinforcing steel bar (steel rods for reinforcing concrete) to drive through and fix them to the ground.
If your steps are deep, fill the space in between the sleepers with shingle, bark or chippings, and compact well so that it sits level with the top of the sleeper.
It is a good idea to improve the grip of your sleeper steps as they can become quite slippery when damp. You can do this by cutting shallow tread lines into the surface, sticking a layer of grit to them, or tacking on a layer of chicken wire.
If you have enjoyed working with sleepers another great project you might consider is making raised planting beds from sleepers which we cover here.
Sleepers make a dramatic feature in any garden and steps made from reused railway sleepers will last a long time. Making them yourself is a great DIY project which you can admire for years to come; please do send us pictures of your sleeper steps when you’ve finished