Making raised beds with sleepers is a very effective and dramatic way to build them, not to mention a very long lasting method. In all likelihood they will be around long after you will!
In this project we will explain the process of making planting sleeper beds, including all the equipment you will need. If you are not looking for raised beds as imposing or long lasting at this we also have a project showing you how to build a different type raised beds here.
Sleeper Safety
If you are planning to make raised beds, or anything else for that matters, with railway sleepers you need to make sure you know what you are dealing with. They are very heavy, and if you are planning to use secondhand ones they can be covered in tar or creosote too.
It is likely that you will drop them or at least put them down more heavily that you intend, so you want to make sure that nothing of you is underneath. This is easier said than done sometimes so there are two crucial things you need:
- Safety boots with steel toe caps and ideally sturdy ankle supports to protect your feet in case a sleeper drops on them. Long, thick socks will add a little cushioning too
- Thick gardening gloves will protect against knocks and trapped fingers to a degree, but also will prevent your hands becoming covered in tar and creosote
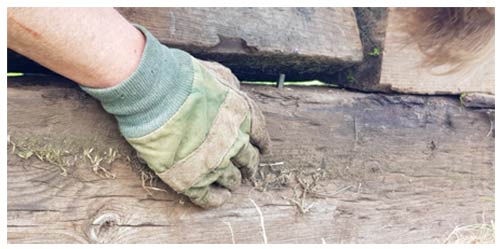
A thick pair of gloves and safety boots are essential for building raised beds with sleepers
Designing Raised Beds to Be Built with Sleepers
There are a number of considerations you should take into account before you start to build anything with railway sleepers.
Effort Involved
As we have already mentioned sleepers are very heavy and cumbersome so try not to start a project that you will not be able to finish.
Make the design simple and positioning accessible so you are not having to carry sleepers too far so you will be able to get the soil into them when the structure is built.
Make sure that you are going to be able to easily access the final stages without the first part of your build getting in the way.
Aesthetic Considerations
Work with sleepers is quite dramatic, some might say “brutal”, so it is worth considering your design before you start. We recommend a really good trawl around the web or Pinterest to get a feel for the style you like. Once they are there then there is nothing much you can do to change them.
Getting your Materials
One of the nicest things about building raised beds is that there is not much in the way of materials, however when you decided to use sleepers there are a few things to be aware of:
Soil
sleeper raise beds tend to be larger than other raised bed designs and therefore require a lot of topsoil. We estimate that our design (see below) requires around 3-4 tonne bags of top soil to fill, so if you can get any top soil or compost nearby from your garden it’ll reduce the cost (and possibly the effort) dramatically.
Sleeper Types
You can get a lot of different types of sleepers. There are new, pressure treated, and used of different grades. Some are hard wood and some are treated soft woods. There are no right or wrong choices, but in general hard woods will last longer than soft woods, treated will last longer than untreated and used or reclaimed will have more “character” than new.
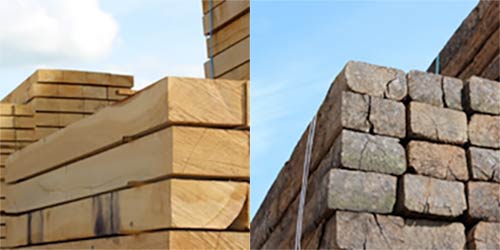
Untreated Oak sleepers and Reclaimed European Hardwood Sleepers – Images courtesy of uk-timber.co.uk
Getting Sleepers Delivered
It is definitely cheaper to buy sleepers online, however once the delivery charges are added they tend to work out at a similar price to purchasing locally, in our experience.
If you’re buying reclaimed sleepers the lengths will vary considerably (see below) so you might be able to choose or reject the really outsize ones if you buy locally.
To buy locally try your local garden center, who will likely sell new sleepers and probably suggest somewhere for reclaimed ones if they cannot help.
Try your local reclamation yard for reclaimed sleepers but we have found that the most surprising people supply them; we got ours for this project from a local mechanic who did a sideline in sleepers!
What You Need to Build Raised Sleeper Beds
The quantities will depend of the design of you raised beds, but for our design which is probably one of the simplest you will need 6 sleepers for each; 4 each side and 2 halves at each end.
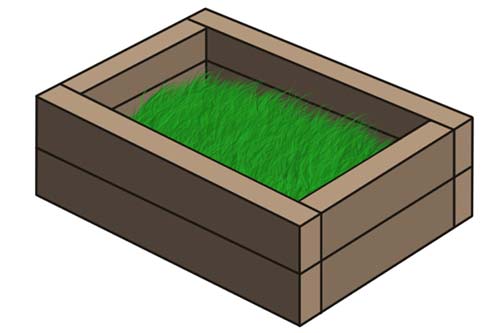
Design for Raised Beds using 6 Sleepers
The materials you will need for your raised beds are:
- Sleepers – your choice of type and hopefully of similar length (see below)
- Treaded bar (1m M10)
- Coach Screws (M10 or M12 over 150mm up to ideally 200mm)
- Washers (M10 or M12 depending on the gauge of your coach screws)
- Thick gauge plastic (DPC)
- Gravel – to fill in around the sleepers
- Soil and/or compost
If you do not want to use the threaded bars you don’t have to. We used them as if you are working on your own it is very helpful to have something to hold the sleeper in place while you are fixing it and filling it with soil, especially when working on unlevel ground.
Potentially a cheaper alternative is to use stakes knocked into the ground to hold the sleepers in position while fixing them, and these can get remove when finished and the raised beds are full of soil.
The Tools that you need on the whole relatively common place however you will need a long wood auger bit which is probably something most people will not have readily available.
Ideally you should get one that is 400mm (16 inch) and the same gauge as your treaded bar and coach screws you plan to use.
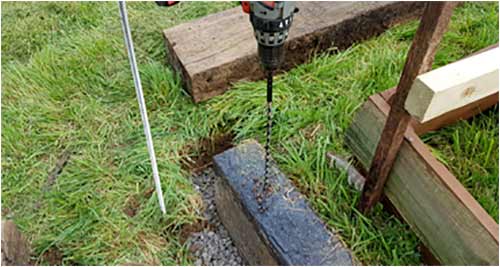
A long drill bit is useful to drill out holes for the fixing rods which hold the sleepers in place
Here are the tools that you will need to build your raise beds:
- Pick and shovel – to clear the area and level the ground
- Pencil, tape measure and spirit level
- Saw to cut the sleepers (if required – see out tips below)
- Good Combination Drill
- Ratchet and socket to screw in the coach crews
- Long wood auger bit (400mm, M10 or whatever gauge your bar and screws are)
- 25mm spade bit
- Hammer
- Hacksaw – to cut the threaded bar to size where required
- Scissors or sharp knife – to cut the plastic sheet to size
- Stapler and staples
- Wheelbarrow – to fill the beds once completed
Don’t forget the gloves and boots too!
A Simple Design for Raised Sleeper Beds
Our design is about as simple as you can get; we will cut one sleeper in half and use the halves as each of the ends, and each side will be a full length sleeper. We have placed the sleepers side up to create greater height. Then we place another layer of sleepers on top of this:
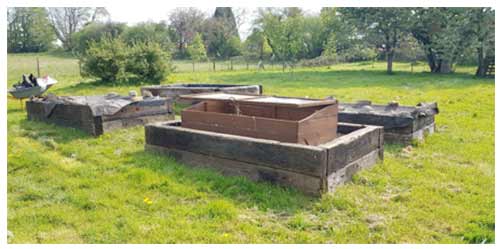
Simple Railway Sleeper Raised Beds
This design reduces the amount of cutting of sleepers that you have to do to only 1 cut per layer of sleepers you decide to use.
Top Tip – If using reclaimed sleepers they will not be the same lengths! Measure all the sleepers you get and plan which you are going to use where. Try to use similar lengths for similar pats of the beds.
The corners are laid next to each other and fixed with coach screws through the sides of the beds and into the ends of the end pieces.
We use the treaded bar to stabilize the sleepers which are sitting on the ground. These can also be used as a dowel to position the sleepers which are placed on top for the second layer.
Once the structure is completed the stability of the whole bed will come in large part from the weight of the soil that is inside it. Once full it will not go anywhere! But before you fill your bed with soil you will need to fix the plastic to the side so that the soil is not contaminated with the tar and creosote from the wood of the sleeper.
Making Longer Raised Beds
We will explain the method in much more detail below, but before we do you might want to vary the design and make a longer bed, for example.
In order to do this you might need to lay more than one sleeper in a line, say for the side of the bed. In order to do this there will be a join which we recommend should be staggered as in the photo below.
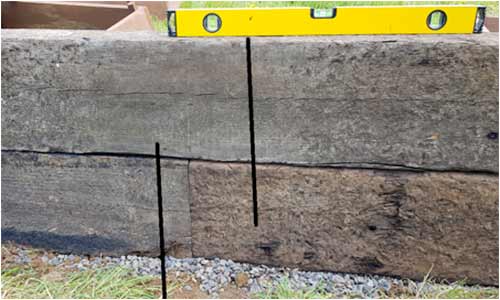
Lines showing the position of fixing rods through sleepers around a join
Use the threaded bar hammered through pilot holes in the sleepers to fix each sleeper to the ground below, or the sleeper above/below it.
How to Cut Sleepers
The easiest way to cut sleepers is to use a chainsaw. Have a look at our page on how to use a chainsaw safely here.
Failing that you can use a skill saw (see how to use a skill saw here). Set it to its deepest cutting depth and cut through.
You will need to turn the sleeper over and saw from the other side and hopefully this will be a deep enough cut to get through the whole thickness.
If not you might have to finish off the cut using a handsaw. Hopefully there will not be too much left as this can be hard work especially if the sleepers are wet!
How to Build Railway Sleeper Raised Beds Step by Step
Follow these steps to make your raised beds:
Step 1 – Mark out the Position of Your Beds
Work out where your beds will be and the level you want them as it is unlikely you will be lucky enough to have a perfectly level space for them.
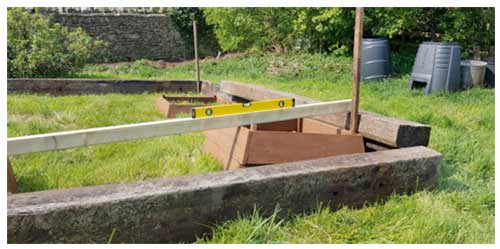
Peg out where the corners of the beds will be and understand the level of the ground
We found it helpful to offer up the sleepers into the rough locations of the finished beds to get a better idea of what it would look like.
This also helps to ensure you get the right sleepers ready for use as, remember, they will all be different lengths if you’re using reclaimed sleepers.
Step 2 – Dig out the Position of Your Sleepers
The next step is to dig out the position of the sleepers so that they are level and in the correct location. Put the dirt you dig out into the middle of there the raised bed will be; this will be a start of the soil you need to fill the bed!
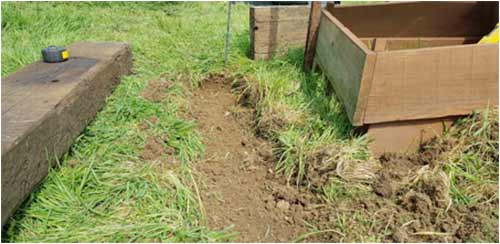
The “bed” dug out for your sleeper to rest
Step 3 – Bed the Sleeper into Position on Gravel
Get the sleeper in position and level on a bed of gravel (if you have some). This will allow moisture to flow away more easily.
Later you will tuck the plastic sheeting stapled to the inside of the bed under the sleeper to form a damp proof course (DPC) of sorts. (For your interest, we have a project about damp issues below a DPC, although this is a very different kind of project).
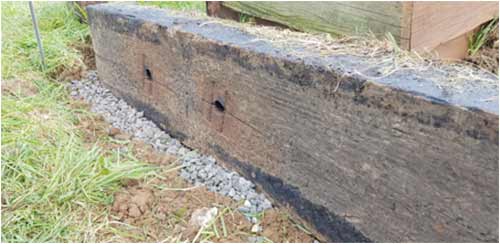
The Sleeper laid in a gravel bed – in position and level!
Step 4 – Pin Your Sleeper in Place
Drill out a pilot hole which you can knock through a rod which will fix into the ground to fix your sleeper in place. We use a 1m threaded bar, cut in half as the topsoil was remarkably thin so we were close to the bedrock.
The bar will fix the sleeper in place while you fix the other sleeper, making the end of the raised bed, in place.
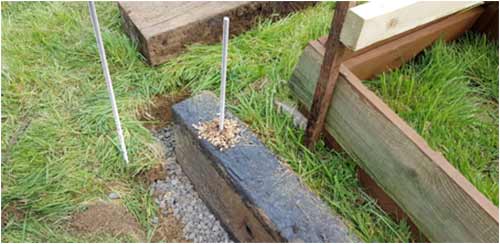
A threaded bar used to “pin” the sleeper in place while the other sleepers are positioned
Do this at each end of the sleeper so that it is firmly fixed at both ends. If you are on sloping ground one end of the sleeper might be almost buried, so in this instance you might not need to fix the sleeper with a rod through it into the ground, as it is already held firmly in place already.
If there is going to be a second layer of sleepers, making a higher raised bed, then don’t hit the rod or threaded bar flush with the top of the sleeper. Leave it standing proud to make a “dowel” for aligning and securing the next layer of sleepers.
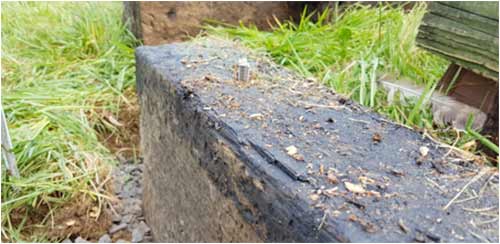
The rod fixing the sleeper will align and fix the next layer of sleepers acting as a dowel
Step 5 – Repeat Steps Above for end Sleeper (at right angles to side sleeper)
At this stage you should have two sleepers making a right angle and both level. This will be the side and end of your raised bed.
Step 6 – Fix the Sleepers Together Using Your Coach Screws
Drill a pilot hole through the side of the side sleeper, stopping when you reach the end of the sleeper which will form the end of your raised bed:
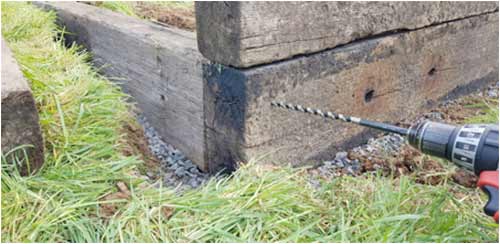
Drilling hole and countersink for coach screw
Then you can countersink your coach screws (see here tip for counter sinking) as we have by using a 25mm flat spade bit. This also helped to get a better fixing into the end of the other sleeper.
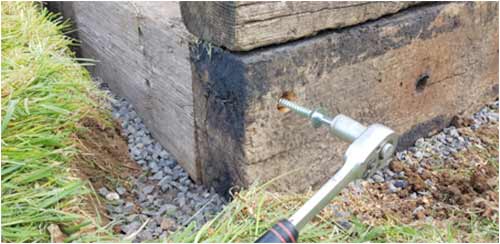
Screw your coach screws to fix the corners of your raised beds
Screw in the coach bolts but do not tighten until you have all four corners completed. This allows a little play before you finally position and tighten up all the fixings.
Step 7 – Bed in all the Remaining Sleepers and fix the Corners
Once you have done this you will have a “single story” rectangular raised bed which is where you might want to stop (jump ahead to Step 9), but if want a higher bed then you can add another layer of sleepers.
Step 8 – Add the Second Layer of Sleepers
This is much the same as the first layer, although easier as your first layer of sleepers will be firm and level so there is less work to do. The next layer should sit on top.
You will need to create the holes in the upper sleeper for the “dowels” (the tops of the rods fixing the lower sleepers in place).
You need to measure carefully where the hole should be to match up with the dowel in the sleeper below, and it is worth enlarging the opening of the hole by rotating the bit around the hole a little so that the dowel slides in more easily.
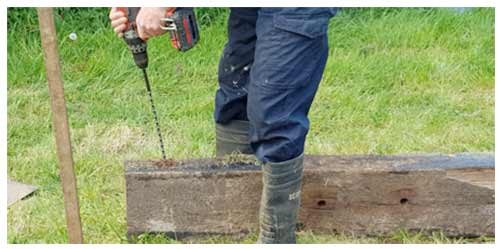
Drilling holes for the dowel
It should be possible to drop the sleepers of the second layer into place, fixed by the dowels.
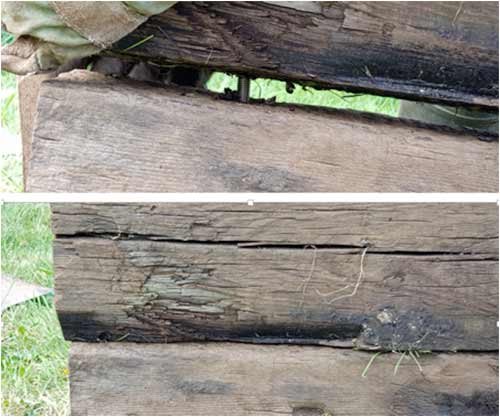
Drop the second layer of sleepers down onto the dowels
Step 9 – Fix Plastic Sheeting to the Inside of the Raised bed
In order to protect the soil and plants from the creosote and tar in the sleepers, and to protect the wood from the moisture in the soil, staple a durable plastic sheet to the inside of the raised bed. Fold the bottom of the plastic under the bottom sleeper and overlap any joins.
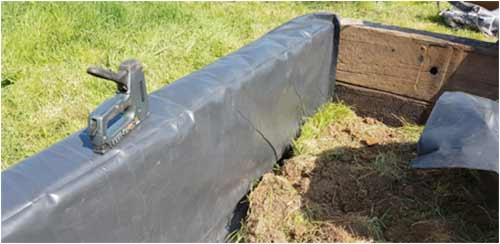
Trim up and fix damp membrane in place
Cut the plastic at the top of where the soil should reach. Then you can back fill the loose soil inside the raise bed against the plastic so as to keep in in position.
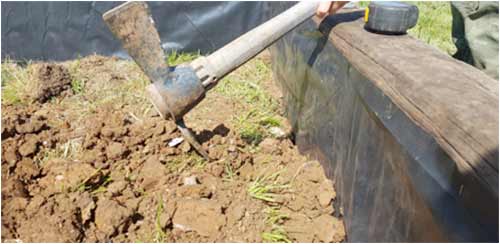
Backfill with soil to hold membrane in place
Step 10 – Finally Fill in the Raised bed With Soil
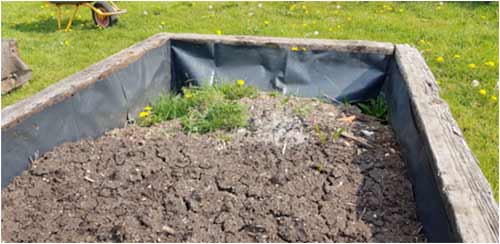
Fill base of raised planter with soil
Don’t worry about the grass inside the bed as this will be killed off by your new topsoil which you will tip on top of it.
It will make good organic matter for the raised bed. If you have a weed free compost you can put this on top to reduce the amount of weeding you have to do.
Failing that, if you have dug out your topsoil from nearby, weeds and all we recommend that you put a weed fabric or similar over the top of the as this will stop the light and suppress many of the weeds.
Do this immediately after filling the bed until you are ready to plant and it will save you a fair amount of weeding.
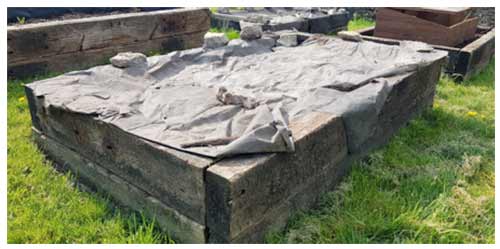
Raise bed covered with weed fabric to suppress weeds prior to planting up
These general principles can be applied to sleeper raised beds of all sizes and shapes. You can increase or decrease the lengths of the sides of your beds as we described above if you need larger or longer beds.
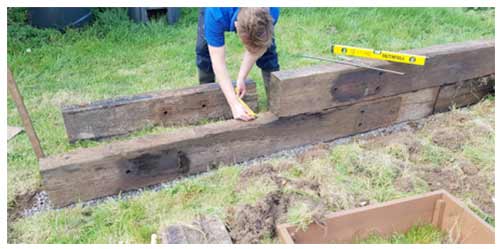
Making the sides of a longer sleepers raised bed – measuring the position of the dowel
Having seen the types of raised beds railway sleepers make you might decide that they are a little “heavy” for your garden. There are other options; if you prefer a lighter raised bed design we have an alternative project for you here.
If you are interested in more projects with railway sleepers you can always take a look at our project on building steps using sleepers.
Making a raise bed out of railway sleepers is a fantastic DIY Project. By its very nature it is not a very precise project as you will never find two sleepers the exact same length, but despite this you can have a dramatic effect and you will have beds that you will be using for many years to come.
The principles here can be used to make all kinds of garden features out of sleepers too, not just raised beds. Take care as the sleepers are heavy and unforgiving especially when they come into contact with a toe or stray finger!

