• Skip to primary navigation
  • Skip to main content
  • Skip to primary sidebar
  • Skip to footer
DIY Doctor

Main navigation

      • Project Type A - E
      • All Projects
      • Brick, Block, Masonry and Concrete
      • Damp, Condensation, Rot and Woodworm
      • Doors, Windows and Conservatories
      • Electrical
      • Project Type F - G
      • Fencing, Decking, Paving and Patios
      • Floors, Walls, Ceilings and Lofts
      • Garages, Sheds and Outbuildings
      • Gardening and Landscaping
      • General Building, Self Build and Renovation
      • Project Type G - J
      • General Repairs and Cleaning
      • Green Living and Eco DIY
      • Ground, Foundations and Drainage
      • Heating, Central Heating and Boilers
      • Joinery and Carpentry
      • Project Type M - P
      • Materials, Fixings and Fixing
      • Painting, Decorating and Finishing
      • Planning Regs, Project Management and Safety
      • Plastering, Plasterboard and Rendering
      • Plumbing
      • Project Type R - T
      • Roofing and Gutters
      • Tiling and Tiles
      • Tools, Appliances and Access
      • Useful Tips
      • DIY Tips
      • Find a Tradesman
      • Contract Download
      • Working With Tradesmen - Ultimate Guide
      • Home Improver Protection
      • Price Doctor
      • About DIY Doctor
      • What we do
      • Trade Shows and Exhibitions
      • Master Classes
      • Book Store
      • Contact Us
      • Feedback
      • DIY Competitions

Home > DIY How To Projects and Tutorial Guides > Removing Polystyrene Tiles

Removing Polystyrene Tiles

In this DIY guide you will learn all about removing polystyrene tilesand how to use a heat gun when stripping polystyrene tiles. Find out how to remove polystyrene tiles from ceilings and walls and how to remove the left over adhesive after removing polystyrene tiles from a wall or ceiling surface.

TwitterFacebookPin ItBuffer

Don't want to do this job yourself? Let us help you find a tradesman local to you

Project Page Menu
  • How to Tutorial
  • Video
  • Find Tradesmen
  • Help

How to Remove Polystyrene Tiles

Removing polystyrene tiles or Styrofoam tiles as they are sometimes known from walls or ceilings can be a tedious job and unfortunately there is no easy way of doing it other than getting stuck in with a wide scraper to scrape the tiles off.

Polystyrene tiles covering bedroom ceiling

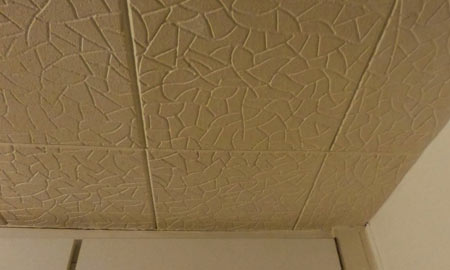
Polystyrene tiles used to cover ceiling in bedroom – Image courtesy of homedecorinterior.info

In most situations, polystyrene tiles were used to cover a surface, whether it’s a wall or ceiling, due to the fact that the surface itself is poor. This can be either be that it’s wavy and uneven or in some cases not finished at all.

As mentioned, removing the tiles themselves is not going to be an easy job, especially if they are on the ceiling.

The tiles themselves will have been fixed to the surface in one of two ways:

  • Completely glued: The entire rear side of the tile is coated in adhesive and fixed to the surface
  • Dot and dab fixed: A dab of adhesive is put in each corner of the rear side of the tile and also normally in the centre

If the dot and dab fixing method has been used this will make the tile removal slightly easier as you can use a scraper to pry up the un-stuck parts of the tile and pull them off leaving only the sections that are still stuck. You can then use the scraper to scrape these off.

Inch Stripping Knife

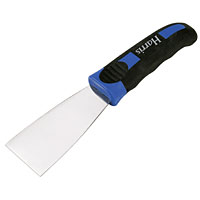
Inch stripping knife or scraper

Where the tiles are totally glued to the surface you will have no choice but to use the scraper to chip and scrape off a bit at a time until all is gone.

This can be a pretty messy job so make sure you cover any carpets with dust sheets and remove as much furniture from the room you are working on as possible. Also, be careful using your scraper! Don’t hold it at too much of an angle, hold it as flat as possible, as you will end up digging into the surface of the ceiling or wall and causing more damage.

Although not the most inspiring of jobs this is the easy part. It gets tricky once you have removed the tiles.

Removing the Left over Tile Adhesive

With all the tiles now removed you may notice a large amount of the adhesive still remaining on the surface that now needs to be removed.

Again there is no easy way to get this off other than to break out the scraper and also a heat gun.
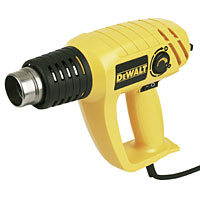
Hot Air Gun

Hot air gun

Warm the adhesive gently until it becomes soft and then begin to scrape it off. Wave the heat gun over the surface from side to side as this will ensure that not too much heat is concentrated in one area for too long. Hold the gun about 6 inches from the surface whilst doing so.

Continue to heat the adhesive and scrape it off once soft, Working in small areas at a time and once you have scraped the soft adhesive from the surface, wipe the scraper on an old cloth to remove it.

Make sure you are wearing the correct safety equipment such as a mask, gloves and eye protection. The act of warming the adhesive will most likely produce fumes that could be potentially dangerous if breathed in.

Once you have removed all the major bulk, you may notice that you still have some residue remaining. In some cases this can be removed by simply scrubbing hard with cloth or a scouring pad. You can also try a cloth and white spirit or a solvent thinner.

Again, make sure you are wearing rubber gloves, a mask and safety specs may not be a bad idea as you may be using solvents above your head. Please be careful.

With all the tiles and adhesive gone, before you go about finishing the surface with your chosen covering (paint, wallpaper etc….) it’s always a good idea to get a plasterer in to skim it over as this will give you a nice smooth base to work with.

Damaged Wall or Ceiling Surfaces

After the removal of tiles and adhesive you might find that the surface underneath is rather less than good. If this is the case then you have a few choices:

  • Replastering: You can replaster the entire surface to get a smooth, flat finish to apply your chosen top coat finish
  • Plasterboard: With this option you essentially fix plasterboard sheets over the top of the existing surface and create a new wall or ceiling that can then be plastered and finished with your chosen covering. To find out more check out these projects here

The above plasterboard option can also be used to cover the entire surface without the need to remove the tiles in the first place. There are both benefits and drawbacks to this option such as:

  • If the surface is in good condition under the tiles then covering it over will involve a fair bit of work and cash, when, with a little elbow grease and time, you could still achieve the same end result.
  • Boarding the surface over and then plastering will, without doubt, give you a nice flat and tidy surface and ultimately, a great finish

All project content written and produced by Mike Edwards, founder of DIY Doctor and industry expert in building technology.

TwitterFacebookPin ItBuffer

Video

Back to the Top

Find a Reliable Local Tradesman

Back to the Top
Don't fancy doing this project yourself? We work with the industries best to ensure that we recommend only reliable and trustworthy tradesmen.
Let DIY Doctor help you find a tradesman

Find a tradesman now!


More Help

Back to the Top
Related Projects That May Help You:
  • How to Wallpaper a Ceiling in Easy to Follow Steps
  • How to Repair a Hole in a Ceiling
  • Removing Cork Tiles from Floors and Walls
  • How to Repair Holes in Plasterboard Walls
Give us Some Feedback!

We love feedback on our DIY tutorials it helps us to make them the best they possibly can be so if you have any comments you would like to share with us, click the button below and let us know.

Primary Sidebar

Master Basic DIY - By DIY Doctor

Our Book - Master Basic DIY

Grab your copy now for all the DIY help you need right at your finger tips!

Buy it Here!

Signup for our Newsletter

Keep up to date with our DIY projects, tips and latest deals

Sign Me Up!

Our Sponsors

Find out about advertising on DIY Doctor

Advertisments

Other Similar Projects
  • How To Repair A Ceiling After Removing Polystyrene Tiles
  • How To Wallpaper A Ceiling After Removing Polystyrene Tiles
  • How To Remove Cork Tiles
  • How To Repair A Hole In Plasterboard After Removing Polystyrene Tiles

Footer

DIY Doctor company logo

Here at DIY Doctor, we offer completely free DIY and construction help and advice to any and all, from professional tradesmen, exactly as they would do it.

We have hundreds of DIY project tutorials covering all aspects of building and DIY that provide step by step instructions on how to complete your given task.

If you need a little help then we also have an active question and answer forum and a find a trademan service and much more.

Site Menu

  • DIY Doctor Ltd,
    The Workshop,
    Newbury Works, Somerset,
    BA3 5RX

  • 0845 6342 179

  • Contact Us

  • Company Number: 05863375
  • VAT Number: 811134774

Other Stuff

  • About DIY Doctor
  • Contact DIY Doctor
  • Media and Press
  • DIY Projects
  • UK DIY Forum
  • DIY Doctor Suppliers
  • DIY Webinars

DIY Doctor Social Channels

  • Advertise
  • Competitions
  • Terms and Conditions
  • Privacy Policy
  • Cookie Information
  • NHIC
  • Sitemap

DIY Doctor are members of:

© DIY Doctor Ltd 2025 All Rights Reserved