• Skip to primary navigation
  • Skip to main content
  • Skip to primary sidebar
  • Skip to footer
DIY Doctor

Main navigation

      • Project Type A - E
      • All Projects
      • Brick, Block, Masonry and Concrete
      • Damp, Condensation, Rot and Woodworm
      • Doors, Windows and Conservatories
      • Electrical
      • Project Type F - G
      • Fencing, Decking, Paving and Patios
      • Floors, Walls, Ceilings and Lofts
      • Garages, Sheds and Outbuildings
      • Gardening and Landscaping
      • General Building, Self Build and Renovation
      • Project Type G - J
      • General Repairs and Cleaning
      • Green Living and Eco DIY
      • Ground, Foundations and Drainage
      • Heating, Central Heating and Boilers
      • Joinery and Carpentry
      • Project Type M - P
      • Materials, Fixings and Fixing
      • Painting, Decorating and Finishing
      • Planning Regs, Project Management and Safety
      • Plastering, Plasterboard and Rendering
      • Plumbing
      • Project Type R - T
      • Roofing and Gutters
      • Tiling and Tiles
      • Tools, Appliances and Access
      • Useful Tips
      • DIY Tips
      • Find a Tradesman
      • Contract Download
      • Working With Tradesmen - Ultimate Guide
      • Home Improver Protection
      • Price Doctor
      • About DIY Doctor
      • What we do
      • Trade Shows and Exhibitions
      • Master Classes
      • Book Store
      • Contact Us
      • Feedback
      • DIY Competitions

Home > DIY How To Projects and Tutorial Guides > How to Repair a Hole in a Ceiling

How to Repair a Hole in a Ceiling

Advice on how to repair a hole in a ceiling including what to do when you have put your foot through the ceiling! Find out how to repair a hole in the ceiling and mend the damaged area. Get lots of tips for ceiling repairs.

TwitterFacebookPin ItBuffer

Don't want to do this job yourself? Let us help you find a tradesman local to you

Project Page Menu
  • How to Tutorial
  • Video
  • Find Tradesmen
  • Help

Repairing a ceiling seems to be one of the main tasks out there these days! (See also our project on repairing holes in plasterboard walls). Perhaps its because more and more people are looking at converting their lofts or maybe that we all have too much junk we need to store it in the loft, but it seems quite a few people every week are putting a least one of their feet through the bedroom ceiling.

The frustrating thing about repairing a ceiling, be it mending holes in plaster ceilings or lath and plaster ceilings, you always have to make the hole bigger before you can repair it.

This method can also be used for inserting a new timber into a ceiling for screwing a light fitting to if required.

Check For Wires And Pipes In The Ceiling

The very first thing to do is to check the immediate area for cables and pipes. Its no good hammering and sawing away to mend a ceiling if you are going to chop through an electrical wire or water pipe and cause a short circuit or leak in the process.

To detect any wires or pipes you will need a hand held metal detector. This will not only show you where pipes and cables may be buried but it will also locate the exact position of the joists and studs.

Cut Ceiling Back To Nearest Ceiling Joist

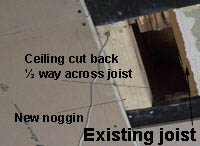
To insert a new piece of plasterboard into a ceiling it’s important to cut the existing ceiling back to the nearest joist. If this is too difficult an easier way is to insert a timber noggin above the place where the new joint or piece of plasterboard will be.

The existing ceiling needs to be cut off square first and the edge of the existing ceiling, together with the edge of the new plasterboard, need to meet in the centre of the joist or new noggin. You can then be sure the joint is stable and will not crack when the new skim plaster is applied.

Enlarge the existing hole to find the ceiling joists

Enlarge the existing hole to find the ceiling joists

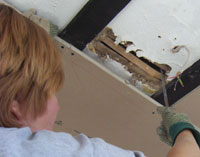
If the hole you have made is quite small, look to the base of this page for our projects on repairing holes in plasterboard and repairing lath and plaster. You will also need to see our project on skim plastering mantioned above. The images above and below show what to do to repair a fairly large hole in a ceiling.

Widen The Hole And Cut Ceiling Back

In the image above you can see the hole is being widened to find the joists. In this instance the hole was made specifically to insert a timber for screwing a new light fitting onto. The same method would be used to mend a hole. Widen the hole until you have found the next joist and cut the existing ceiling off square to it and in the centre of it. Now screw (do not nail) the existing ceiling to that joist.

Insert Noggin Into Ceiling Under Joint In New Plasterboard

The image below shows we have inserted a noggin under the joint in the new plasterboard. This was to enable us to put in a "last minute" light fitting for the client. The same process can be used for mending a hole. Just make sure any new timbers are directly over the joint so you can screw both sides of the joint to the timber.

Hole in ceiling ready for repair

Hole in ceiling ready for repair

All project content written and produced by Mike Edwards, founder of DIY Doctor and industry expert in building technology.

TwitterFacebookPin ItBuffer

Video

Back to the Top

Apologies, but we don't seem to have a video for this project yet, but we will do our best to get one up soon

Find a Reliable Local Tradesman

Back to the Top
Don't fancy doing this project yourself? We work with the industries best to ensure that we recommend only reliable and trustworthy tradesmen.
Let DIY Doctor help you find a tradesman

Find a tradesman now!


More Help

Back to the Top
Related Projects That May Help You:
  • How to Fix a Damaged and Leaking Roof
  • How to Wallpaper a Ceiling in Easy to Follow Steps
  • Fixing to Lath and Plaster Correctly
  • How to Skim Plaster Walls and Ceilings: A Full Guide
  • How to Use a Stud Finder
  • How to Repair Holes in Plasterboard Walls
Give us Some Feedback!

We love feedback on our DIY tutorials it helps us to make them the best they possibly can be so if you have any comments you would like to share with us, click the button below and let us know.

Primary Sidebar

Master Basic DIY - By DIY Doctor

Our Book - Master Basic DIY

Grab your copy now for all the DIY help you need right at your finger tips!

Buy it Here!

Signup for our Newsletter

Keep up to date with our DIY projects, tips and latest deals

Sign Me Up!

Our Sponsors

Find out about advertising on DIY Doctor

Advertisments

Other Similar Projects
  • How To Wallpaper A Ceiling
  • How To Find Joists And Timber Behind Plasterboard
  • How To Fix Into Lathe And Plaster
  • How To Apply Skim Or Top Coat Plaster After Repairing A Hole
  • Leaking Roof - Identifying The Cause Of A Leaking Roof And How To Repair Storm Damage To Roofs
  • How To Repair A Hole In Plasterboard

Footer

DIY Doctor company logo

Here at DIY Doctor, we offer completely free DIY and construction help and advice to any and all, from professional tradesmen, exactly as they would do it.

We have hundreds of DIY project tutorials covering all aspects of building and DIY that provide step by step instructions on how to complete your given task.

If you need a little help then we also have an active question and answer forum and a find a trademan service and much more.

Site Menu

  • DIY Doctor Ltd,
    The Workshop,
    Newbury Works, Somerset,
    BA3 5RX

  • 0845 6342 179

  • Contact Us

  • Company Number: 05863375
  • VAT Number: 811134774

Other Stuff

  • About DIY Doctor
  • Contact DIY Doctor
  • Media and Press
  • DIY Projects
  • UK DIY Forum
  • DIY Doctor Suppliers
  • DIY Webinars

DIY Doctor Social Channels

  • Advertise
  • Competitions
  • Terms and Conditions
  • Privacy Policy
  • Cookie Information
  • NHIC
  • Sitemap

DIY Doctor are members of:

© DIY Doctor Ltd 2025 All Rights Reserved