Wallpapering a ceiling is very much the same as wallpapering a wall except, of course, its a fair bit trickier as you will be working at height and also against gravity.
If at all possible, it may be better to simply paint rather than paper but if you are wanting to go for a patterned look or to simply apply lining paper to cover hair line cracks or other imperfections, then papering is the only way to go.
With the above in mind, the most important thing before you even start to hang paper on the ceiling is to make sure you can work comfortably and have a good solid and flat platform from which to work.
In respect to your working platform, using ladders and steps are totally fine, but ideally you should use something like a platform that you can also walk along as this will be much easier when you are needing to push up or smooth the wallpaper on your ceiling, rather than having to stop, climb off your ladder or steps, reposition them and then climb back up again.
The platform will ideally be just high enough for you to reach the ceiling comfortably without having to bend or contort your body into odd positions. As this can be a fairly long job, having to stand and stretch or lean will quickly become uncomfortable and tiring, making the job much more unbearable. You should be able to look up normally with enough flex in your elbows to be comfortable and not having to stretch to reach.
If you can, buy, borrow or hire a couple of hop ups (similar to the one below) and a decent scaffold plank. You can then position them along the length of the paper your hanging, allowing you to easily reach your ceiling and also giving you some horizontal movement.
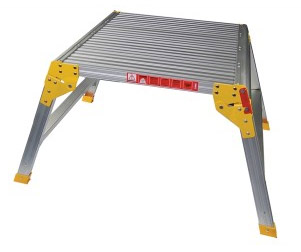
Hop up platforms are ideal for reaching high and hard to reach areas
Many professional find that old milk crates are just the right height to work comfortably on a ceiling so an object of similar height with, again, a short scaffold board on top will allow you to walk up and down the length of area to be papered (Note: Do not allow any planks to overhang any ends as they can easily flick up if you stand on the overhang and throw you off!).
Which ever of the above options you go for, just make sure you are careful! Working at any hight, no matter how heigh, is dangerous and a fall can cause serious injuries, so make sure you know where your feet are at all times, don’t rush and ensure that everything is solid and firm and not wobbly.
Preparing a Ceiling for Wallpapering
As with any job, the final finished result will only be as good as the initial preparation work. With this in mind, go over the entire ceiling area and remove or scrape off any flaking paint or other loose items. The best tool to use for this is a standard paint scraper.
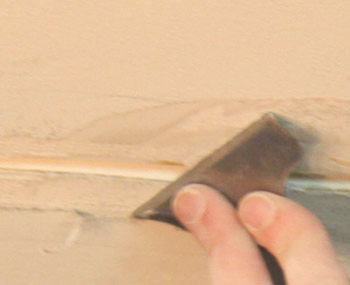
Scraping loose material off of the ceiling surface
Once this has been done, wash the surface over lightly with some sugar soap to remove any grease, dust or other debris and then wash over again with clean water and leave to dry.
Note: Do not be tempted to wallpaper over the top of any existing paper that may be present. The moisture from the new paste can soak through the old paper and loosen the old paste, making the whole lot come down.
It may seem like a huge chore removing the old paper (especially if it’s woodchip) but for the sake of the longevity of your new covering, it has to be done.
When it comes to the wallpaper itself, make sure you have enough to cover the entire area with some left over. Wallpaper patterns and styles come and go like the wind and your chosen style or type can quickly be discontinued, so its good to have some spares for any future repairs that might be needed.
A Note on Pasting and Folding Wallpaper
The best paste to get we have found is the “mix it yourself” type. Is it possible to get ready mixed paste but this tends to loose its stickiness and does not adhere to the wall as well as the paste you mix up yourself.
All the mix-yourself-type pastes have instructions on how they are mixed on the packet so follow these to the letter. The paste itself is usually best mixed in a bucket and then poured into something like a paint tray as you need it.
Use your judgment in terms of how much to use as you don’t want to waste any. Most manufacturers state how many rolls a full packet will cover so use this as a guide.
Handy Tip: Tie a piece of string across the middle of the bucket where the handles are fixed. This will give you a place to rest your brush while you’re not using it and save getting paste everywhere.
A pasting table or long table is a must when wallpapering. Technically you can do it on the floor but the risks of standing on your paper or standing in excess paste and spreading it all over the place are quite high, coupled with the fact you will be bending and getting up and down all day will make the job more arduous than it needs to be.
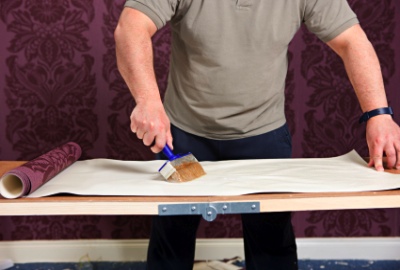
Using a pasting table to apply wallpaper paste is easiest and most hassle free way of get it on the paper
If the room you are doing is quite large, position the pasting table in the middle so that you can work all around it. If it’s not that big, place the table in the best place you can so that you have enough room to work in.
When pasting the paste on to the paper, work from the middle out to the edges, making sure you do not miss any. Once pasted, the easiest way to move the paper around or store it is to fold the wet sides together, leaving the finished, dry sides facing outwards.
For longer sections of paper you can even fold it into thirds or quarters, just make sure only the dry faces touch eachother. You can find out more about wallpapering and using this technique in our wallpapering project here.
This will help avoid brushing up against wet paste and getting it everywhere either all over yourself or doors or furniture etc….
Setting out Your Starting Point
Before you start papering a ceiling, you must set out your start point just as you would on a wall. The plan below is a ceiling which is out of square (as pretty much all ceilings are), but we have perhaps exaggerated it a little!
From the plan image you can see that if you hang the first piece of paper from point B to point C and follow the out of square wall, all of the paper that is fixed to the ceiling from that point onwards would be at an angle to the two long walls and the job would look awful.

Wallpapering plan for wallpapering a ceiling
Additionally, if you cut all of your paper too short you will also have lots of triangular shaped cuts to fill in and as good as perfect as you get these, they will almost always be visible.
The main point and most important thing to get absolutely spot on is to get each paper joint running at 90 degrees to the long walls. To do this you first have to work out where the widest part of the room is:
- Measure the width of your roll of wallpaper and on the ceiling mark a point from point B along the long wall to point A (being the total width of paper) and mark this on the wall with a pencil
- Now, measure from the point you have just made to the corner at the other end of the room, on the same section of wall marked D in the plan image and make a note of this measurement
- Next, measure the same distance that you have just taken (points A – D on the other wall) from point E along the other wall, heading back towards point C and mark this point also. Both marks you have made on your wall that correspond with point A on the plan should now be opposite each other and parallel
- The final piece of the puzzle now is to joint up your two “A points” across the width of your room. This is best done with a chalk line (see our project on using a chalk line for help) but you could use a long straight edge if you have one. You may also need a second pair of hands for some additional help
Now that you have a nice straight line that is totally square to your longer walls (or walls you have chosen to work between) you can now hang your first piece of wallpaper safe in the knowledge that it will be square and all subsequent paper you hang will also follow.
Getting the Wallpaper on the Ceiling
The first job is to measure how long your first piece of paper needs to be so, using a tape measure, measure the width of your room in the direction you are laying your paper in, in this case, between your “A points”. Don’t be tempted to measure across the room at the base of the walls as they could easily “splay” inwards or outwards at the tops making your measurement too long or short.
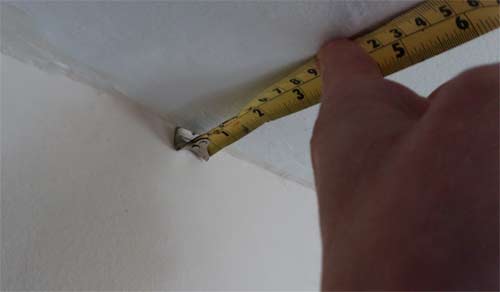
Make sure the tape is pushed right up to the joint between wall and ceiling
With the help of a friend or family member, position the tape at the top of the wall where it meets the ceiling and you or your helper can then run it across to the same point on the opposite wall to give you your width. Add 2 inches either end to allow a little more to work with and you have the length of your first piece. Make a mark at each of these two inch points both ends so that you can easily see each. This will be important later.
Roll the wallpaper out over your pasting table and measure it out to the length your calculated above. Measure both sides of the paper and mark each point and then using a straight edge draw a line between your two points and cut along it.
Lay out your cut paper, finished side down and then, using a pasting brush, apply your paste from the centre outwards (as stated above) until all areas have been covered.
Now comes the tricky part; you will need a second pair of hands at this point also. Fold the paper up into quarters as discussed above so that it is easier to manage. Using a ladder, hopup or platform, climb up and get yourself into a comfortable position, starting at one of your walls.
Find your two inch mark and position it as close to the point where the wall meets the ceiling as you can and also right on your chalk line. The paper should now be in exact position to lay it across the width of the room.
Unfold the paper a bit at a time, using your helper to support the weight of the paper as you lay it along your line. Use a slightly damp sponge or a paste brush, push the paper up to the ceiling and push it on, working out to the edges to prevent any air getting trapped which will cause bubbles.
Work your way across the room, taking your time and making sure the paper is pushed firmly up to the ceiling surface. Once you reach the end, use your sponge or brush to push the wallpaper firmly into the angle between the wall and ceiling to create a nice, crisp angle.
Using a pair of scissors, run the back edge across the corner angle to create a visible line. Pull the paper gently back off the ceiling and then use the scissors to cut along the line. Push the paper back up to the ceiling and you should now have a nice accurate finish. Repeat this for the other end you started at and you have now laid your first piece of wallpaper.
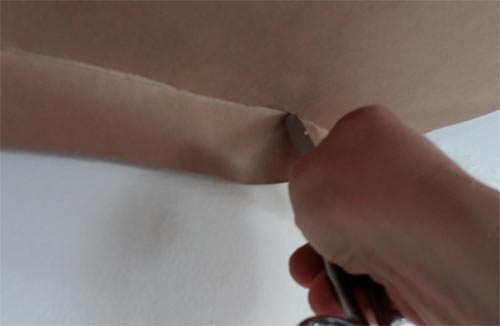
Use the back of a pair of scissors to score a line to mark the joint between ceiling and wall
You can use the above technique to mark any cutting lines when the paper is already up on the ceiling. You can of course mark the line with a pencil or pen if you need to but just make sure you get any marks as accurate as possible.
The next piece you lay should be piece number two (marked on the image above). This will be the odd shaped piece where the length of your walls has caused the room to be slightly off-square, meaning that it starts at one width and then tapers down so that it is narrower at the opposite end.
Start by measuring from the line of the paper you have just laid out to your wall at each end and this will give you a width for each end.
Next, measure out the length of paper you need, don’t forget to add your extra 2 inches each end, and cut the paper to size. Lay the paper out of your pasting table, finished side down and mark a line between both of the 2 inch points at either end.
As the paper is facing finished side down, this is how it will go on the ceiling so from the edge that will butt up to the piece already on the ceiling, measure out along the width ends the measurements that you took above for the tapered area and mark these points with a pencil.
Once you have made your marks, draw a straight line between them to create your angle and again, don’t forget to add an extra two inches working space on to your line and then cut the piece to size and add your paste and then get it on the ceiling using the process stated above.
Once again, you can remove the excess by scoring along the corner between ceiling and wall with your scissors and then cutting it off.
With your first piece done and also the tricky tapered cut, repeat the above for steps to lay the rest of your paper up in position. Make sure you measure the length of the paper you need for each cut as walls can undulate a fair bit so don’t rely on tha fact that they each piece will be the same length.
You may find that when you get the opposite end of the room you are working towards that you have a thin section to fill in (area seven in the image above). To deal with cuts like these you can follow the same techniques used in forming your angled, tapered cuts for area two in the image.
Wallpapering Around Light Fittings on the Ceiling
Unlike wallpapering on to walls where you will almost certainly encounter doors, windows, electrical sockets, light switches and many other objects, the one bonus of wallpapering a ceiling is that there are very few obstructions. In most cases, the only item you will run in to is a ceiling rose, but these can be quite easily dealt with.
When a light fitting is encountered and you have laid your paper over it, mark the centre of the fitting on the wallpaper and push through that point with the sharp point of your scissors. Then cut out from this point to the outer edge of the fitting.
The leaves of the cut will push out as you push the paper over the fitting and they can be trimmed of with a knife later.
Safety is always paramount when dealing with electrics so make sure you do this part in the day light as you will need to isolate and turn off your lighting circuit, disconnect the ceiling rose and position the wires out of the way. For tips on staying safe when working around electrics see our electrical safety project here.
If you are at all unsure about working around electrical items, always play it safe and get the professionals in. Find a reliable and trustworthy tradesman near you here.

Cutting wallpaper on the ceiling to fit around a ceiling rose
If you read the above project on how to hang wallpaper on a ceiling in conjunction with our other wallpapering projects you should have no problems completing most types of paper hanging jobs.

