If you notice damp patches or stained plaster on your bedroom ceiling, you may have a leaking roof. This guide focuses on identifying and addressing the most common areas of roof leaks.
Performing quick checks can prevent potential problems or pinpoint the source of visible water damage early, extending your roof’s lifespan and fortifying it against storms.
A severe roof leak can cause significant damage to roofing timbers, plaster, and interior décor. It’s crucial to address small issues promptly to prevent worsening problems.
Common sources of roof leaks include damaged lead flashing, cracked ridge and verge tile mortar, tile damage, and blocked roof valleys.
We’ll help you diagnose the cause of your leaking roof, identify storm-vulnerable areas, and guide you through the necessary repairs.
Roof damage typically stems from ageing materials or storm-related factors such as high winds, heavy rain, frost, or snow.
Understanding Different Parts of a Roof
It’s essential to know the various components of your roof and their functions. Here’s a quick overview:

Different areas of a roof
- Ridge: The highest point where two roof slopes meet, often capped with ornate ridge tiles.
- Valley: The “V” shaped area where two roof sections meet on a downward slope.
- Hips: Lines where two sections of a roof slope meet at the top.
- Flashing: Usually lead, it seals between roof tiles and the building’s structure (like brickwork).
- Verges: The edges of the roof exposed above the gables.
- Eaves: The roof overhang beyond the building’s walls.
- Fascia Board: Attached at the roof’s lowest edge, supporting guttering.
For more detailed information, visit our roofing DIY projects section.
Safety Tips for Roof Repairs
Ensuring your safety is paramount when working on your roof, even for quick inspections. We strongly advise reviewing our ladder safety guidelines before starting any work.
Here follows some tips on what you should use in order to safely inspect any area of your roof:
Roof Ladders and Roof Hooks
When working on ridge tiles or chimneys, consider using a proper roofing ladder or roof hooks.

Pair of Zarges Aluminium roof hooks with wheels
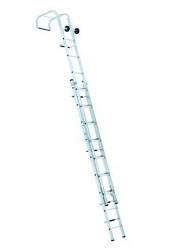
Roofing ladders
Ladder Safety
Enhance ladder safety with essential devices. Use ladder stopper mats to secure the base and prevent slipping. For added comfort and safety during extended work periods, consider using a platform.
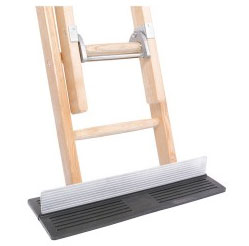
Ladder Stopper – Available in our DIY Superstore
Platforms and Scaffold Towers
If you frequently work at height on ladders, consider investing in a platform or scaffold tower for increased safety and comfort.
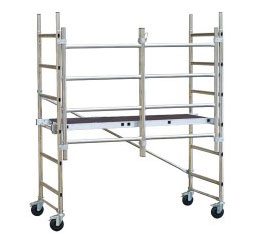
Scaffold Tower
Drone
The emergence of domestic use drones over the last few years has not only meant fun for the kids and some amazing camera work for wildlife documentaries and movies, but it has also enabled anyone to inspect their roof in fine detail.
Most semi-decent drones can be equipped with a high quality 4K camera and with a little time learning how to fly it, can be used to inspect any area of a roof in high detail from the comfort and safety of ground!

Domestic use drone and high quality camera
How Long Do Roof Tiles Last?
Manufactured roof tiles typically have a lifespan of around 20 years, though many can endure for centuries under favourable conditions. Examples include Roman villas with terracotta pantiles and Welsh cottages with slate roofs, which can last between 50 to 150 years depending on type and exposure to the elements.
However, all types of tiles are susceptible to damage from storms, falling trees, or branches, potentially cracking or chipping them. After severe weather, it’s wise to inspect your roof promptly.
Any tile that is cracked or chipped could cause a potential leak, so really needs to be replaced if possible.
The Most Common Types of Roof Damage and How They’re Fixed
As we have touched on above, the most common forms of roof damage are generally caused by storms or through age and wear and tear. Here
Repairing Storm Damage to Roof Tiles
Storms can damage various parts of your roof, including ridge tiles. Older and weathered sections are especially vulnerable when it comes to strong winds and rain.
When mortar becomes loose and damaged it can allow rain water in which in itself can cause damage and also make the issue worse due to freeze/thaw.
Over time this can also cause tiles to come loose as teh mortar no longer holds them firmly in place and when this happens, strong winds can easily dislodge them and blow them off.
To remedy this, if the pointing on ridge tiles is damaged but the mortar is weathered, repointing may suffice.
However, for loose ridge tiles, removing and rebedding them in fresh mortar is really the only solution and provides a more lasting fix.
Repairing Lead Flashing on Chimney Stacks
As roofs age, timbers and trusses may shrink or warp, putting pressure on walls and chimney stacks and potentially dislodging mortar joints.
Cracks in these joints allow rainwater to collect, leading to further damage during freeze/thaw cycles, potentially affecting brick or stone walls if waterlogged.
Lead flashing around chimney bases is particularly susceptible to water ingress from roof movement. Cracks and gaps around the flashing should be repointed as soon as possible.
Repointing involves removing old, damaged mortar and replacing it with new mortar to seal gaps. Learn more about repointing in our repointing project.
Watch our video demonstration on repointing ‘step flashing’ to ensure your chimney remains weatherproof.
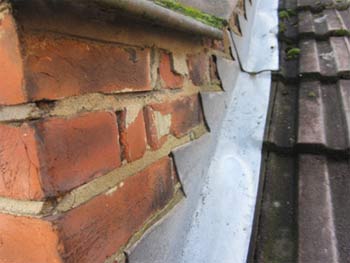
Check lead flashing regularly with binoculars to look for damage or signs of a potential leak
Cracked Chimney Mortar
Aside form the potential of the flashing to fail on a chimney, due to the fact that it’s generally the highest point of a building, it gets exposed to much more of the elements and due to this can take an absolute hammering.
Over time, wind and rain, freeze and thaw can gradually degrade, crack and even blow out chunks of mortar, allowing water and moisture to penetrate down into the structure.
If this is allowed to happen, it can reek havoc to the interior surface, finishes, delicate timbers and the likes.
If you find any form of cracking or failure of your chimney mortar, this needs to be repointed asap.
Due to the nature and placement of a chimney, tis is obviously tricky and dangerous work so if you are in any way unsure, then it’s a job best left to the professionals.
Blocked Gutters
The guttering that borders your roof is absolutely essential to it’s correct operation, channeling water and into the drainage system.
However, if gutters become blocked with leaf debris and the likes they will stop working as they should do and eventually allow water to collect and pool.
Once this happens it can then easily find it’s way into any small cracks or weak spots that were previously unaffected.
The solution here is to get your gutters cleaned! This is a fairly easy task and just involves scooping the debris out and then washing them through. You can easily do this job yourself, however it does involve physically getting up there to do it, so if you are in any way unsure of working at such heights, get the professionals in!
Broken or Missing Tiles
This really goes without saying. If there are cracked, badly chipped or even missing tiles in your roof then they need to be replaced right away.
Cracks, chips and breakages are normally caused by heavy items falling on them or sometimes just age as over time, some tiles can become brittle and crack easily
Missing tiles are generally due to the fact that the nail or clip that was holding them in place has failed and allowed the tile to drop down the roof.
As said, if you identify any such issues, source a replacement tile of the same type and either replace the damaged one or reinstall it if it’s missing.
Poorly Installed/Failed Skylights, Sun Tunnels etc.
If you have an skylight, sun tunnel or other roof window or light installed in your roof, then there is a chance that if the flashing was not installed correctly then it will allow leaks.
Also, over time, some flashing can fail, again causing leaks.
In order to fix, inspect all of the flashing around each of you windows for cracks, splits or other damage. If moss and debris is present, clear all of this away also so that you can see everything in detail.
If you find any damage, get it repaired. If it’s not too bad you can use a flashing patch or some silicone sealant, however if it’s bad then it’s worth replacing the entire flashing unit with a new one.
Leaking Roof Valley
A roof valley can leak if tiles shift or old mortar crumbles. Debris buildup can force rainwater under tiles, soaking roof timbers and potentially leaking through bedroom ceilings as damp or discoloured patches.
During storms, driving rain exacerbates leaks, though gradual accumulation over time can also dampen roof timbers, leading to potential rot and decay. Learn more about timber damage in our timber decay projects section.
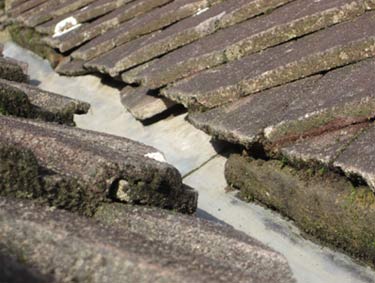
Check roof valleys regularly with binoculars to look for broken tiles or mortar damage
Verge Tiles and Mortar Bedding
Verge tiles are located at the edges of pitched roofs, including gable ends and dormer windows, and are bedded on a layer of sand and cement, often protected by a roof membrane.
These mortar verges are susceptible to frost and water damage. If the sand and cement deteriorates, cracks, or flakes away, the verge tiles may require lifting and rebedding with fresh mortar.
Ensure to follow safety tips when working on a roof.
Explore our DIY Video Guides on our YouTube Channel for more information.
What if there are no Signs of a Cause?
In the event that after close inspection you don’t find any form of damage or cause or leakages then there is a chance that any issues you are experiencing are due to condensation build up in your loft space.
Loft areas are very prone to condensation issues as they are at the very top of the property and when any rising heat hits the cold underside of a roof, it can easily condense.
Once it condenses it can then easily run anywhere down into ceilings or cavities, making it seem like a leak but in fact it’s not.
During colder months, closely inspect your loft area and the underside of any tiles, felt or membrane. If there is condensation present this needs to be fixed and in most cases the fix is simply to add some decent ventilation (ventilation tiles) to allow any humid warm air to escape.
Also, improving your insulation to keep more of the warm air down in the living areas is a good idea as this will prevent it from rising up.
If after inspection, you identify any damage to any part of your roof area, it is essential that this is repaired as soon as possible, as if it’s not, then additional, more significant and costly damage could easily be caused.