Why Does Lead Flashing Need Repairing?
The main reason for repairing lead flahing, splits and cracks in lead and failure in lead flashing is because of its high coefficient of linear expansion. What on earth does that mean I hear you cry ! Simple. Lead expands a huge amount in the heat, shrinks a lot in the cold, and wanders about a bit at all temperatures in between.
If this expansion and contraction are allowed to continue freely, the lead flashing will last for 100 years. Lead flashings however are usually fixed in position for one reason or another and it is this limitation to movement that causes splits and cracks. Lead should also have support for every square mm of its coverage. If the lead is not fully supported it will eventually sag and split.
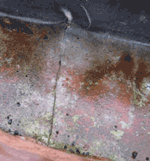
Although the image below is of a lead gutter (not lead flashing) this presents a good example of how lead can split when it sags. If the gutter is not supported correctly at regular intervals by supporting brackets then it will sag and weaken and then split.

Lead gutter full of sludge and debris
How To Repair Lead Flashing
When lead does split the correct way to repair it is to weld a piece of lead over the split. This is quite an advanced procedure which was always historically in the plumbers domain of jobs. Very few plumbers these days know how to weld lead and its very different to welding steel or ali. Welding lead uses a relatively cool flame and needs to be very precise.
Lead gutter full of sludge and debris
A DIY way to repair splits and cracks in lead and lead flashing is to use something we call Flash band (trade name) or sometimes it is also known as flashing tape.
Using Flashing Tape To Repair Lead Flashing
Flashing tape is comprised of a very thin strip of aluminium covered on one side by a tacky bitumen layer. It is self adhesive and can be used with a primer to help the adhesion but for lead repairs it works best when heated up. We must stress that this is not a permanent repair for lead as welding or replacement is the only permanent solution but in this, as in many other cases involving lead, it was cheaper for the customer to repair the lead every two years than it was to replace the lead gutters and flashing surrounding her property.
The gutter you can see above is lead lined. It looks a little orange in places because the wooden shingle roof had been sprayed a week before we arrived to repair the lead.
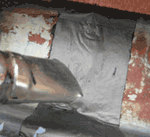
Firstly we traced the leak by looking for dripping below and then we cleaned out the gutter. It is important, both when welding lead or patching lead, that everything is spotlessly clean and degreased. We wiped the split, and either side of the split using paper towels to make sure we soaked up most of the moisture which had filtered through the split and was puddling under the lead.
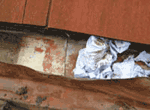
Cleaning the split lead thoroughly
Next, using a hot air gun we heated the area gently for about half an hour. This will warm the lead which in turn will warm the water under the lead which will evaporate out through the split. In all cases you must try to get all the water out from under the lead because, if it is left there and the split sealed, the water can go no where and it will eventually rot the timber it is sitting on.
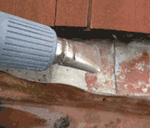
Heat the area to evaporate any remaining trace of water
Tools and materials required for this job are minimal and all can be bought in our tool store. A roll of flashing tape is required, as is a heavy duty hobby knife. A good hot air gun is useful although a standard blowlamp can be used. For the novice DIY enthusiast we would suggest the hot air gun rather than the blowlamp as it is a lot less dangerous. Rags and perhaps a roll of heavy duty kitchen towel are also needed. Gloves are also a good idea!
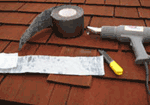
Selection of tools required for lead repair
Once again, we must stress that this is only a temporary repair. If done properly it will last 2 or even 3 years but as the lead continues expanding and contracting with the varying temperatures in this country, it is inevitable that the patch will split also. The tape, of course, is fixed on both sides of the split so cannot expand and contract well. This means that it may not move at the same time and over the same distance as the lead.
Cut a length of flashing tape ready. After heating the area and allowing the water to evaporate the lead should stay warm for a few minutes. This time should be spent warming the bitumen base on the flashing until it is warm and soft but not runny.
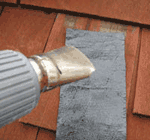
Heat the lead flashing
Quickly warm the lead again and lay the flashing tape over the split. Use a rag (you should also be wearing gloves) to press the flashing tape into place. Warm the top of the tape after a few seconds to keep the bitumen nice and warm. It sticks so much better this way.
Heating top of patch
Finally give a final press down onto the patch using a cloth. Start as you do with wall paper, from the centre, pushing towards the edges to get rid of any air trapped under the patch.

Press down using a rag or towel
Repairing lead flashing and splits and cracks in lead using this method should provide a good temporary fix and from start to finish, even with cleaning out the gutter, took 1½ hours.