How are Flat Roofs Constructed?
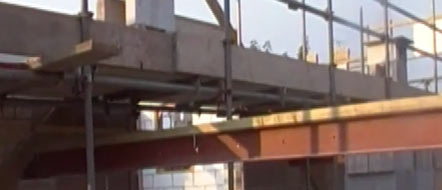
Rolled Steel Joists or RSJ’s are used to support joists in flat roofs
On a basic level, flat roof construction comes in the form of roofing timbers, or joists as they are more commonly known or steels that are laid across two uprights (walls in most cases).
The steels, or RSJ’s (Rolled Steel Joists) are often built into one or both walls to give added stability to the roof structure.
The joists are then either laid on top of the steels or cut into them. These joists are spaced at a specified distance apart, usually 400mm depending on the width or span they are covering and the surface that is to be applied.
In the majority of cases the covering will be plywood or OSB timber which is more commonly called Stirling board.
When timbers are used in flat roofing they obviously need to be waterproofed so boards are normally laid across the joists and then a felt or rubber is used to cover the boards to make them waterproof. Where two boards meet and the joint is not on a joist, tongue and grooved decking boards make the joint strong enough to support the flat roof load.
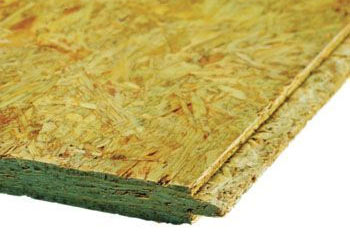
Stirling board with tongue and groove for fitting to flat roof joists
When is a Flat Roof Needed?
Sometimes town planners will not allow the height required for a pitched roof. This is because it may obscure a neighbours view or light. Sometimes a pitched roof is not appropriate for an extension because it would mean obscuring light to the home owners own windows. Usually however, a flat roof is constructed when an extension butts up to an existing building.
To use a pitched roof in these circumstances would mean adding roof valleys or box gutters and make draining the roof difficult and expensive. Using a lean-to flat roof allows water to run easily away from the building into new gutters which can be connected to existing drainage systems or even new soakaways.
Occasionally a new flat roof will be required to replace an old roof, for example asbestos or corrugated tin roofs which are either not allowed under building regulations or are in a complete state of disrepair.
Care should always be taken when removing old asbestos and advice sought from the local council on the correct way to dispose of the asbestos.
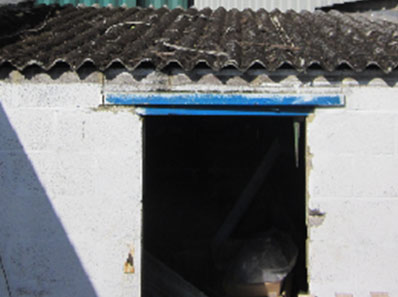
Old asbestos roofs are often replaced with flat roofs
Sizes of Joists Needed for Flat Roof Construction
As you may imagine there is a fair amount of weight involved here, in terms of boards, felt etc…. so any timber joists that are used need to be strong enough to support this weight. To ensure that these timbers are strong enough for the span they have to cover a formula is used to calculate the correct width and height that the joists should be.
Additionally as part of the Building Regulations Approved Document A for structure further calculations are required to take into account additional loads such as snow that some roof may be subjected to. In most cases this depends on the area of the country the property is in and also on the ordinance datum (vertical height) of the property above sea level.
Due to these factors it is very important that before construction begins that you gain building regulations approval.
To aid you with this, there are 8 ″maximum span″ tables in the building regulations, which deal with the loading and span of the roof together with any slight pitch over 10 degrees that it may have to dispose of rainwater.
You can see the joist span table at the following link on the DIY Doctor website where we discuss how to remove a load bearing wall and make sure joists are the correct size to span openings.
These tables and rules are designed to protect your home. A copy of these rules can be obtained by ordering from www.tsoshop.co.uk or telephone 0870 600 5522. Fax orders are taken on 0870 600 5533. The booklet costs around £10.00.
Your calculations will need to be checked by a structural engineer to ensure they cover all eventualities. If, for example, the incorrect size timbers were used and as a result your roof were subject to unnecessary movement, its covering would soon become weaker and is liable to split and possibly leak.
The diagram below is a general one and the specified timbers must be inserted at the correct centres. Timber ″noggins″ must also be inserted between the joists at 600mm centres to avoid twists in the joists. This roof shows the traditional covering of felt, there are more applications these days including fibreglass and rubber.
How to Construct a Flat Roof
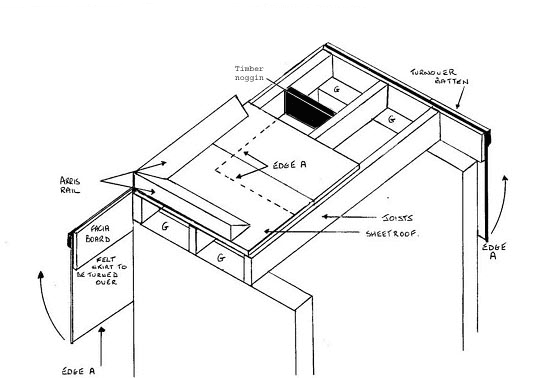
Plan of components of a flat roof used for laying felt covering
Never confuse the word flat, with the word level. Flat roofing should always be flat, but never level…. not in just one direction anyway.
Water must be allowed to flow off flat roofs as puddles of water are very heavy and they soon force a dip into the timber roof decking which then becomes bigger allowing more water to puddle until the roof can bear the weight no longer and leaks occur.
The diagram above gives you a basic idea of the components used in constructing a flat roof, the diagram below goes into greater detail about how all of these component parts work together.
In the above diagram, gap G may be built in with masonry to avoid twist in the timbers. Failing that the joists can be fixed to the wall using joist hangers…. See below for further information
For timber sheet, we recommend 18 or 22mm Stirling board or ply.
The arris rail is purpose made and available from most timber merchants and gives a 2-inch up stand to edges from which the water flows away. This stops water dripping over edges that do not have gutters and spoiling the wall surface on which it would otherwise run down
The felt roofing to the correct building standards can be applied all over the roof in the specified number of layers, and strips of mineral felt are then fixed to the facia boards with the back facing out.
They are then turned over the arris rail and sealed to the top of the covering. This gives a finished edge to the roof and seals the gap between roof and facia board.
Types of Flat Roof Construction – Warm and Cold Flat Roofs
Flat roof construction can come in the form of a warm roof or cold roof depending on the requirement of the owner and architect as they relate to the building regulations regarding heat loss and insulation.
Put simply a warm flat roof has insulation of some kind packed into every available void and a cold flat roof allows air to circulate between the joists. This air is vented at either end of the roof to allow a continuous air flow.
In terms of rules on ventilation, BS 5250: 2011 (Control of Condensation in Buildings) is the document to view. It states that there should be at least a 50mm gap between the underside of the roof decking and the insulation below it.
The design of the roof, either warm or cold, must be precise. If a warm roof is not fully packed with insulation, yet a constant air flow is not achieved, condensation will form in any unvented void. Condensation forms as warm air (in insulated voids) hits cooler surfaces (underside of roof decking) and can rot the roof from the inside out.
You will need to look at Approved Document C and also Approved Document F of the building regulations (for Scotland see Section 3 in the Technical Handbook) as these documents will help you calculate the amount of ventilation that will be required for your particular project.
This type of condensation is called interstitial condensation. This warm vs cold roof situation also occurs in pitched roofs and it is vital, in simplistic terms that either no air is allowed into voids or a constant air flow is achieved.
Cold Roof Construction
Having laid out the rules in simplistic terms above, the most common type of flat roof these days is one which combines a warm insulating layer, with an air flow to protect the joists from rot, more commonly known as a cold flat roof (see diagram below).
This is a very simplistic diagram designed to show the user the principles of the cold flat roof.
If you are designing or building a flat roof at home you need to do a little more research to show you how and where to incorporate a vapour barrier into your roof and whether or not you need (in the case of an externally insulated roof) to add a further layer of roof decking timber to the top of the insulation.
As mentioned above, you will also need to ensure that you have an adequate amount of air change or ventilation to ensure that no condensation is allowed to build.
It is impossible in a generic flat roof project such as this to "cover all bases" so please ensure you investigate your own project thoroughly.
One point to note with cold flat roofs is the they are not a recommended solution in areas of high humidity and due to this are not generally recommended by Scottish Building regulations.
It can be seen that warm air (without a vapour barrier) can rise up through the plasterboard (or material used on the ceiling) into the void.
Any insulation present in the roof void will further warm this air which will rise until it hits the cold underside of the flat roof decking.
It will then condense and water droplets can fallback onto the insulation and even soak through to the plasterboard ceiling. Do not underestimate the dangers of condensation.
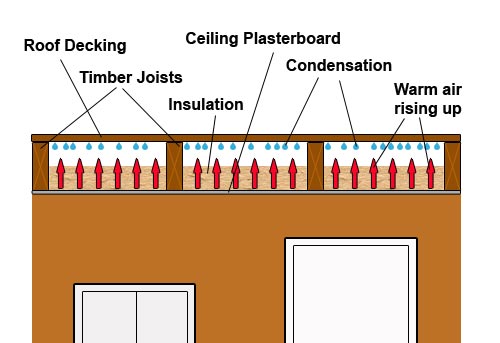
Cross section of cold flat roof with air flow and showing condensation can occur
Warm Roof Construction
There are effectively 2 different formats for a warm flat roof construction – one where any void is fully packed with insulation leaving no air gaps at all to avoid any chance of condensation buildup and the other where there is an air gap below the insulation.
In this latter case, warm air rising from below will travel up through any voids as you would expect, but because the roof deck itself is insulated it will be warm and not cold and therefore, any rising warm air won’t condense. The air, however, will still need to be ventilated!
By fully packing a warm flat roof with insulation there can be no air to condense. However this type of warm roof relies on there being absolutely no voids whatsoever, otherwise interstitial condensation will occur and this can go unnoticed for many years.
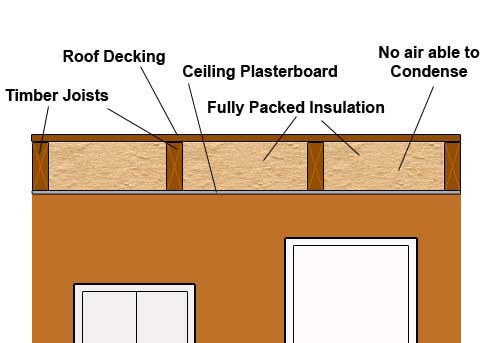
Warm flat roof fully packed with insulation to prevent any condensation build up
Where insulation above the roof void allows the air underneath to stay warm, avoiding condensation, but also allows for an air flow (should one be deemed to be required) through the joists.
As long as the air flow is small (but constant) the air will not get cold enough to condense and the heat will remain in the room below.
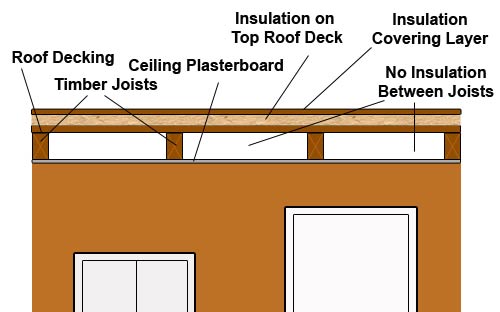
Warm flat roof with insulation above air gap and just under roof deck
When it comes to the insulation itself, you can use the standard mineral wool/ mineral rock-type insulation or the compressed board-type insulation e.g. Celotex, Kingspan etc.
Flat Roofs Built for a "Lean-To" Extension
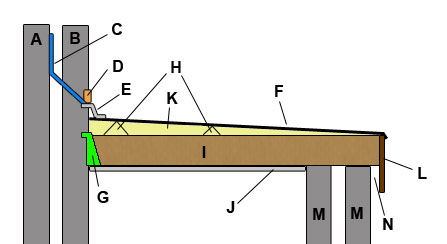
Section through elevation of lean-to flat roof
- A – Internal house wall
- B – External house wall which, when the lean to extension is added, becomes an internal wall below the level of the extension roof. This necessitates the retrospective insertion of C, the cavity tray in the case of an added extension
- C – A cavity tray must be inserted in all cavities where an external wall becomes an internal wall in any circumstances. This applies to new build properties as well as buildings with single floor extensions added to them. This is because all external skins (B) leak to some degree. The water gets into the cavity and drops down to ground level where it drains away through the bottom of the same wall it entered by…This is one of the reasons for having a cavity wall. However, when a room is placed on the external side of the wall, allowing this water to drain into this room would be madness. The insertion of a cavity tray ensures that the water can only drop as far as the roof of the adjoining building where it is forced to drain through the brickwork, via a weephole (D). From there it simply runs down the roof
- D – Weephole through external brickwork. The reason for this weephole is given above. Many times the weephole will just be a perpendicular joint which has been left mortar free, but more often there will be a plastic weephole inserted into this joint . The plastic weephole vents are gridded to stop insects making nests in the cavity
- E – Lead Flashing – To cover and seal the joint between the flat roof and the wall of the existing property. Lead is used because it is very flexible while very strong. The lead is tucked into a horizontal joint of the existing property masonry, retained by banging in lead wedges or clips and sealed by either repointing the groove (or chase) with cement mortar, or sealant. The lead is then "dressed" down onto the roof where it takes the shape of the roof tiles, slates or decking
- F – The Flat Roof Covering:
- This flat roof covering can be roofing felt (usually 3-layers) with a mineral chipping topping to soak up the heat of the sun which protects the felt from both melting and breakdown under UV rays
- The flat roof covering can also be EPDM. This (Ethylene Propylene Diene Monomer) rubber covering is very versatile, long lasting and very strong. EPDM, or rubber roofing, can be bought in DIY kits which include all trims and adhesives to get a neat waterproof job without any previous training other than maybe a YouTube video. More about this at the base of this project
- The flat roof covering can also be fibreglass. Fibreglass flat roofing, also known as GRP roofing or Glassfibre Reinforced Plastic roofing. The fibreglass is made from a mixed resin and hardener which is "painted" onto a mesh mat which then hardens to form a fully waterproof surface. It is light, easy to lay and, because it is almost entirely liquid in it’s original form, is easy to get into otherwise inaccessible corners to ensure waterproof surfaces
- G – Joist hangers – These hangers are inserted into, or on top of, masonry or stud walls to carry the end of the joists. They are made from galvanised (non-rusting) steel and come in a variety of shapes and sizes. Their use allows speed and saves money from the old method of having to build each joist into the wall
- H – Firring (or furrung) piece – Firring or Furring pieces, refer to a method of raising or making flat, uneven surfaces or levels which need to be adjusted in some way. It is thought the UK spelling of firring is a derivation of the 16th century word furring which means to trim out… Whatever its origins, a firring piece is a piece of timber shaped or cut to give you the types of surface profile you require. In the case of a "firred out" flat roof, these are timbers cut to a triangular shape and fixed to the top of the roof joists. This gives the required slope to allow rainwater to run off without puddling on the surface
- I – The roof rafters or ceiling joists, they do both jobs! Joists must be strong enough to take the weight of the immediate covering, i.e. timber, insulation, felt etc,plus allowances must be made for snow covering in winter. Roofing timbers in Norway for example are much larger than those used in England
- J – Plasterboard – This is a universally accepted ceiling and wall covering which has many forms. Plasterboard is pretty fire resistant, is easily cut, can come in moisture resistant, sound resistant, vapour resistant forms and is easy to secure to the surface. It allows decoration of all kinds and can be plastered
- K – Refers to the void (or otherwise – see above) between the joists. This void can be a warm void or a cold void depending on the insulation requirements of the home but whatever is decided it must be kept moisture free to avoid rotting the roof timbers
- L – The Facia Board – A facia board is essentially a cover strip to present a neat facade. This covering though has a number of uses. It holds the rainwater gutters to take the surface water away from the roof. It covers any gaps between the roof and the house walls, on tiled roofs it provides a "tilt" to the first row of tiles so that they do not droop down onto the property walls thereby splitting the roofing felt and finally it hides the gap N between the facia and the extension wall which is left to allow the passage of air into and out of the roof void between the joists
- M – External wall to the lean-to extension. This can (and most often is) a cavity wall but can also be a single support wall
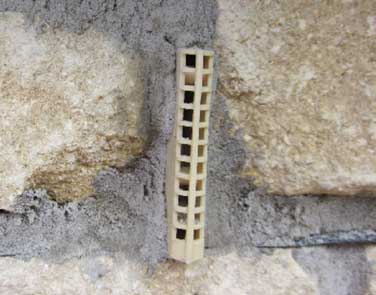
Weepholes allow water to drain from a masonry cavity
How Moss can Affect a Flat Roof
Problem: Without an adequate fall on your flat roof, water can accumulate in puddles laying on the surface of the roof.
Seeds and spores can drop into this fertile environment and in no time at all, the flat roof is covered in moss and even weeds. The moss in particular holds on to the water every time it rains and when wet doubles the weight on your roof.
This weight leads to sagging of joists which in turn leads to splitting of the roof covering.
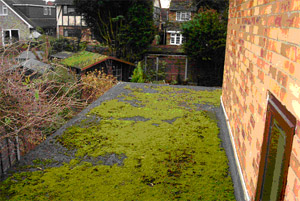
A moss covered flat roof can lead to sagging joists and leaking roofs
Solution: Add firring pieces to the roof to increase the fall and keep the roof free of moss.
Fibreglass and rubber flat roofs are far less likely to attract the same amount of moss and weeds that felt will especially if some effort is made to keep them free from grime.
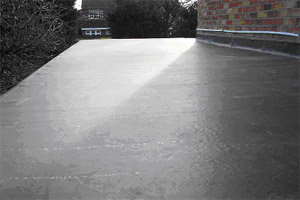
A modern EPDM rubber or fibreglass roof with firring pieces can prevent water buildup and moss growth
DIY Doctor’s Flat Roofing Advice and Recommendation
In the case of a felt or fibreglass covered roof, we very strongly advise the installation of this by a professional. You will get a guarantee, usually 10 years and that is worth its weight in gold.
If you are felting a flat roof and you do get a leak having done the job yourself, 99% of the time a patch will not work because the water will have seeped under the felt already, causing soft spots to your sheet covering and ultimately rot.
In this case and depending on the severity of the damp the damaged area will need repairing and in severe cases the entire roof may need replacing. Even the repair to a small area can be costly!
Rubber Flat Roofing – DIY EPDM Kits
If you are reasonable at DIY there are EPDM rubber roof DIY kits available. Pretty much all teh kits available regardless of manufacturer will include everything you need – the membrane itself, trims, glues, fixings and the all important installation guide.
One thing to be aware of though is that in most cases you will be replacing an existing roof and in most cases this will be a felt roof. Depending on the age and manufacturer of your existing roof and roof felt and the type of adhesive that has been used to fix it down, the glue that is used can be detrimental to the glue that is used to fix the EPDM rubber down and can cause it to fail.
In respect to this you will either have to remove the whole roof and board it out from scratch using only the existing roof joists or you can board over the top the existing roof. For this use 18mm sterling board. It is also advisable to remove the existing felt or covering to minimise the risk of future damage as much as possible.
In all cases it is ultimately better to completely strip the roof and start from scratch.
When it comes to DIY kits there are quite a few EPDM rubber roof suppliers in the market at present.
When considering which kit to purchase make sure you do your homework and confirm that the kit will include all the necessary items you will need including full fitting instructions.
Most companies will require you to supply them with the dimensions of your roof and they will supply the correct amount of rubber membrane to cover that area.
If possible (this will depend on the size of the area that needs covering) ensure that the covering is a single piece of rubber and that it is not supplied in cut sections that you then have to join together. Although this is fine (as long as the joints are sealed correctly) best practice is to use a single piece as the more joints there are the more chance there is of a leak developing in time.

