Whether you are a novice or a professional, attempting to remove and replace a wall or floor tile with a new one is a tricky job, especially avoiding damaging any surrounding tiles. Even the experienced tradesman will not succeed on every occasion!
With this in mind, this guide will show you how to remove both wall and floor tiles and replace them with a new one.
Why do Tiles Need Replacing?
There are numerous reasons why you may need to remove and replace a tile in your home and replace it with a new one. Although not an easy job, sometimes it’s a necessary one. Here follows some of the most common reasons:
- Cracked or Damaged Tiles: One of the most obvious reasons tiles need replacing is when they become cracked or damaged due to heavy impact or water and tear over time.
- Stains and Discolouration: Tiles that become stained or discoloured can detract from their overall appearance. Whether it’s due to spills, age, or the wear of time, incorrect cleaning products, discolouration can make your once-beautiful tiles look old and worn.
- Outdated Style: Another reason why tiles might need replacing is simply due to outdated style. Home trends change over time, and what was once fashionable may no longer suit your tastes or the overall look of your home.
- Poor Installation or Low-Quality Tiles: If your tiles were poorly installed or if low-quality tiles were used, you might find that they wear down much faster than expected and then one or more need replacing.
- Tile Movement or Lifting: Tile movement, or lifting, can occur when the adhesive underneath the tiles breaks down or when moisture gets beneath them. This is particularly common in areas with high humidity, such as bathrooms or kitchens.
Sourcing Replacement Tiles
Tiles come in many materials, colours, patterns, and sizes. Over time, some tiles may crack, chip, or become outdated, but finding an exact match for your current tiles can be tricky.
Sourcing the right replacement tile ensures your repairs blend seamlessly into your space, maintaining both the aesthetic appeal and functionality of your surfaces.
Whether you’re fixing bathroom tiles, kitchen splash-backs, or floor tiles, matching the right tile is key for a professional and consistent finish.
In order to source your new replacement tiles, pay attention to the following points:
- Identify the Tile Type You Need: identify the type of tile e.g. ceramic, porcelain, stone etc.
- Check Tile Dimensions: Measure a current tile you have on the wall/floor and ensure you know the exact size
- Search for Replacement Tiles Online and Locally: check online and go to any local DIY stores and identify your chosen tile. Ensure it’s the correct size
- Check the Batch Number and Colour Matching: When buying replacements, make sure they come from the same batch number to guarantee colour and pattern consistency. If the batch number isn’t available, you may want to request a sample before committing to the full order
- Order Extra Tiles: Once you have sourced your replacement tiles, ensure that purchase extras on top of the ones you need. These will always come in handy, especially in situations like this!
Safety First When Replacing Tiles
When replacing tiles, as it involves hammer, drilling and chipping away at the tiles, always wear safety glasses or goggles to protect your eyes from sharp tile shards. A small piece of tile can cause significant eye pain and irritation if it jumps out and gets in your eye.
Sturdy gloves are also essential to protect your hands as broken tiles can have extremely sharp edges.
Whether you’re working with wall or floor tiles, the goal is to break through the glazed surface by hammering or drilling and remove the underlying material, such as ceramic, porcelain, or stone.
Be careful to avoid damaging surrounding tiles by separating the damaged one carefully.
Tools and Products Needed for Replacing a Tile
When removing a wall or floor tile, aside from some luck, you will also need the following tools and products:-
- A utility knife, preferably one with a fixed blade and several spare blades
- A grout rake/grout removal tool or diamond dust wheel for drill/angle grinder
- Hammer
- Small cold chisel
- Power drill/driver
- Selection of tile drill bits
- Sponge and bucket with water for softening the grout and cleaning the area
- Masking tape
- Grouting sponge
- Stiff scraper, such as a wallpaper stripping tool
- A dustpan and brush for cleaning up
- dust sheet or old sheets
- Replacement tile(s)
- Tile adhesive and matching grout
- Tile spacers of the correct size

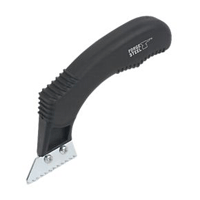
Tile grout removing blade or Grout Rake
We’ve now gotten to the part of this guide where it’s time to start doing some work and actually start replacing some tiles. Read on to find out how.
Step 1: Prepare Area
he very first job to do before anything else is to first prepare the area you’re going to be working in. Start by removing any movable objects from around where you will be working and then using dust sheets and the similar, lay these out around the tile you’ll be working on. Tape them down if possible.
If you’re working on removing a wall tile, lay plenty down on the floor, especially if it’s a tiled floor, Large chunks of tile falling from height can easily crack floor tiles, leading to more work!
Step 2: Removing the Old Tiles
The first job here is to now put on your PPE gear, especially googles and gloves. This is a must!
The first step in replacing wall tiles is to remove the old ones. Start by scoring the grout lines around the tiles with a grout rake. This will help you break the adhesive bond and prevent damage to neighbouring tiles.
If you’re working on floor tiles, this stage can be quite tricky, depending on what grout or adhesive has been used, as most floor tiles use cement-based versions of these meaning they’re very hard.
Using the rake, rake out as much grout as you can and clear the joint as fully as possible.
Next, pop a 6 or 8mm tile drill bit (you can use masonry bits if you don’t have tile bits) and drill a few holes in the centre of the tile. This will start to weaken it and allow you to work a chisel in and start breaking it up.
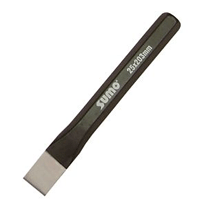
Now, using the hammer and chisel, gently start tapping down on and around the holes you previously made and steadily start breaking up the tile.
Be careful not to apply too much force, especially if you are working on a wall tile and you can damage the wall behind it. However, if a floor tile, the solid surface behind it will help to break it up.
Continue this process for each tile, working in small sections at a time.

Sumo cold chisel
Step 3: Preparing the Wall or Floor
Once the old tiles are removed from the wall or floor, inspect the area for any damage and use a decent quality filler to fill any large holes or depressions if present.
The next job is to then scrape off and remove any remaining hardened tile adhesive from the wall or floor. Use a scraper or bolster chisel to remove any stubborn adhesive residue, ensuring the wall or floor is smooth and clean and ready for any new tiles.
Before moving on any further, allow any filler, plaster etc. to completely cure before moving on to the next step.
Step 4: Applying Tile Adhesive
Once everything has been fully prepared, the next job now is to now get the new tile in place on the wall or floor.
Once it is, apply a thin layer of tile adhesive to the wall or floor and then, using a notched trowel, run it over the adhesive to create the desired furrowed lines to allow some wiggle room for the tile and also create a strong, solid bond.
Step 5: Installing the New Tiles
Next, with the adhesive in place, it’s time to start placing your new tiles on the wall. Pop any tiles in place and apply gentle pressure whilst wiggling it slightly until it’s level and evenly positioned with the surrounding tiles. Finally, slip in some spacers on their edge around the tile to position it perfectly while the adhesive dries.
If you need to cut tiles to fit around corners or edges, use a tile cutter or wet saw. Be sure to measure carefully before cutting to avoid mistakes.
Step 6: Grouting the Tiles
After the adhesive has fully cured (allow at least 24 hours), it’s time to grout the tiles. Mix your grout according to the manufacturer’s instructions or if using pre-mixed it should be ready to go, then use a rubber grout float or even better a sponge, to scoop out and spread the grout into the gaps between the tiles.
Push the grout into the gaps making sure they are fully filled, then wipe off the excess with a damp sponge. Be sure to clean off any grout haze from the surface of the tiles before it hardens.
Step 7: Finishing Touches
Once the grout has set, apply any silicone sealant around the edges of the tiles that’s needed, especially in areas like corners and around sinks, showers, basins or baths. This helps prevent water from seeping behind the tiles and causing damage over time.
Finally, allow the grout to fully cure for 48–72 hours before using the space. Once complete, you newly replaced floor or wall tile job is done!
Removing and replacing a tile, whether it’s a floor tile or wall tile can be a tricky job and can quickly go wrong if not done correctly, however if you take your time and follow the instruction carefully above, it’s one that can be completed successfully by anyone.
If you would like to find out more about more substantial tiling jobs, check out our other tiling projects below: how to lay floor tiles and also our project onceramic wall and floor tiling.

