Drilling and fixing into tiles in both kitchens and bathrooms is a necessary job in almost every home, with cupboards that need hanging, toilet roll holders that need fixing and the likes.
This has always been a tricky job due to how tough tiles can be, especially porcelain tiles, so in this guide we take a look at how to drill into tiles using diamond-tipped drill bits.
Porcelain vs. Ceramic Tiles: Key Differences
Bathroom and kitchen tiles serve as attractive, waterproof surfaces for walls and floors. There are two main types: ceramic and porcelain tiles. Both are made from clay and hardened by heat, but their properties differ significantly.
Ceramic tiles: are typically lighter, thinner, and more affordable. They are often glazed and easier to cut, making them suitable for most areas with moderate foot traffic or use. However, their surface can be porous if unglazed, absorbing water when exposed to it.
Porcelain tiles: are made from a finer, denser clay mix that includes minerals like iron and magnesium. Fired at much higher temperatures (up to 1400°C), these tiles are thicker, less porous, and more durable, making them ideal for high-traffic and wet areas like bathrooms and kitchens. Despite this, they are tougher to cut and require a diamond-tipped drill bit for drilling.
In summary, porcelain tiles are more durable and water-resistant, while ceramic tiles are lighter and easier to work with. Both have their place in the home, and which you go for will ultimately depend on your needs.
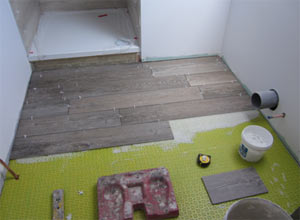
Porcelain tiles pressed to a wood grain effect being used on a bathroom floor
What’s the Problem With Drilling Tiles?
Drilling into tiles can seem like a straightforward task, but it comes with a number of challenges that can make the process tricky. Whether you’re hanging shelves, installing a towel rack, or simply wanting to insert a screw, the hard, slippery surface can cause a range of issues.
Learning how to get around these problems is the key to getting a successful outcome:
Tile Material Hardness: is one of the main challenges when drilling. Tiles, particularly porcelain and ceramic tiles, are made from dense materials, with tough ceramic coatings that are designed to withstand moisture and wear, but on the flip side make them hard to drill and cut.
Slippery Surfaces: Tiles have a smooth and glossy glazed finish. This surface makes it difficult for the drill bit to get a good grip, leading to slippage and damage to the tiles surface. To avoid this, create a small pilot hole or use masking tape over the drilling point.
Heat Buildup: The friction between the drill bit and tile surface, when drilling, can cause excessive heat, which can lead to cracking or discolouration of the tile. To prevent this, use a steady, controlled drilling and apply water periodically to cool both the tile and the drill bit.
Use the Right Tools: One of the biggest issues is using the wrong type of drill bit. Standard drill bits aren’t designed for tiles, and using them can cause a great deal of damage. Tile-specific drill bits, such as carbide-tipped or diamond-coated bits, are designed to handle the hardness of materials, including tiles, so these are teh only bits that should be used.
Drilling Into Porcelain Tiles
As we have mentioned, porcelain tiles are much harder than other ceramic tiles and due to this should only ever be drilled using suitable equipment such as a diamond tip drill bit or a diamond core drill bit.
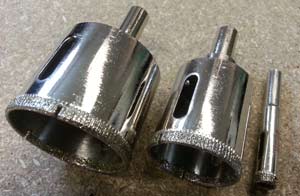
Diamond drill bits with no arbour or pilot drill for drilling through porcelain tiles and ceramic tiles
One of the best types of drill bit to use today is the modern diamond-tipped drill bit (as can be seen above). These bits simply fit into the chuck on any modern drill and can be used right away.
The only tricky bit is starting it and keeping it in the right place as it rotates and cuts into the tile, however, this can be overcome using various cutting guides that are available (more on this below).
The more traditional type of diamond bit (as seen below) is still a great solution and with the arbour and drill bit, is certainly easier to get started, but unfortunately doesn’t cut quite as well as its diamond counterpart above.

Old tile drills usually have a core drill bit and arbour to centre a hole through a ceramic tile
Using a Guide Plate Instead of a Pilot Hole When Drilling Into Tiles
When drilling into porcelain tiles, using core drill bits with a centre drill can make it difficult to work near the edges or enlarge existing holes. As we have also mentioned, starting the drill off without it slipping and sliding all over the place can also be tricky. This is where a guide plate comes in handy.
By replacing the centre pilot drill or guide with a guide plate, you can drill closer to the tile edge and even overlap holes. The guide plate features non-slip pads that hold it securely in place on the tile, preventing the drill bit from slipping, while you drill your hole.
Simply position the drill bit in the provided hole, and you can easily drill through the tile without the need for a pilot hole.

Using a guide plate to centre a hole through a porcelain tile
Tile Drill Bit Sizes for Porcelain and Bathroom Tiles
When drilling porcelain tiles in your bathroom, it’s essential to have a range of drill bit sizes for different tasks, such as installing toilet cisterns, towel rails, or pipework. Here are the key tile drill bit sizes you’ll need:
- 6mm (x2) – for red wallplugs
- 8mm (x2) – for brown wallplugs
- 16mm – for 8mm to 15mm copper pipes
- 30mm – for 22mm copper pipes and tap connectors
- 40mm – for plastic drainage and large holes (can be overlapped)
These drill bits, including both traditional and diamond-tipped versions, are available at most DIY stores. They can be bought individually or in sets.
Remember, diamond-tipped drill bits are versatile and can also be used on ceramic, marble, Travertine, slate, limestone, and granite tiles.
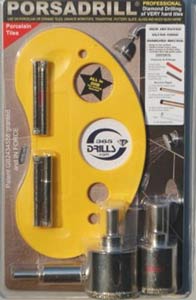
Porsadrill bathroom drilling kit
Cooling Down Diamond Drills When Drilling Porcelain Tiles
As we have touched on above, to prevent any damage to the tile while drilling, it’s essential that both the tile and drill bit are kept cool and to do so, ensure that you regularly add some water around the drilling area.
Also, using a water-soaked sponge and dripping the drill bit into this can have the same effect.
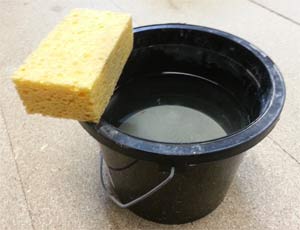
A dripping sponge cools down the diamond tipped drill to allow more effective grinding
Tools and Products Needed for Drilling Using Diamond Tile Drills
In order to successfully drill a hole in a tile using a diamond-tipped drill bit, you will need the following tools and products:
- Tile(s) for drilling
- Suitable drill/driver
- Selection of suitable diamond tile drill bits
- Diamond drill guide plate
- Tape measure
- Solid, stable surface to drill on (if not drilling on wall)
- Fresh water
- Sponge or old rag
- Dust sheets/covers for covering/protecting floor, surroundings etc.
- Dust pan and brush
- Suitable PPE gear – gloves, goggles, old clothes etc.
- Masking tape
- Pen/marker for marking tile
How to Drill Tiles Using a Diamond Tile Drill Bit
Now that we have looked at exactly what diamond tile drill bits are and how they make drilling tiles, especially porcelain tiles and much simpler job, it’s time to look at exactly how to use one to drill a hole.
- Step 1: Mark the Spot – Use a pencil or marker that will mark tiles, firstly measure and then clearly mark the exact spot where you want to drill. This ensures accuracy and prevents you from making mistakes during the drilling process.
- Step 2: Apply Masking Tape/Drill Guide – If you are using a standard tile drill, place a piece of masking tape over the marked spot or fit your drilling guide over (if using diamond drill bit), ensuing the mark is at its centre. This will help prevent the drill bit from slipping off the tile’s smooth surface and keep the hole aligned correctly.
- Step 3: Set Your Drill Speed – Set your drill to a low speed. Drilling too fast can cause the tile to crack or chip. A slower speed will give you more control and reduce the risk of damage.
- Step 4: Start Drilling Slowly – Position the drill bit over the marked spot and start drilling at a slow speed. Apply gentle pressure, and let the drill bit do the work. Avoid pressing too hard, as this can crack the tile. If using a diamond drill bit it’s often best to angle the bit slightly and start and start it cutting on one edge
- Step 5: Use Water to Cool the Bit – As you drill, the friction can create heat, which can damage the tile and also the drill bit. Periodically spray water onto the tile to keep the bit cool and prevent overheating. This also helps reduce dust and debris. Rolling the bit on a wet sponge can also help to cool it
- Step 6: Increase Speed Gradually – Once the drill bit has started to make a small indentation, you can increase the speed slightly. However, continue to use light pressure to maintain control over the process and avoid any damage.
- Step 7: Drill Until You Reach the Desired Depth: – Continue drilling until you reach the desired depth for the hole. Take breaks if needed to prevent overheating.
- Step 8: Finishing Up: – Once the hole is drilled, carefully remove the masking tape and/or drilling guide. You may want to smooth any rough edges of the hole using a fine file or sandpaper, especially if you’re installing fittings or screws that need a clean, smooth edge.
- Step 9: Clean Up: – After you’re done, clean the tile surface and the drill bit to remove any debris and dust. Also, sweep or vacuum up any dust on the floor. Take care as you do any cleaning, microscopic tile filings can be razor sharp and easy cause injury!
Holes drilled in tiles for hot and cold water service pipes in bathroom
Drilling into and through tiles, especially porcelain tiles can be a very tricky job and if not done correctly can easily lead to damage of both tools and tiles, so to avoid any such issues always use the right tools and in this case, a diamond tipped tile drill bit.