Cleaning and restoring quarry tiles can be a very difficult job for which there are many proprietary products available.
This project concentrates on the many floors from earlier periods which have simply been covered in bitumen and overlaid with vinyl tiles or lino.
Remove the old Vinyl Lino or Tiles from Quarry Tile Floors
Once you have removed the existing covering and discovered the thick black, sometimes gooey mess underneath it looks like a daunting prospect but our advice to you is to take it a little at a time and as soon as you have seen a couple of square feet of beautifully clean quarry tiles gleaming up through the greasy mess it will give you the impetus to push on.
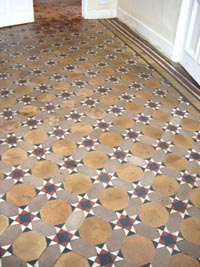
Traditional quarry tile floor covered with lino
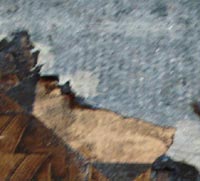
Traditional quarry tile floor with all lino removed
Gloves are vital for this job and a mask is a very good idea. The bitumen can be scraped up cold using one of the scraper types shown but we usually use a hot air gun to melt the bitumen slightly. This is because when the bitumen is warm it does not require very forceful scraping and causes less damage to the tiles. If the bitumen is hard the tendency is to bash the scraper into it and this can scratch the quarry tiles.rubber
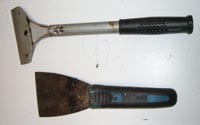
Selection of scrapers for removing vinyl lino or tiles
Removing Bitumen from Quarry Tiles
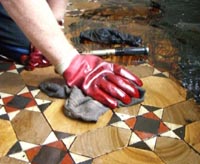
Holding the heat gun above the surface watch for signs (a slight bubble or wave appearance) that the bitumen is starting to melt. Scrape up the section quickly and wipe the scraper blade on the edge of a bucket. Continue with this for an area of about 1 square metre.
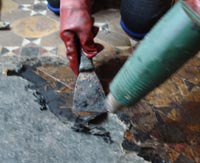
Gentley heat and scrape the lino and bitumen from the floor
Tip some white spirit onto the scraped area and scrub with a nail brush and a cloth. A green scouring pad can be used but these clog up very quickly. There will probably still be a few lumps of bitumen as you wipe over. These can be removed gently with the sharper of the scrapers.
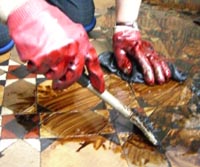
Rub with white spirit and scrub with a toothbrush
Wipe hard. You will go through a great many cloths ! Keep adding white spirit if necessary.
Please Note: If you believe your floor to be valuable and do not want to risk the above method of cleaning which, it must be said, can sometimes destabilise the original adhesive the quarry tiles were fixed down with, then consult an expert before you begin. If you are concerned that the cleaning method may damage your tiles in any way, either try it out in a small inconspicuous area first, or consult an expert.
See our related projects, right, for more information about cleaning, restoring and sealing stone floors.
Rub with a cloth to remove residue