Tufting is a commonly used technique in upholstery and furniture making and involves often using tufting buttons or blind finishes to create a padded finish. In this guide we show you the different styles of tufting and how tufting is used in upholstery.
What is Upholstery?
Upholstery is a method used in furniture making that mainly applies to domestic seating or bedding, and is also used in automotive vehicles, locomotives, aircrafts, and marine vessels.
A person who works with upholstery is called an upholsterer. An upholsterer will take a piece of furniture or seating, such as a chair, a sofa, or ottoman, and layer together springs, padding, webbing, and fabric or leather coverings to create an upholstered piece.
There are plenty of different varieties of soft furnishings that can be and are upholstered, the most obvious being chairs and sofas, but others such as stools, ottomans, headboards, car and other vehicle seating are amongst them.
Different sorts of furniture require different sort of materials, for instance; an upholstered headboard would not require springs or webbing, but a chair or sofa would.
With plenty of practice and the right tools and materials, upholstery can be a relatively easy trade to learn, and it is definitely a skill that pays off, particularly if you are a DIYer.
Upholstery, as with most things, has come a long, long way since it was first used.
Modern upholstery focuses on aesthetics just as much as comfort and new, more durable materials have been designed to replace some of the previously used materials that no longer keep up with the standards of modern upholstery.
What Materials Were Traditionally used for Upholstery?
The materials used in traditional upholstery were usually made from natural fibres which overtime could degrade and break up meaning that the furniture would have to be repaired and re-upholstered more often than any modern upholstered furniture.
Many of the materials used in traditional upholstery are either no longer used, or have been modified to fit the new modern style of upholstery:
What Different Types of Springs are used?
A coil spring is a spiral-shaped wire object resembling a spring.
Coil springs have mostly been replaced with serpentine springs or zig-zag springs, which lay horizontally rather than vertically.
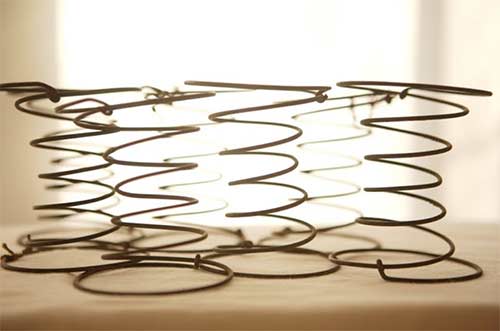
Traditional coil springs as used in chairs, sofas and other items
Previously, as the padding started to deteriorate and lose its effect, the coil springs could be felt, and as the fabric became worn the springs had a habit of poking out over the top or out the bottom.
This was obviously very uncomfortable, but also very dangerous.
The new serpentine springs lay across the furniture parallel to the floor so even if they do become worn or slip out of place, they aren’t likely to hurt anyone.
These springs are mainly used with seating and chairs as they offer support and buoyancy for the padding used.
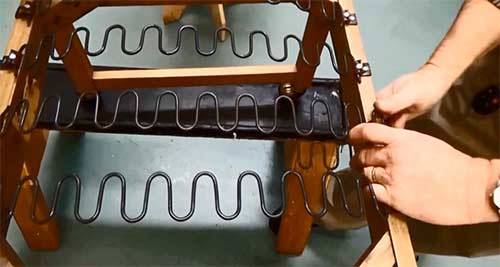
New s-type serpentine spring
The springs run from front to back and are fastened securely with a strong clip which is either nailed or screwed to the frame of the chair at each end.
It is very important to not only fix these to the chair correctly but also to use the right length and strength for the chair.
Too little and the spring may break or snap resulting in the cushion sagging, but too much will result in the same outcome.
Traditionally, What Type of Padding was used in Upholstery?
The padding for upholstery was previously made from natural fibres such as animal hair or dried plant life. These have their obvious downsides as they are biological and so are prone to decomposing. Some of these are as follows:
- Animal Hair: such as horse, hog, and cow
- Coir: a natural fibre extracted from the husk of the coconut
- Straw or Hay: stalks and plants dried for either animal bedding or feed
Hay, in particular as I’m sure we can all agree, is a terrible material for upholstery due to its moist nature and its susceptibility to growing mould and even bursting into flames.
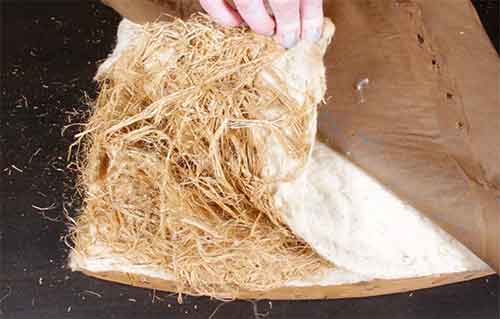
dried plant life used as padding in traditional upholstery – Image courtesy of Pinterest
The padding for upholstery nowadays is made using high-density foam which can come in different weights and thicknesses depending on what type of furniture you are upholstering and how much “give” you want in your furniture.
There are a few different kinds of foam that could be used in upholstery, the most obvious one being upholster’s foam, which was designed specifically for upholstery.
However professional upholstery foam can be rather expensive, so if you have decided to do some upholstery of your own then buying other sources of foam would be your best bet.
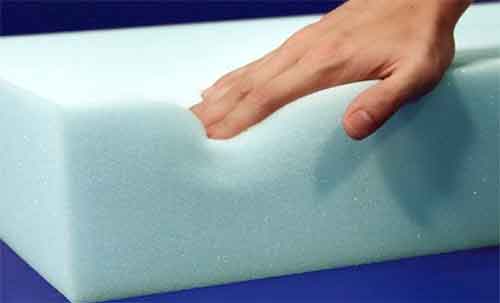
Top of the range upholstery foam
A good source to start would be mattress toppers or egg crate foam. These will most probably be thinner than what you need, especially if you’re going for plushness, but a couple of layers of these should do the trick.
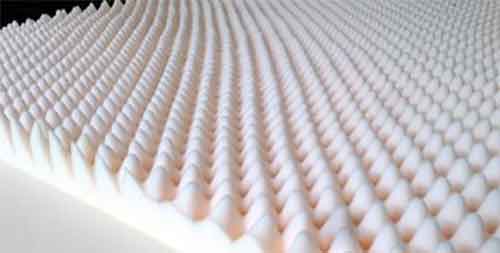
Slightly cheaper egg crate foam
On top of being super comfortable and more durable than traditional padding, foam with its sponge-like tendencies has its own buoyancy and “cushion” which almost completely eradicates the need for springs.
Nowadays the springs are used for support rather than for “springiness”. In traditional upholstery, without the use of the coil springs, the padding would quickly become flattened and no longer offer any comfort or cushioning.
What is Cotton Wadding or Batting used for?
Wadding, also known as batting, is still used in modern upholstery and has gone relatively unchanged.
Most wadding is made from cotton, but you can also get synthetic batting (which can be better for those who have certain allergies).

Wadding (or batting) used to encase and round-out padding used in upholstery – Image courtesy of Pinterest
Wadding was used as a way to plush-out and encase the padding.
Nowadays it is used mainly to provide an extra layer of lining over the foam and to help to round out the edges of the foam for a softer finish.
If you wanted even more roundness you can trim the edges of the foam to the desired angle before laying over the batting.
How Burlap (Hessian) and Line Scrims are used?
As mentioned above, in traditional upholstery the padding was made from animal hair or straw and as such over time would become dislodged and break apart.
This often caused the loose hairs to fall through the springs and wadding and end up on the floor beneath the chair or stool.
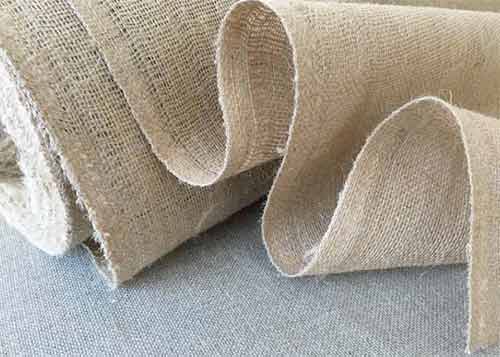
Burlap used to keep padding from coming loose and falling through, replaced by a modern dust cover – Image courtesy of Pinterest
To prevent this, upholsterers used fabrics made of burlap or linen to cover up the open area underneath. This was known as a dust cover and is still used today.
Dust covers nowadays are mainly made from a lightweight nonwoven polypropylene material usually in black, but you could use whatever lightweight material you wished, and if you wanted to go old school, especially if you are reupholstering an antique piece, then burlap or linen are still widely used.
What is Tufting in Upholstery?
Tufting is the term used for a specific method of upholstery. It is widely used and still very popular in home décor.
Tufting your upholstered pieces adds a very professional finish to your furniture and can make something simple into something plusher.
As mentioned above, traditionally the padding was made from animal hair or dried plants, which after numerous uses could become flat and clumped, making the furniture lumpy and uncomfortable.
Tufing was created as a way to keep the padding in its place and add a rounded firmness to the overall finish.
The act of pulling the fabric taut in various places created little pockets for the padding and made it difficult for the padding to shift around under the fabric.
This meant that not only did the furniture look good for longer, but the actual padding also lasted longer too.
Nowadays, with the invention of specially designed foam, tufting had become more of an aesthetic than a practical necessity.
Tufting is the action of making strategic indentations in the fabric and padding to create “tufts” and pleats.
The shape of the tufts depends on the method of tufting you are doing, and when securing the tufts in place, there are a couple of different ways of doing so.
What are the Different Methods of Tufting?
In the world of upholstery, there are three different styles of tufting;
- Diamond
- Biscuit
- Channel
There are also two ways to finish tufting;
- Button
- Blind
The first three refer to the shapes of the tufts e.g. diamond, square, or rolls (tunnels) and the last two refer to how the tufts are finished e.g. with a button or without.
These can be used in conjunction with one another and can be adjusted to suit your personal preferences.
For instance, playing around with the sizes and spacing of your tufts can be a great way to personalise your pieces.
What is Button Tufting?
When it comes to tufting, button tufting is considered the more traditional style and is frequently used because of the overall aesthetic and general impression of sophistication that it affords.
Tufting buttons are used to pull the fabric down to not only form a plush and luxurious pattern but to also hold all the padding in place and create a nice firm seat or the similar.
Blind tufting, in contrast, is relatively contemporary and has become rather popular in modern homes. Blind tufting is minimalist whilst still retaining all the visual interest of tufting.
Both are simple enough to do on one’s own if you are patient, and there are plenty of tutorials out there for all the different methods of tufting that are a great help for beginners.
There are a couple of different variations on how to do both button and blind tufting.
For button tufting, the most secure option (in our opinion, at least) is to thread twine or string through the base of the button (most buttons have a little loop or hole which you can thread through).
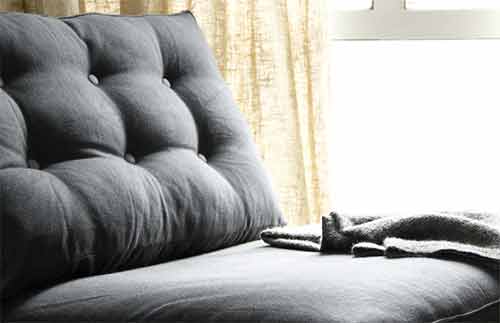
An example of button tufting – Image courtesy of Pinterest
Using a tufting needle, which is longer and has a wider eye than a regular needle, push the string through the fabric and pull it out the other side pulling on the string until the button is flush with the fabric and the tufts are shaped to your desire, and then secure the string on the other side with staples.
Another method is to pin the fabric in place with tacks or staples and then simply glue the button on top.
This method, whilst easier than the previous one, is a little less secure as the buttons can fall off after time or be pulled off, and the tacks and staples may not hold up to the strain of holding the fabric in place for very long.
Take a look at our project on how to create upholstered wall panels to get a more detailed description of how to do button tufting.
What is Blind Tufting?
Blind tufting is achieved in a similar manner.
One method is to take a string or thread of the same, or as similar as possible, colour as the fabric and using the needle thread the string up from underneath and over and back down, making a small stitch about 5 to 10 millimetres long.
Then, same as for buttton tufting pull on the string until the fabric is taut and the tufts are arranged to your desire and staple down the string.
The finished article should result in tufts that, from a distance, make it hard to see what’s actually holding them in place, and only from up-close can you see the thread.
If you wanted to make sure it was secure, you could do the same thing with a second piece of string in the opposite direction to create a small cross stitch which would hold down the fabric more securely.
This method works for both diamond and biscuit tufting.
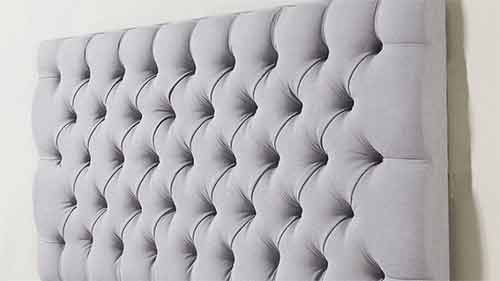
A blind-diamnond tufted headbaord – Image courtesy of Pinterest
Using a Sewing Machine or Hand Stitching Blind Tufting
Another method for blind tufting involves a sewing machine and can be a little more complicated.
You can also hand-sew if you don’t have a sewing machine (or if you prefer not to work with one) but it would take much, much longer and, unless you are an expert, would not look as neat or professional as with a sewing machine, nor would it be as strong.
However, if you do decide to hand sew, we suggest using the backstitch as it is the strongest and most secure of the hand stitches.
For this, as always, you’ll need a fabric that is much larger than the piece you are going to be tufting.
Example: Making a Headboard Using Biscuit Tufting With a Blind Finish Using a Sewing Machine
As an example to illustrate what we are dicsussing we are going to run through the steps of making a 4ft by 2ft 6 inch headboard using biscuit tuft.
What is Biscuit Tufting?
Before we run through the steps involved in making our headboard, firstly, lets take a quick look at biscuit tufting itself.
Biscuit tufting is a newer style of tufting in which instead of the traditional diamond pattern, the tufts are arranged in squares.
This method feels very modern, especially in comparison to diamond tufting and is very at home with the more contemporary style of sleek, new homes.
Biscuit tufting, like diamond, has incorporated itself into many different pieces of furniture, from sofas, to armchairs, to headboards. Using biscuit tufting instead of diamond can really upscale your home in a different direction whilst still feeling quite lavish.
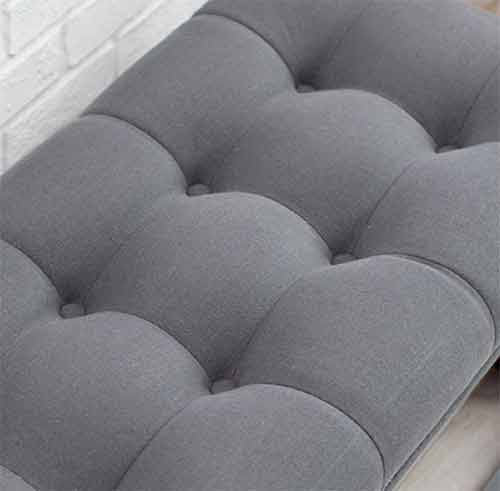
Biscuit tufted bench – Image courtesy of Pinterest
If you are eager to bring in a little comfort to your new-style home, but don’t wish to break the atmosphere you have created with your fashionable and current style, biscuit tufting is the way to go.
Just a little touch of it here and there can be a great way to add just that little bit of extra interest to your home.
Now that we know a little more about bicuit tufting, lets get started.
Measuring out
Firstly, you would start by drawing out your plan so that you know your measurements and layout.
The width and height of your tufts depend on how many tufts you want and you can play around with large and small layouts to see which design you prefer.
In this example, we will focus on eight by three tufts.
To get this measurement, first, you divide forty-eight inches (4ft) by eight which leaves you with six.
This means that the width of your tufts are going to be six inches and since biscuit tufts are square in shape that means they need to be six inches in height too.
So, to get this measurement we divide thirty inches (2ft 6 inches) by six which leaves us with five.
However, since this is a headboard and we only want three rows, the bottom twelve inches will be left as a whole as that part will sit behind the mattress.
You can, of course, continue the tufts all the way to the bottom, but that is just giving yourself extra work that is not needed.
Add a Seam Allowance
After marking your measurements for the surface of your tufts, you now need to add in the seam allowance.
To do this you need to add an extra inch to each tuft so that you have half an inch of seam allowance on all sides.
This will make your overall tuft size seven by seven inches and will make the total surface size fifty-six inches by thirty-four inches.
Add Allowance for Foam and Board
Now you just need to add on the excess fabric that goes around the foam and under the board.
In this example, we’ll say that the foam is three inches with one-inch of foam around the outside of the board and top and the board itself being 20mm.
Give yourself about five inches on each side to cover the foam and the board, and then an extra two or three inches to allow you to be able to pull on the fabric and staple it into place underneath.
You can always cut away the leftover excess fabric.
Mark out Your Design
Start by laying your fabric face-side down so that you can draw your pattern on the back-side of the fabric in fabric chalk or pencil.
It might be a good idea to use different coloured chalk for the two different set of lines; one colour for the six by six lines, and a different colour for the seven by seven lines.
This will help you not get the two confused as you start to stitch. Remember that the six by six lines are the stitch lines, and the seven by seven lines are the fold lines.
Fire up the Sewing Machine and get Stitching
Taking the first set of stitch lines, fold your fabric over at the fold line so that the right sides are together and stitch along the stitch line with a basic straight stitch. If you need to, use pins to hold the fabric in place.
Remember to backstitch the first centimetre or so to close up the stitch so that it does not start to unravel.
If the fabric you are using has some stretch to it we suggest sewing a narrow zigzag stitch instead as that will allow the fabric to stretch without popping any of the seams.
A good tip to holding the fabric straight and flat when stitching is to grip it on either side of the needle and foot and gently guide it forward at the pace of the machine.
DO NOT try to go faster than the machine as that will cause the fabric to rumple and bunch up and you will have to seam-rip it all and start again.
As you get to the point where the lines start to cross over each other, stop and mark a curved line from the stitch line out to the centre point and then back down to the stitch line and carefully stitch along this curved line.
Go slowly and gently guide the fabric around so that the needle stays on the curved line.
When you get to the outer edge stop, and with the needle still buried in the fabric, lift the foot and rotate the fabric until the curved line is once again in line with the foot, then place the foot back down and start the stitch again.
Keeping the needle in the fabric acts as an anchor and helps to keep it in place as you rotate it.
Do this for every cross section and when you get to the end, backstitch once more to close up the seam and trim the thread.
Do this for all the columns and then again for the rows. When you finish you will be left with your sewn squares with the puckers (or dips if you’re looking at it from the front) that will be pushed into the holes in the foam.
Pull Tufts into Place
Now to attach the string to the puckers so that you can pull the tufts into place and staple it all down nice and tight.
Get 20 inches of string for each hole and thread it through a curved needle, then taking a pucker, push the needle through the tip of the pucker and pull it through.
Tug on the string so that there is an equal amount of string on either side of the pucker and tie a couple of knots to keep it secure. Do this for all the puckers.
The next part follows almost exactly the same process for button tufting.
Mark out on your board where the holes are going to be and drill through it, then lay the foam down on top and use an adhesive spray to keep it in place.
Using the tufting needle, poke it through from underneath so it goes through the hole in the board and up through the foam and mark on the foam where the needle comes up, then using a 1 and 3/4 inch holesaw drill a hole through the foam to create the hole for your tufts.
Using a holesaw gives you a perfect cut at the right size, but you can use whatever you have available if you do not have a holesaw.
Lay out Batting and Staple it
After you have cut out all the holes, lay the batting over the foam and staple it down underneath.
The measurements for the batting is the same as the surface of the headboard plus the extra to go around and under.
In the case of this example it would be 4ft by 2ft 6 inches, plus the five extra inches on all sides to cover the foam and board, and the additional two inches to staple underneath.
Any excess batting can be trimmed away afterwards.
Find Holes and Thread Strings
Next, using your fingers, find where the holes are through the batting and cut a small cross through the batting over the holes.
Lay your fabric over the top and align the puckers with the holes. It doesn’t have to be perfect at this moment.
Starting in the middle of the second row, thread the string through the eye of the tufting needle and use the needle to pull the string down through the holes.
Do this for the rest of the row and then the top and bottom rows.
Once all the strings have been pulled through, arrange the rest of the fabric utill it’s all neatly.
Unlike with button tufting, you don’t have to worry about creating pleats between each hole as sewing the fabric has done that for you.
Now you can staple down your strings.
Follow the same path as before and tug on the strings utill the tufts are to your desired depth and staple down the string in a zigzag formation for extra security.
With the seams acting as the pleats all you need to worry about is making sure that all the tufts are straight and even, and that the depth of each dip is the same.
Staple Down Outer Edges
Once you’ve finished stapling the strings, move on to stapling down the outer edges.
Starting in the middle of the top of the headboard, staple down the fabric and work your way outwards, arranging and smoothing the fabric as you go.
Don’t pull too hard on the fabric as you go as you may tear or distort it, and remember to keep the outside smooth for a well-rounded finish.
After the top of the headboard is done, move to the bottom and then the sides, then staple down the corners.
Cut Away Excess and Tidy up
Afterwards, you can cut away any excess batting and fabric and if you wish neatly staple or tack down a black gauze-like material, like a dust cover, over the top to hide away the staples and strings and rough edges of the fabric for a professional finish.
This method works best with biscuit tufting but could be adjusted to work for diamond tufting also.
What is Diamond Tufting?
Diamond tufting is the most popular and widely used method of tufting.
Its signature diamond arrangement, timeless elegance, and connotations of luxury and opulence have made it a firm fan favourite for decades and it shows no sign of slowing down.
Diamond tufting is also varied in the ambience it produces based on what fabrics you pair it with. Soft, plush fabrics like velvet and satin feel lavish and feminine, whilst the leather feels more masculine.

Diamond button tufted end bench for a bedroom – Image courtesy of pinterest
Diamond tufting can be used with pretty much any piece of furniture and has even started to make its way onto furniture that you wouldn’t expect, such as nightstands. It really is a diverse and adaptable way to upscale your furniture and room.
If you wish to learn how to go about getting the right measurements and supplies for diamond tufting take a look at our upholstered fabric wall panel project for more in-depth detail.
What is Channel Tufting?
Unlike the previous types which can all be used interchangeably with one and other, channel tufting is in a league of its own.
A fairly new style of tufting that is quickly stealing the limelight, channel tufting has become vastly popular.
There are a few different methods on how to create channel tufting, and in our experience most of the time the method you use depends on what you are making.
For instance, the backing of a chair or car seat would be different to say, a headboard.
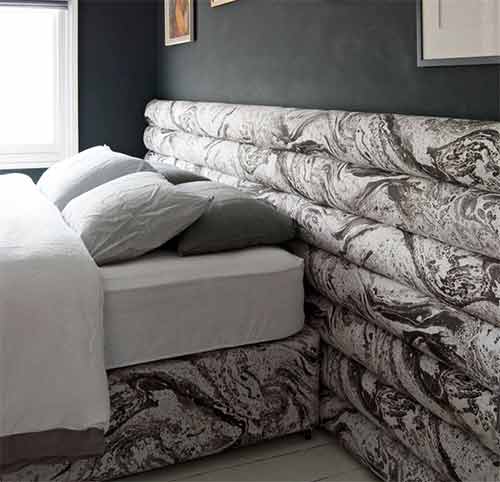
Channel tufted modern styled headboard – Images courtesy of Pinterest
The easiest and most straightforward way is actually very similar to the principles of creating a fabric wall panel (explaiend in our project here), only this time instead of squares or rectangle, the pieces of wood you would be upholstering would be long and thin and would stack on top of each other, or pushed right next to each other to create the signature channel tufted look.
Another method that could work for creating a channel tufted headboard or even a footstool or end-bench for your bed, would be to tuck the fabric between thin lengths of foam and “sew” the fabric to the board.
Work out Measurements and cut Board
To do this you need to get some plywood or mdf board (or another kind of board of a similar type) cut to the size you need.
Once you have worked out the size of board you need, source it from your local timber merchant or DIY shed.
For this example we will stick with the 4ft by 2ft 6 inch measurement we used above. With this settled on, measure how many channels you want.
For arguments sake, we’ll say six horizontal channels of five inches high.
Cut Foam to Length and Staple Fabric to Board
Gather your foam, be it professional high-density foam, or a cheaper alternative you’ve found, and cut it to the right length and width.
To attach the fabric to the board, the best way would be to staple the fabric down between each channel.
You need to be very precise with your staples, and it would help if you had a pneumatic staple gun as the extended nose allows you that precision.
However, a normal staple gun, or even a hammer and tacks, would work if you do not have a pneumatic staple gun.
We suggest first doing a “test run” to make sure you have enough batting and fabric.
Temporarily Attach Foam to Board
Lay out your foam and attach it temporarily to the board with a loose staple on each side and then lay and tuck your fabric in between each foam length and under the board.
Once you are sure all is well you can remove the fabric and staples and get started.
Choose Your Fabric and Cut it to the Correct Size
The best fabric to use is one with no discernible pattern or image so that nothing gets “lost” between the channels.
Patterns with no apparent start and stop, like vines, floral, or gingham are better as it will not matter that parts of the fabric are tucked away. If you are unsure, go for a fabric that does not have a pattern.
To get the right length of fabric you need to take into account the size of the foam and the surface size of the board.
In this example, the board is 48 inches (4ft) by 30 inches (2ft 6 inches) with the channels at 48 inches by 5 inches.
If the foam were two inches in thickness each channel would “swallow” about four inches of fabric – two inches going down, and two inches coming back up.
So to get the right measurement, we need to know how many channels there are; thirty divided by five is six, and add on four for each dip. If there are six channels, there are five spaces between them.
Four times five is twenty, so add twenty inches to the thirty we already have plus five on either side to go over the outside of the foam and under the board and you have your vertical fabric measurement.
The horizontal measurement would be 48 inches plus about an extra five on either side to go over the foam and under the board.
This gives you 58 inches wide, by 60 inches in height.
Be aware that because you will be tugging on the fabric as you pull it over the foam lengths, the foam will be compressed a bit under the fabric and so the actual amount of fabric in each tuck won’t be exactly four inches, but you always round up as it is better to have too much fabric than too little.
Once you have your board, foam, batting, and fabric cut to size, it is time to assemble.
As in this example, the channels lay horizontally so we start at either the top or bottom of the headboard.
Staple Down Batting and Fabric of the First Channel
Firstly, on the back of the board, staple down the batting and then the fabric, a couple in the middle and a few more on either side. You can go back and add more at the end.
Turn the board back over and using an adhesive spray, adhere the first foam length to the board.
Once it’s dry pull the batting over the foam and staple it down to the board.
Next, pull the fabric over, making sure it is smooth and straight, and do the same.
Keep the staples as close to the foam as possible without pressing against the foam so that you do not compress it.
If it helps you, draw on the board the measurement of the channel so that you have a line every five inches and staple in that line. Make sure that the fabric is stapled down firmly.
Stick Down Foam and Staple Fabric on Subsiquent Channels
Flip the fabric and batting back over so that they are out of the way and stick down the next foam length.
Make sure it is pressed up as close as the previous one as possible without squishing it.
Each foam length must fit into its spot without being overly squished against one and other, otherwise you will be left with a gap on the board after your last length.
At the same time, do not space them too far apart or you will not get the unique channel tufted look.
After the foam has been attached, once more pull the batting and fabric back over the foam and staple down as before.
Do this for all of your lengths, making sure that as you go the fabric is straight and even, without any rumples or wrinkles that may distort it, and that the channels are all at the same size and height.
You will see your channels start to form. When you get to the last channel, staple the batting and fabric under the board as you did at the start.
Staple Down Sides
Because the fabric is all one long piece, stapling down the sides is a little trickier.
You will need to cut through the fabric between each channel from the edge of the fabric to just before you get to the board so that you can work with them as if they were individual pieces. Do the same for the batting.
Start with the second one in, the outer ones involve the corners and they will be done last.
Take the flap of fabric and pull it taut over the foam to round it out (without pulling to tight that you flatten it) and down under the board.
Fold under the little excess bits that come from tucking in the fabric between the channels and staple down it all down.
Do the same for the others and remember that while folding under the little excess pieces you hide the rough edges from cutting the fabric to overlap the pieces slightly so that the batting and board underneath don’t show through.
Dealing With Corners
When you get to the corners first staple down the inner edge as you did the others and then neatly fold in the corners as if you were wrapping a present, keeping all the folds underneath and staple it all down.
Add a Dust Cover if Required
As before, the addition of a dust cover is optional as all the rough edges and staples will be hidden against the wall, but for a more professional finish, adding a dust cover brings everything together for a neat finish.
These are just a few examples of what you can do. There are other ways to do channel tufting and plenty of examples and tutorials out there for you to explore.
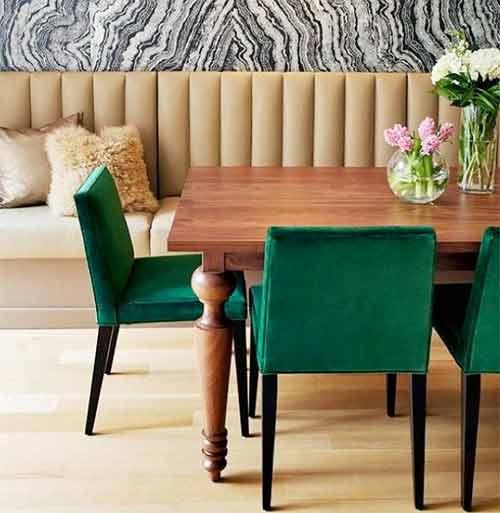
Channel tufted dining room sofa for a modern dining seating area. Image courtesy of Pinterest.
The above methods focus mainly on techniques that use a single piece of fabric, which is the most common way, but in recent years, the method of stitching together multiple pieces of fabric to get the desired effects without needing to worry about creating pleats has started to arise.
Similar to the method we mentioned above for blind stitching, not only does it eliminate the need for pleats, but it also provides a nice decorative finish, and you could mix and match different fabric to create new and interesting designs, such as colour blocking or mixing solid colours and patterns.
Really, there is a whole plethora of different ideas and designs you can do with upholstery and tufting, and with the rise in diy upholstery, more and more creative and innovative people are putting their mark on this illustrious industry and that is very exciting to see.

