If you need to locate existing ground drainage runs on your property the first place to look for help is your property deeds. These may have information on them showing any existing runs of underground drainage or any changes that have been made over the years.
You will also need to find out if your existing drainage was installed before or after 1st of October 1937 with reference to the Public Health Act 1936. After that date, the law changed regarding who is responsible for the maintenance of these underground drainage sections. You do not want to be paying for repairs to drainage you are not responsible for!

Plastic bend used in underground drainage
If you are installing new runs of underground drainage or you are converting or changing existing “runs”, you are legally required to inform your local Building Control Department. You will have to supply them with drawings of your proposed works and have your works inspected by a Building Control Officer.
If you are just replacing existing damaged Underground Drainage you do not have to contact your Building Control Department.
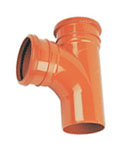
T junction used in underground drainage
Choice of Pipes for Underground Drainage
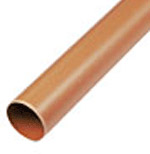
There are many types of pipe available for use with Underground Drainage, such as uPVC, concrete, vitrified clay, cast iron, glass fibre reinforced plastic (GRP) and asbestos. Some are not used anymore for obvious reasons. It is important to note that underground drainage is always a brown colour while above ground drains are grey or black.
Most houses/properties in the UK have used two types of pipe work for underground drainage since the late 1970’s, Clay & Plastic UPVC. The latter has become cheaper and more popular.
In regions where there is, or might be, soil movement due to topography, precipitation and climate, it is advisable to use vitrified clay pipe. This form has more structural strength and is not so dependent on the back fill materials being the structural part of the underground drainage system, known as Class D bedding.
Joining the older clay pipes to newer plastic pipes can be achieved with a clay to plastic coupling shown on the left. This, and all other pipes etc, can be bought by clicking on the tool store images at the base of the page.
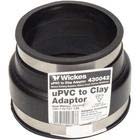
Clay to plastic pipe coupler
All plastic pipe runs must be incased in a 10mm pea shingle layer or fine gravel mix, before larger grade material can be placed on top for compacting and then receiving top layer of back fill.
Note: If you are replacing old damaged underground drainage pipes, some building merchants will hold stock, or be able to acquire old imperial sizes of pipe work. Conversion adaptors from imperial to metric are also available.
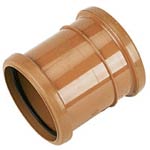
Coupling for joining plastic drain pipes together
The sections of pipe you will be using will be of two types; either straight connection or socket format i.e. male to female with the female section always being the lower part of the run.
Most modern pipe runs are now straight connection types incorporating a collar connector – See below.
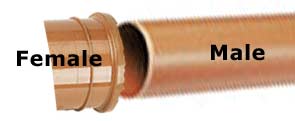
Male and female joints in drain pipes
What Types of Pipe to Use
Plastic Pipe (uPVC) 110mm
The obvious benefit of using plastic pipe is the ease of use, with it being lighter in weight and being able to acquire longer runs of pipe therefore needing less connectors. Plastic pipe comes in 3m and 6m lengths. Plastic pipe runs can be ridged and not allow much flexibility.
Underground drainage plastic pipe 110mm
Plastic pipe only requires the use of a hacksaw to cut the pipe. But don’t be fooled by this, sometimes it is hard to achieve a straight cut on a large diameter plastic pipe with a hacksaw. It is often easier to use a cheap wood saw to achieve a straight cut.
If you are installing plastic pipe work in the winter months, take your time when cutting pipe as it will be more brittle because of the lower temperatures and therefore will be more prone to fracture or cracking.
You will need to file down the cut edge anyway to create a chamfer to ease the acceptance of the connector with a lubricant; a simple action as shown in the pdf supporting this project at the bottom. Many drain layers use fairy liquid as a lubricant for joining pipes but we recommend you use a proprietary compound.
The cheapness of plastic pipe can sometimes be misleading as you will incur higher costs with the specified back fill materials compared to the back fill materials required for clay pipe sections.
Vitrified Clay Pipe:(100mm)
This can be purchased in lengths up to 2m long, is heavier in weight and more stable to work with than plastic. It requires cheaper costing materials for support and back filling and is making a big play on its greener credentials in the process of manufacturing compared to plastic pipe. This is making clay pipe very popular with large construction projects and companies.

Clay pipes for underground drainage
Other benefits of clay pipe are that it is more stable under pressure from soil weight mass from above and has a taste not enjoyed by the rodent society unlike plastic pipe! It can also withstand more modern methods of high pressure underground pipe cleaning, that plastic cannot.
However, VCP requires more substantial cutting tools, such as clay pipe cutters. These wrap around the pipe and increase even pressure till they produce a straight fracture cut and even motor skill saws or grinders can be used to create a straight cut. When using a high speed cutting device, extreme care should always be taken.
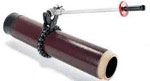
Cutting clay pipes with a chain cutter
Extra care when cutting is needed as clay pipe can be fragile before being installed.
As with plastic pipes, lubrication will be needed to aid the connecting of sections and connectors together when using clay pipe. These come in either fluid and jelly form.
Digging a Trench for Underground Drainage
Before any pipe laying can proceed you will have to dig your trench. It is best not to dig your proposed trench too far in advance of your pipe laying. Overnight rain and conditions could cause your trench to collapse or fill with rain water and unless you have a sump hole pre dug, this may halt any works.
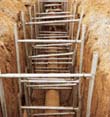
Shoring up a trench for working in
Safety Requirements for Trench Digging
- If your trench is deeper than 1200mm (4ft) it must be shored up by law !
- Never work in trenches on your own
- Do not have your trench open for too long, sides may collapse or fill with rain water
- Make sure your dug trench is fenced off from people, children and pets
- Keep your trench widths to a minimum width to stop sides collapsing (300mm plus width of trench)
- Do not dig trenches in bad weather
- Don’t stand close to edge of the trench and if you can not shore up, ramp the top of the trench back at 45 degrees to stay safe
If you are laying a straight run of pipe work you will have a start point and finish point of your run. You can connect a string line between these two points which will give you a correct guide to how much base bedding you need to place in your trench before you start laying pipe work.
More modern ways of checking levels/gradient can be checked with the use of a laser level or other leveling instrument.
Minimum gradient requirements:
- Surface water drainage = 1:100 (10mm fall in height per metre of run)
- Foul water drainage = 1:40 (1:80 if WC connected) (25mm height fall per metre)
- Laying a run of pipe work is a simple repetitive procedure as follows;
- Lubricate connector and pipe
- Push connector onto pipe
- Lubricate receiving connector and open end of pipe
- Push next length of pipe into connector
What Depth Should Underground Drainage Pipes be Laid at?
There is no minimum depth stipulated simply because there is always an “end point” where each pipe discharges.
It is the depth of this end point that governs the depth of every access chamber leading to it.
Access Points Required to New Underground Drainage Run
When ever you are installing a new run of underground drainage you will need to have inspection chambers, manholes, roding eyes and access fittings so that any blockages can be accessed and removed.
Inspection chamber required where pipes change direction
These items must be installed to allow access at such points of your new underground drainage if:
- Head of your new run
- Any change in direction
- Increase or decrease of pipe size
- Any junction in your new drainage run that can not be accessed from another point of access
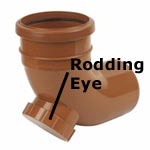
Rodding eye or access bend for underground drainage
There is no specific distance stipulated between manholes other than no part of a pipe should be more than 50m away from an inspection chamber.
It is good practice, where the maximum manhole distance is to be deployed, to install rodding eyes, at every 22m or so.
This means that all pipes can be accessed from at least one location every 22-25m where blockages can be pushed into an access chamber.
Backfilling Your Trench
Once you have completed the installation of your new Underground Drainage run and it has been tested for possible leaks, you can start the process of back filling your trench with the use of the correct materials:
For Plastic Underground Drainage Pipe use….
You will already have 10mm pea shingle or 14-5mm graded shingle as your bedding for your plastic pipe covering up to the top of your plastic pipe.
You will need to lay a 100mm covering of selected fill or granular material next when back filling your trench and finally filling with a layer of selected back fill consisting of no stones over 40mm, no clay over 100mm clumps and no frozen material.
The last layer can be compacted as it is laid in the trench.
For Clay Underground Drainage Pipe use….
Again, you will have the bedding layer of shingle or graded shingle which your clay pipe run will be sitting in.
You do not have to completely cover your clay pipe with this layer. A minimum covering of half way up the clay pipe will suffice.
You can then complete your back fill with selected fill consisting of no stones over 40mm, no clay lumps over 100mm and no organic matter or frozen materials.
Note: Pipes laid at depths less than 600mm and which are not under a road should, where necessary, be protected against damage by placing over them a layer of concrete, paving slabs or similar. A minimum 75mm cushioning layer of granular material must be laid between pipes and the slabs or concrete.
For clarification; where necessary means where the pipe is in any kind of danger of being broken or disturbed. Disturbance, cracks and breakages can cause build up and blockage.