If you have ever done any form of plumbing at all then the chances are that at some point you will have had some dealings with a soil and vent pipe, whether that’s fitting one or more than likely, connecting into one.
In this project guide we take a close look at the humble soil pipe and all that it involves, including how to connect up a new toilet and also how to connect modern UPVC soil pipes to traditional cast iron ones.
What is a Soil and Vent Pipe?
A soil and vent pipe, also known as a S&V pipe or a soil stack, is a vital part of your home’s plumbing system.
It safely removes waste water and sewage from toilets, sinks, baths, and showers, carrying it down to the main sewer line.
Just as importantly, it allows foul-smelling air and gases from said appliances to escape above roof level, preventing unpleasant odours from entering your home.
In most UK homes, the soil and vent pipe runs vertically up the side of a house or inside the wall cavity. You may be familiar with the large grey or black pipe that runs from floor to roof level on many UK homes. This is the humble pipe itself.
The lower sections of the pipe collect waste from your bathroom appliances, while the upper section continues above the roofline, acting as a ventilation outlet for air and gases. This venting prevents a vacuum from forming in your pipes, which could otherwise cause water to gurgle or trap sewer smells inside your bathroom.
Soil and vent pipes are typically made from uPVC in modern installations, as it’s durable, low-maintenance, and resistant to corrosion. Older homes may have cast iron versions, which are heavier and more prone to rust, but still commonly found across the UK.
When making any changes to your plumbing system, you need to retain proper waste flow and ventilation, otherwise you risk contravening Part H of the Building Regulations rules.
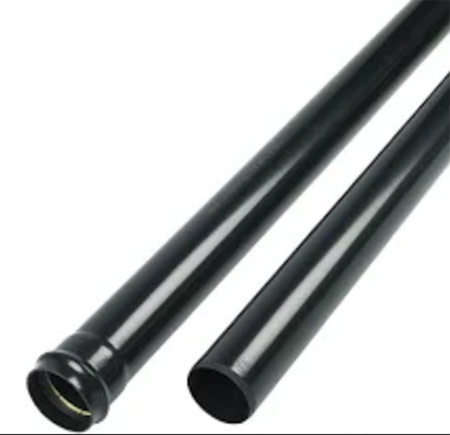
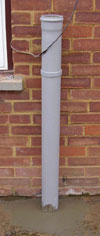
Standard uPVC soil and vent pipe
What are the Rules for Soil and Vent Pipes in the UK?
In the UK, soil and vent pipes must follow strict guidelines under the Building Regulations (Part H).
These rules are in place to ensure waste is removed safely and to prevent harmful gases from entering your home, so whether you’re installing a new system or making changes during a renovation, it’s important to meet these requirements.
Ventilation
This is a significant rule! Soil pipes must extend above the roofline or be fitted with an air admittance valve (AAV) to release trapped air and gases. This stops foul odours and pressure build-up in your drains.
If vented above the roof, the top of the pipe should be at least 900mm above any opening window, door or balcony within 3 metres, to avoid smells drifting into your home.
Pipe Placement and Materials
Soil stacks should be positioned to run vertically wherever possible, with a minimal number of bends to keep the waste flowing smoothly.
Modern systems typically use uPVC pipes, which are lightweight and corrosion-resistant.
Any changes to existing systems must be done using compatible materials and fittings.
If you’re altering your drainage system or installing a soil and vent pipe for the first time, you may need to notify your local Building Control team. In some cases, particularly in new builds or extensions, approval is required before work begins.
Failing to comply with these rules can lead to poor drainage performance, unpleasant smells, or even fines. So if you’re unsure, always speak to a qualified plumber or check with your local authority before starting work.
How High Should a Soil and Vent Pipe be?
Getting the height right is essential. It’s not just about function, it’s also a legal requirement.
If your soil pipe vents through the roof, it must extend at least 900mm (0.9m) above any window, door, or ventilation opening within 3 metres. This prevents sewer gases from drifting into your home. The vent should terminate in open air and be well above head height to ensure safe and effective dispersion of gases.
If you’re using an Air Admittance Valve (AAV), the differ. AAVs don’t need to exit the building, but they must be installed above the highest waste pipe in the system, such as an upstairs toilet. They should also be placed in a ventilated, accessible location, often in a loft or service cupboard, to allow for air intake and easy maintenance.
Getting the height wrong can lead to slow-draining sinks, gurgling noises, and nasty smells. Worse, it can cause pressure imbalances that damage your plumbing over time.
If you’re unsure, it’s best to speak to a qualified plumber or contact your local Building Control department before starting work.
What Happens if a Soil and Vent Pipe Isn’t Vented?
If a soil and vent pipe isn’t properly vented, it can lead to serious issues in your home’s plumbing system.
The most common problem is trapped air, which causes a vacuum effect when water drains. This can lead to gurgling sounds, slow drainage, or even siphoning, where water is pulled out of nearby traps like those in sinks or toilets. Once the water seal is broken, foul odours from the sewer line can rise back into your living space.
Pressure build-up is another concern. Without a vent, the pressure inside waste pipes can rise, forcing waste back up the system. This can cause toilets to bubble or overflow, or waste to appear in places it shouldn’t, creating a serious hygiene hazard.
This is a long and detailed project divided into two parts and covers the fitting of the external waste pipework necessary for fitting a new toilet or to move a toilet. The work required to fit 32 or 40mm solvent cement waste pipes for hand basins, sinks and shower waste pipes can be seen by clicking here and Part 2 of the project can be seen by clicking here.
How to Install a New Soil and Vent Pipe
In this section of the guide we will now go through all the steps involved in how to install a soil and vent pipe system.
As there are several sections to this process we have broken them down below:
Connecting new uPVC Soil Pipe to old Cast Iron Soil Pipe
Connecting modern plastic toilet pipes to old cast iron waste systems is a common challenge for UK DIYers. Cast iron is thick, rigid, and comes in slightly different sizes than today’s plastic pipes, making it tricky to cut or adapt when adding a new toilet, basin, or shower waste.
While it’s possible to drill into or grind down cast iron to fit a 100mm plastic collar, this often proves time-consuming and costly, so in most cases, it’s simply quicker, easier and more cost-effective to replace the old cast iron with a modern plastic soil and vent system.
Upgraded plastic soil and vent system replacing old cast iron pipes
Step 1: Remove the Old Cast Iron Soil and Vent Pipe
Before removal, take a clear photo or sketch the layout of your existing cast iron soil and vent pipe. This ensures any new system follows the original routing, which likely complies with UK building regulations. This is of course unless you’re doing a full redesign.
Cast iron pipes are heavy and brittle so always wear gloves and eye protection. Most are removed by carefully striking them with a lump hammer, which causes the iron to crack and break, however be cautious as shattered pieces can be sharp and dangerous and can fly every.
The best and safest method in this instance is to use an angle grinder and cut off disc or a petrol cut off saw and simply cut it away near the base where it enters the ground.
In some older homes, soil pipes may be made from cement-based materials that resemble asbestos, however some much older pipes can be asbestos. If you are in any doubt at all over this, get it tested before you do anything. If it is asbestos it will need removing professionally.
In terms of actually breaking the pipe down, break it right down to almost ground level, leaving a couple of inches just above ground level.
Note: If your new bathroom layout has changed, as in this example, where all pipework was moved to suit a relocated bathroom, document the updates clearly before you begin work.
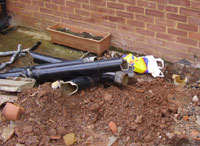
Broken cast iron pipe
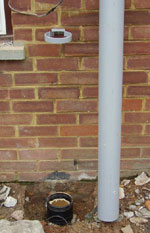
Step 2: Locate and Prepare the Clay Drainage Pipe
This next step will likely involve some digging, whether that’s in soil, gravel or concrete as you will now need to dig down around the point the sol pipe enters the ground to reveal the point where it enters the main clay drainage pipe. This pipe will lead off to the nearest foul water manhole.
In many cases, the clay pipe is pretty close to the surface soho careful when digging down as not to damage or crack it or break the collar (as can sometimes happen), so carefully excavate around it to create enough space. This makes it easier to cut the pipe square for a clean, secure connection.
Note that older clay and cast-iron pipes have much thicker walls than modern plastic pipes. While the internal diameter is similar, the external size is not. Clay or cast iron can measure up to 136mm, whereas plastic pipes are typically 110mm.
Thankfully, this mismatch is easily solved using modern pipe connectors, designed to join clay and plastic systems seamlessly.
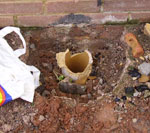
Old clay pipe taking waste to manhole
Step 3: Plan the Route for Your New Soil and Vent Pipe
Before any new installation work takes place, firstly identify where the pipe will start (at the toilet) and where it will end (at the ground connection).
Sketch out the full route on paper to visualise the layout and this will also help you to calculate the exact amount of pipework and the number of fittings needed.
This planning ahead will make the job faster, easier and more accurate and minimise any mistakes or potential wastage of materials.
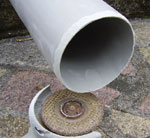
Step 4: Connect Plastic Pipe to the Clay Drain
This is where we start getting some serious work done as it’s now time to get our joiner in place ready to receive our new uPVC soil pipe.
Today, the easiest and also best way of doing this is to use a purpose made flexible rubber coupling joint. There are other solutions but on the whole, we have found this one to be the best, most effective and most reliable as it also allows for some ground movement.
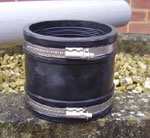
Connector
To use the coupler, simply loosen both the jubilee clips at either end and slide the widest end over the top of the clay pipe, down to the point the coupler reduces in size. This will ensure that it can create a decent seal around the body of the pipe once the Jubilee clip is tightened.
Plastic fittings are designed to be airtight and watertight, so they fit very tightly. To make assembly easier, apply a purpose-made pipe joint lubricant. Avoid using washing-up liquid as it can be messy and reduce grip. A proper lubricant ensures a smoother, cleaner fit.
Once all in place, use a screwdriver or small socket to tighten the Jubilee clip up fully, but not to much as to strip the thread.
If you are going to need to leave the exposed pipe for any length of time, it’s best to cover over the open end to prevent anything from falling or even climbing into the drain. For this you can scrunch up a plastic bag or spread one over the opening and secure the edges over the pipe using a large elastic band or bungee.
Connection sleeve fitted to clay pipe
Step 5: Chamfering Ends and Fitting First Upright
In this next step we will get the first vertical section of pipework in place that all the remaining new sections of pipework can then be connected up to and we will also look at how to prepare each section of pipe so that it fits easily.
With this in mind, firstly, you measure and cut a length of plastic soil pipe to the correct length, but on doing so you will notice that the cut the end is left fairly sharp and burred. It will not matter how much lubricant you put on the end of this, it will just rip out the rubber joint of the receiving collar or indeed damage it so that it no longer seals.
To get around this issue the end of a cut pipe should be filed to a shallow chamfer to make sure the pipe slides easily into the joint. You can see from the image below we have used a 4 inch grinding wheel to create our chamfer but this can easily be done with a rasp file or even a sheet of rough sand paper.
When you use a grinder, please make sure you have the correct safety equipment on (eye protection, gloves, old clothes etc.) and always use the grinder so the blade is throwing any waste away from your body.
Chamferring off the end of the pipe
Once you have measured, cut and chamfered your first section of upright pipework leading from your drain, firstly lubricate the end that will be insert into the newly installed flexible connector.
Next, push the first length of pipe into the flexible sleeve connection and tighten the Jubilee clip as before.
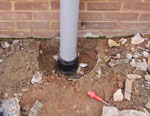
Pipe fitted into flexible soil pipe joiner
As we have mentioned, this first, short section now forms the basis of all other connections as ultimately, this is where the whole system ends up.
When installing any form of pipework on a wall, it is essential that it is supported correctly so that it won’t sag and joints wont fail. To ensure this pipe brackets need to be fitted at regular intervals.
For vertical runs, pipe brackets should be fitted at least every 2 metres and for horizontal runs, brackets should be fitted every 1 metre.
Where you have a bend, branch or joiner a bracket should be fitted either side of the fitting.
As we have a fairly short section of pipe here, install one bracket roughly two thirds up from ground level. Put the bracket in place and mark through the fixing holes on to the wall. Drill out each hole, insert a wall plug and then screw the bracket up tight to the wall.
Step 6: Concrete in Pipe and Adaptor
The final stage in this process once your adaptor and pipe are in place is to concrete it in, cementing it in place for ever.
However before you do so it’s worth just pouring a watering can full of water down the top of the pipe and checking the flexible adaptor to ensure that everything is fully sealed as it should be.
Once you have confirmed this, mix up some concrete to the correct consistency, pour it into the hole and then use a suitable trowel to trowel it off smooth. For help with any of this, See our mixing concrete project.
First length of soil pipework fitted and concreted in
Installing the Remaining Pipework
Now comes the trickier part of installing, joining and connecting up the rest of the soil pipe system. As you did before, plan the full pipe route clearly, noting exactly where it needs to start and finish.
Step 1: Position Your Toilet and Drill Hole
If you’re fitting a new bathroom as we are here with a repositioned toilet, decide on the final toilet location.
Once done you will need to drill a new waste outlet hole through the wall. For this use a 150mm diamond core bit and heavy-duty drill. These can be hired for around £50 from your local hire centre.

Using a diamond core bit
These tools make the job faster, cleaner, and far easier. Avoid the temptation do save a few quid and do it by hand using chisels and the likes; they’re slow, messy, and can damage the wall.

Hole in wall for toilet
After drilling the wall hole, place the assembled toilet and cistern where it will sit permanently with its back to the wall. Measure from the toilet outlet to the wall, then add the wall’s thickness. Cut a soil pipe to that total length, and chamfer both ends for a snug fit.
Attach a 90° bend to the pipe, as shown below, and feed the assembly through the wall opening.
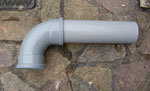
90 degree easy bend
A 150mm core drill hole leaves enough space for adjustments, handy during final alignment. To prevent moisture entering through the gaps, we temporarily filled any open cavities with expanding foam. Later, we replaced these with matching bricks for a neat finish. Learn how in our guide on replacing a damaged brick.
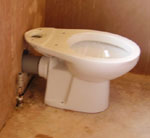
Toilet put in place with pipe fitted
Bend and pipe fitted into wall
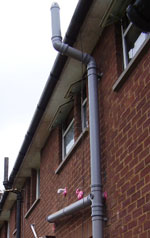
Step 2: Fitting an Access Point in the Soil and Vent Pipe
Now that we have a start and end for our soil pipe system, we can now get the remaining elements fitted in place and the first thing to do is install an access point.
It is important to remember that when a drainage run changes direction it should have an access point installed which will allow access to the inside of the pipework to rod out and clear any blockages.
To make this simple you can buy special access bends and access branches to fit into your system and these can be bought from your local DIY store.
These fittings are slightly more expensive than their non accessible counterparts but one plumber being called to unblock one pipe will soon show you which is the cheapest option!
Once you have your access fitting, chamfer the end of the pipe you are fitting it to, apply a little lubrication and then slip it on and position it so that the access point can easily be accessed.
Once the access is in place you can then continue installing your pipework on up the wall remembering to ensure that it is perfectly upright and level and then you have brackets installed at the correct intervals.
As you work up the wall you will get to the point, as we have done here in the image below where you will need to install a Y-piece or similar to receive the section of pipe that will run from the new toilet position. Where this point is will be determined by the correct fall of the pipework to ensure it drains correctly, this is covered in the section below.
Access point fitted and Y junction now in place
Step 3: Ensuring the Correct Drainage Fall for Soil and Vent Pipes
To work out the correct fall of your drainage and where items such as joiners and Y-pieces are fitted, first measure the horizontal distance from the toilet outlet pipe to the vertical soil pipe. This is how far the waste will travel before dropping into the main drainage system.
To ensure smooth flow, your pipe must have a gentle slope, known as the “fall.” Too flat, and waste won’t move; too steep, and liquids may outrun solids, causing blockages and noisy gurgling.
The ideal fall for a horizontal soil pipe is 1 in 40. That means for every 40cm of pipe length, it should slope down by 1cm. Calculate this on paper to find the correct height for the Y-junction on your vertical pipe.
Once you’ve measured the fall, cut your pipe to length, allowing room for it to slot into fittings at each end.
Chamfer the ends, attach pipe brackets (every metre for horizontal runs), then install and tighten everything securely. The oversize wall hole gives you space to adjust the pipe as needed.
Connection made between toilet and vertical svp
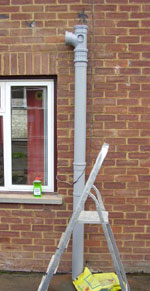
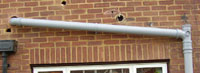
Step 3: Extend the Soil and Vent Pipe to Roof Level
Next, continue the soil and vent pipe up to the roof, allowing foul gases to vent safely outside. UK Building Regulations require the pipe to terminate at least 900mm above any window or opening nearby to prevent odours from entering the home.
Fit a vent terminal (also called a bird guard) at the top of the pipe to stop birds or debris from blocking the pipe. Secure the pipe firmly using brackets. Place one as high as possible and add more along fascia boards or walls as needed.
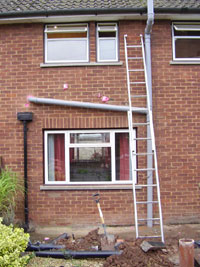
Always use a strong ladder or scaffold tower to work safely at height. Proper support and safe access are essential when installing roof-level pipework.
Soil pipe up to vent terminal
Step 4: Fit the Toilet to Your new Soil and Vent Pipework
The final part now once all of your new soil and vent pipework is in place is to install any and all appliances such as sinks, baths, showers etc. and then connect each of them up to the new waste pipes.
As such tasks are quite involved, they are a little outside the scope of this DIY project, however we have separate guides covering each task in full:
- How to fit and install a toilet
- Changing an old low level toilet suite for a new close coupled suite
- Installing washing machine and dishwasher wastes
Installing new soil and vent pipework from scratch for a new bathroom or even a bathroom refurb may seem like a huge undertaking if you are fairly new to DIY and construction, however as long as you work carefully and follow the guide above in detail you are sure to succeed!