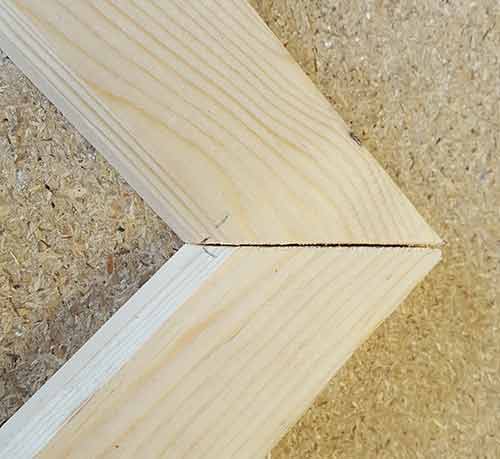
A mitre joint is a very common woodworking joint where two pieces of timber are cut at a 45° angle and then butted together to form a 90° turn or corner.
Some very common uses for mitre joints are for joining skirting boards, making picture frames and and also architraves around doorways and similar carpentry jobs.
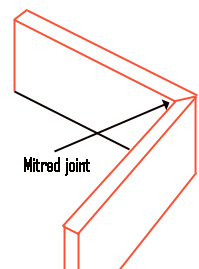
Mitred Joint
The mitre joint is most commonly used to form the joints for architrave around doorways and also where pieces of skirting board meet in the corner of a room. They are also used to form the joints of drawers in a chest or drawers, dado and pictures rails, other items of furniture and a whole host of other things.
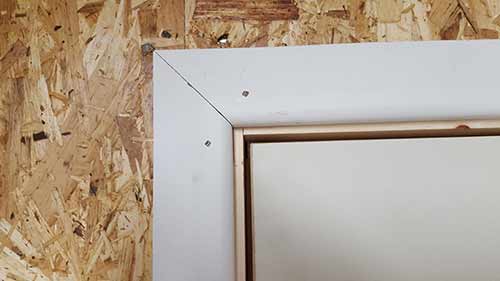
Architrave installed around door way featuring mitre joint to join architrave at 90°
The mitre joint is mainly used as a decorative and light duty timber joint due to the fact that they are not the strongest form of timber joint, so wouldn’t suit anything loadbearing or an item that’s subjected to heavy pulling forces.
How is a Mitre Joint Made?
The angle at which each piece of timber is cut to form the mitre joint is half of the total angle involved. As we have mentioned, most mitres are used to form a 90° turn as most rooms are square, or very nearly in the case of most modern buildings!
This gives each corner a value of 90 degrees. Both sides of the timber are therefore cut at 45 degrees so they meet to form the 90 degree turn.
However, a mitre joint can be cut at pretty much any angle, so their not just confined to forming 90° turns.
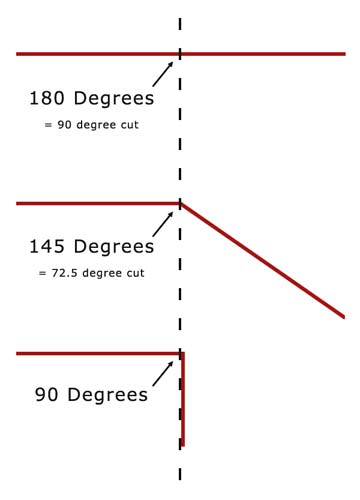
Different types of angles for mitre cuts
As an example, to fit a piece of skirting board, you would measure the length of the section of wall you’re fitting it to, cut the skirting board to that exact length and then cut a 45° bevel cut at each end.
The next piece of skirting board is then cut to length and again, a 45° bevel cut is made at each end, only this time the bevel needs to be cut in the opposite direction to form the 90° joint with the piece of skirting that’s already fixed in place.
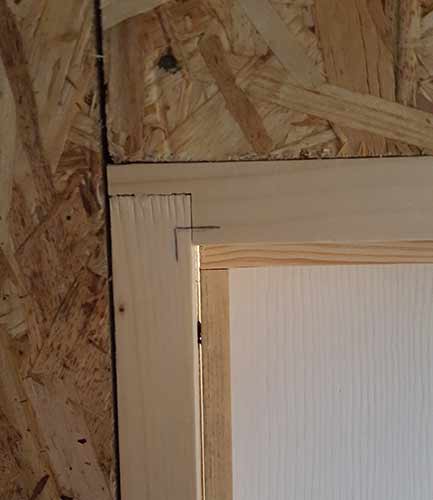
One of the key points to be aware of when cutting mitre joints is which side of the timber the bevel needs to be cut (front facing side or rear side) and whether it’s to form and internal or external mitre joint.
As very general rule of thumb, if you are cutting internal mitre joints then the mitre should be cut on the front face of the timber but if you are cutting an external mitre joint then the cut should be made to the rear of the timber.
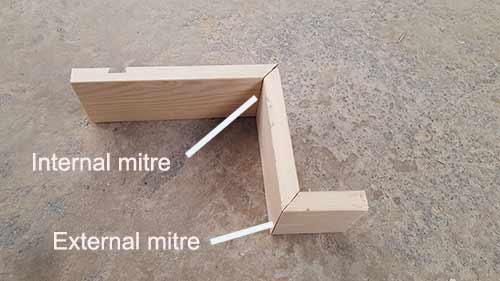
Internal and external mitre joints – internal joints are cut to front face of timber while external joints are cut to the rear
Now that we know exactly what a this joint is and how they are generally used, lets look at how to cut one and what tools can be used.
To cut and form a mitre joint yourself you have a couple of options:
- Mitre Block and Tenon Saw/Jack Saw: You can use a handsaw and special mitre block with slots that the saw follows in order to cut your mitre joint. This will allow you to cut your mitre but in most cases it may not be 100% accurate
- Sliding Compound Mitre Saw: A compound mitre saw is specifically designed to quickly and accurately cut timber at a range of different angles. You can quickly set the cutting angle required and make your cut with pretty much 100% accuracy
Lets look at each technique above and see how each can be used to cut a mitre joint.
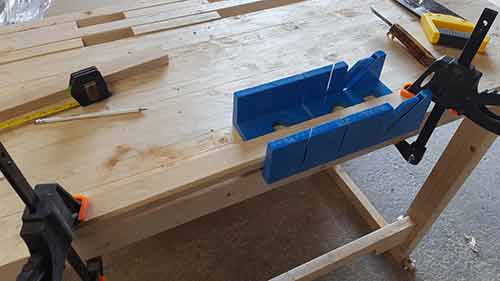
For the purposes of this DIY guide we’re going to be cutting mitres for a piece of architrave to go around a doorway.
As you may notice from the images we’re using a piece of 20mm x 42mm batten, this is just what we had knocking around in the workshop at the time, so you’ll have to image it’s a nice planed piece of bullnose architrave.
How to Measure and Mark a Mitre Joint Cut
One of the most important factors that will determine how accurate and successfully your joint is, as with many other DIY jobs, is your initial measuring and marking out.
Essentially if you don’t measure accurately and mark the exact position that you cut needs to be made and then indeed make your cut in the correct place then your joint will be sloppy and look poor.
To this end you firstly need to know where to measure. What do we mean by this you may ask! Well, there are essentially 2 points that can be measured and marked in order to cut your mitre; either the internal or external point that the joint changes direction.
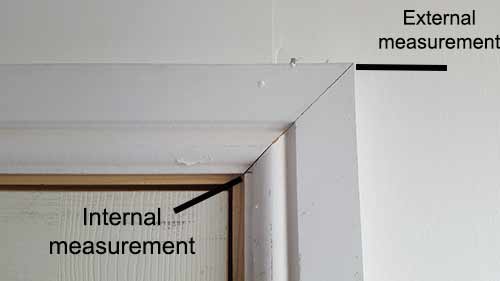
Internal and external points to measure for a mitre joint cut
The best route to take is to always measure, mark and cut from the internal point of the joint and not the external.
Marking on door frame showing point to measure to for mitre joint cutting position
This point should be measured and marked directly on, in this case, the door frame as we’re putting up architrave or if you’re working on something else, on the frame or external of the item you’re working with (as seen in the image above).
One other point to think about is where you actually put your mark – have you marked your pencil point directly on the point you need to cut or have you put the mark to the left or right of your measurement?
This is an important point to consider as if you mark your pencil line directly on the cutting point, meaning the cutting point is at the centre of your pencil line then you will need to make sure that you cut through the middle of the pencil line.
Likewise, if you put your pencil mark to the left or the right of your cutting point, you will need to make your cut to the left or right of the mark.
There’s no real right or wrong method of marking, just make sure you know exactly where you have put your mark in relation to where you need to cut. Even a fraction of a millimetre off and there will be a gap in the joint that will stand out a mile off.
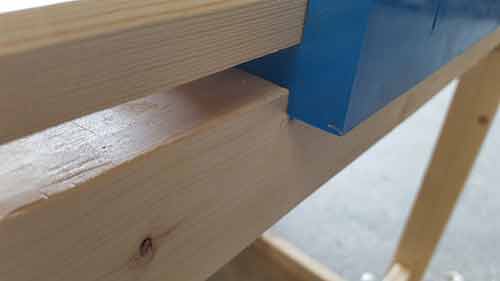
Additionally, you should also be aware of the width of the saw blade itself and how much timber material it will remove.
The width of the channel that a saw blade creates is known as the “kerf” and how wide this channel is depends on the width of the blade itself, how much the blade moves as it rotates at speed and also the set of the teeth on the blade.
This will vary depending on the type of blade you’re using and the type of saw, so teh best way to find out is to cut down through a piece of waste timber and then measure it.
You will then also need to take this into consideration when marking.

Cutting channels left by width of compound mitre saw blade (left) and also hand saw blade (right)
Cutting a Mitre Joint Using a Mitre Block
The mitre block is about the cheapest solution to go for if you’re needing to cut some mitre joints fairly accurately. Available form most DIY sheds or hardware stores, purchasing one should set you back around £5
Essentially a piece of timber is placed inside the uprights of the mitre block and a handsaw is slotted down into the pre-cut slots at the correct angle you wish to cut your mitre joint.
This is a good solution to go for if you don’t currently have any other means of cutting your joint, but they do come with a few downsides:
- You only have a few angle cutting options, normally straight cut, 45° and possibly 66°
- Cuts tend not to be 100% accurate
- Unless firmly clamped the timber can move ruining the cut
- The act of sawing between the slots does actually cut away parts of the mitre block itself meaning your cuts are less accurate over time due to the fact you have widened the slots themselves
Despite the above they are still a decent cheap solution and if you’re feeling brave you can even make your own!
One final note before we move on to actually using the block to cut a mitre joint is the type of hand saw to use.
To get the most accurate cut possible and prevent any “tear out”. This occurs when you are cutting across the timber grain and the saw itself tears the grain out at the edges as it travels forwards and backwards.
To avoid this as much as possible you should use a saw with fine teeth such as a tenon saw, however a brand new saw such as a jack saw with razor sharp teeth can produce a fine cut if you work carefully.
Step 1 – Measure and Mark Timber
Before we start cutting, the first job is to measure and mark the exact cutting position on our piece of timber, in this case our architrave.
Using the information on measuring and marking above, mark your points on the door frame or external area of the object your working on that defines the point that your mitre joint turns through 90°s; and then measure up from the floor to this point.
Take your architrave and lay it flat on a workbench or level surface and then measure and mark the measurement you arrived at above on the architrave.
Cutting point for mitre joint marked on architrave – mark identifies the internal mitre
Step 2 – Position Mitre Block on Firm Surface
With our cutting point correctly marked, take your mitre block and position it on a firm and solid work surface.
On most blocks there is a small lip on the bottom of the front edge that should be butted up to the work surface your using. This helps to prevent the block moving around too much when cutting.
Lip on the base of the mitre block should be pushed up to workbench to prevent movement
Step 3 – Position Timber in Mitre Block and Clamp it up
Next, pop your piece of timber or architrave into your mitre block, making sure that the cutting point marked on the timber is accurately lined up with the correct slot on the bottom edge of the mitre block.
Timber placed in mitre block and cutting mark lined up with slot
Once accurately aligned, clamp the timber and the mitre block down to the work surface to prevent any movement while cutting.
Timber and mitre block clamped firmly down to work bench
Step 4 – Insert saw and Make the Cut
With everything lined up correctly and firmly clamped to your work surface to prevent any movement, we are now ready to make our cut.
Insert the cutting edge of the saw blade down into the correct slots in the mitre block and then start cutting.

Saw inserted into mitre block ready to start cutting
Cut steadily and consistently down through the timber, ensuring that the saw blade remains within the slots on the mitre block at all times.
Once you have cut down through your piece of timber, unclamp it and then remove it form the block.
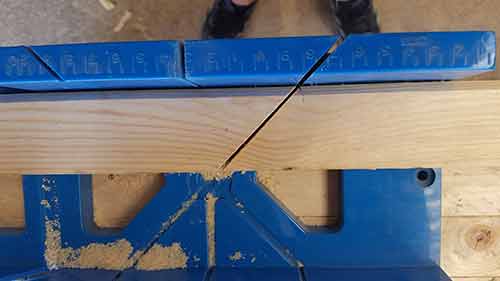
Cut successfully made in architrave timber using mitre block
If you have to make any further cuts, repeat the above steps, again making sure that any measurements are accurate and marked correctly on the timber.
Step 5 – Test fit Mitre Joint
With all of your cuts made you can now test fit them together.
Clear a flat area and lay out your nicely mitred architrave or timbers. Push the joints together ensuring that the the top and bottom edges are aligned accurately.
With your timbers lined up and pushed together, check the joint and make sure that both 45° cut edges fit together perfectly.
Timbers pushed together to test mitre joint
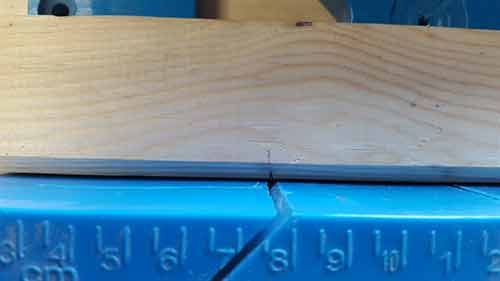
As we have mentioned, cutting mitre joints using a hand saw can lead to the joint itself not being a 100% accurate, but this isn’t the end of the world. Read on below for tips on how slightly inaccurate joints can be rectified.
Slight inaccuracy due to cutting mitre joints with a handsaw
Cutting a Mitre Joint Using a Compound Mitre Saw
The sliding compound mitre saw (or mitre saw, double bevel mitre saw, dual bevel mitre saw – some of their other names) is an essential tool to have in your workshop if you do any regular DIY or if you have quite a few mitre joints to cut you should definitely consider buying one.
They can be seem quite expensive initially but once you have used one, you quickly realize that the time you save and the accuracy of your cuts far outweighs the initial outlay.
For around £100 – £150 you can get a fairly good one that will more than meet your needs from a DIY perspective. To find out more about these hand tools, see our project here on using a mitre saw.
Using a sliding mitre saw to cut mitre joints is definitely the preferred option if you have the choice. As you can see form the “using a mitre block” section above, as good as they are, the joints tend to not quite be as good as they could be.
Using a mitre saw with a decent blade will pretty much guarantee as perfect a joint as it possible.
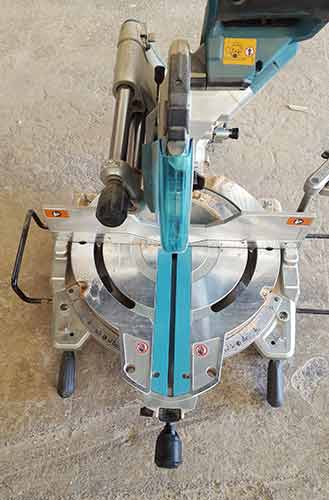
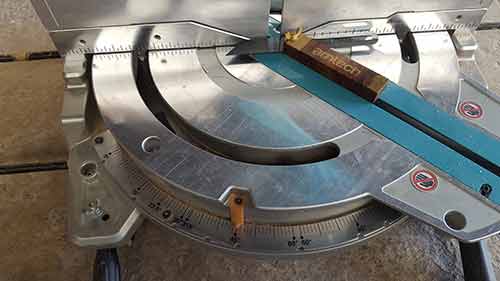
Makita cordless 36V sliding compound mitre saw
Step 1 – Measure and Mark Timber
The first job is to measure and mark the exact position on the timber, the point at which the mitre joint is formed e.g. the point at which it turns 90°
See the “How to Measure and Mark a Mitre Joint Cut” section above to find out how to accurately measure this.
Measure up from the floor level to your mark on the door frame and then measure and mark this figure onto your architrave timber, making sure that you mark the correct side.
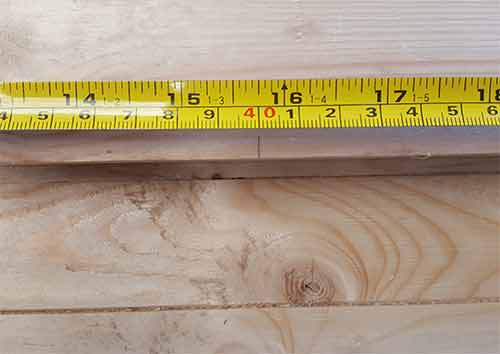
Cutting point marked on timber ready for cutting with saw
Step 2 – Set Correct Angle on Mitre Saw
With our cutting point accurately marked, the next job is to setup our mitre saw to make our cut at the correct angle, in this case 45°.
Unlike the mitre block, this task is fairly easy in that all you need to do is unlock the mitre lock handle at the front of the saw and turn the mitre scale until the indicator reaches 45°.
This will in turn, angle the blade to the correct 45° angle that we need
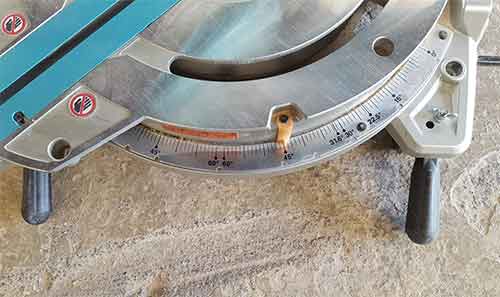
45° angle set on mitre saw ready for mitre cut
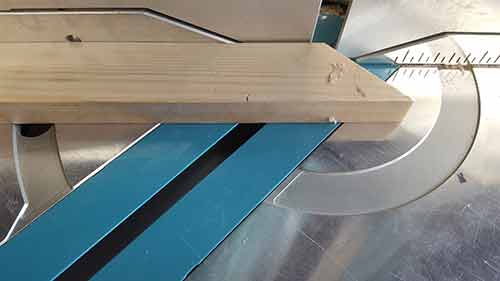
Step 3 – Position Timber for Cutting
The next job is to then position our timber on the flat table of the mitre saw and push it up tight to the fence.
Once flush with the fence, move the timber until your cutting point is directly over the centre of the blade recess on the table.
Some more expensive saws will feature a laser guide that pin-points the exact spot that the blade cuts, but if you don’t have this feature, the centre line of the blade recess should be your position.
Cutting in this position means that the saw blade will cut down through the centre of your pencil mark. As we have mentioned above, just make sure this is the exact point that you want to make your cut.

Timber positioned on saw table ready for cutting
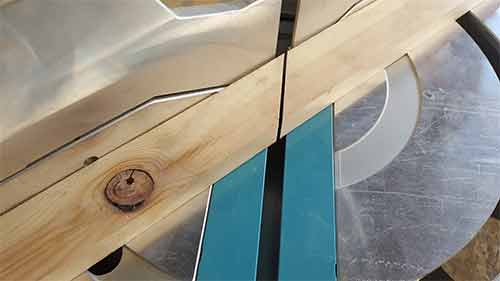
Step 4 – Cut First Piece of Timber for First Side of Joint
With your timber positioned it’s now time to get cutting. Just before we do make sure you are wearing the appropriate safety gear; safety goggles, old clothes etc.
Also, make sure that you’re not wearing any loose items of clothing or anything that dangles down. Power saws are very dangerous tools and if anything gets caught sucked in by the rotating blade, it can also drag your in along with it!
Press the power switch on the handle to start the saw and then use your thumb to press the handle release. This will then allow you to lower the blade down to your timber. Use your spare hand to hold the timber tight against the fence so that it doesn’t move.
At all times, ensure that your hand holding the timber is far out of reach of the blade!!
Once you have cut down through your timber you should then be left with a perfectly cut piece of timber.
Piece of timber cut at 45° ready to form mitre joint
With your first piece of timber now cut, repeat the above steps for the remaining 45° angle that can then be used to form your full mitre joint.
Second piece of timber positioned on saw ready for cutting
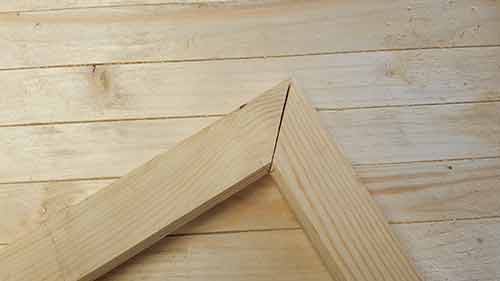
Step 6 – Test Fit Mitre Joints
With both of your timbers cut at 45° you are now ready for a test fit.
Lay both timbers on a flat and level surface and then pull them together at the point that your mitre joint will be formed.
If all is well and your cuts have been accurate you should now have a perfectly formed mitre joint.
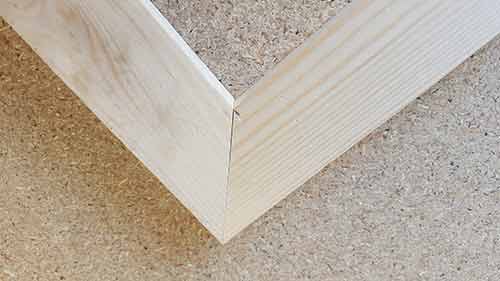
Perfectly cut and formed mitre joint created using a compound mitre saw
Cutting a mitre joint is a fairly simple and straightforward job regardless of whether you use a mitre block and hand saw or a compound mitre saw.
As long as you take your time, make sure nothing can move while cutting and more importantly, ensure that your measurements and markings are 100% accurate, there is no reason why you can’t cut one as well and the pro’s!
How to do Find the Exact Angle of the Mitre Joint you Need to cut?
In the above example we have cut and installed some architrave which is nearly always formed using a 90° mitre and in probably 95% of all cases, any mitre joints you cut will be cut at 45° to form a 90° joint.
However, on the very odd occasion that you need to cut a mitre or other join using something other than a 45° cut, how would you first work out the angle and secondly, make an accurate cut?
The first job is to get an accurate template of the angle so that we can calculate it. For this we can use an angle finder or angled/sliding bevel (see our project here on how to use one).
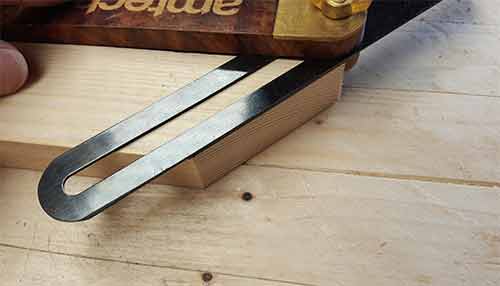
Using an angled bevel to get an accurate template of an existing angle
Once we have a template of the angle itself we then need to find out exactly what the angle is. You can either use a standard protractor or it you have a compound mitre saw handy, you can use the mitre scale to work this out pretty accurately.
Place your angled bevel on the saw table with the blade flush against the fence. Next loosen the mitre lock handle and then move the table until the blade recess in the table is total flush with the stock of the angle finder.
Look down to the mitre scale and see what the reading is. In the image below, the reading is 45° and as we already know the cut is exactly this (as we cut it in the steps above) we can see that this is a fairly accurate method for calculating an angle.
Angled bevel laying on mitre saw bed to set correct angle for mitre saw
What if my Mitre Joint isn’t that Accurate?
As we saw above, depending on what technique you use, it may transpire that after you have cut your mitres, their not quite as accurate as you might like them to be.
Fear not, don’t throw them in the waste pile just yet, there may be a solution.
If you are planning on painting your architrave or mitred timbers then it’s still possible to get a great looking finish.
Fix your timbers in place, ensuring that the joints are butted together as well as possible, but the timber itself is fixed in it’s correct position.
You can then use some decorators caulk to fill the gap left in the mitre joint. Use a caulk or skeleton gun to force the caulk into the joint until it is full.
Once the joint is totally full, put the gun to one side and then wet your finger and run it over the joint to smooth it off and remove any excess caulk.
Leave the caulk to cure fully until it is set and then you can paint over it.
If you have filled the joint fully and the caulk is totally flush with the both timbers, once painted, any imperfections should now be pretty much invisible.
However, if you are planning to expose the timber itself e.g. leave it bare then using caulk is a big no no! Instead, you could use a colour match high performance 2-part wood filler to try and colour match the filler to the timbers to disguise the repair.
Once applied and cured, the filler can then be rubbed down flush with the timber and if it’s a good colour match then the repair should be pretty well disguised.
Other Types of Timber Joint
As we have already mentioned above, the mitre joint is a fantastic method of forming timber joints for skirting boards, architrave etc but it’s not necessarily a joint that should be used for anything structural.
If you would like to know more about the other types of woodworking joints and what they are used for, see our other timber joints projects below:
- Timber Joints – The Bridle Joint
- Timber Joints – Halved Joints
- Timber Joints – Mortise and Tenon Joints
- Timber Joints – Dovetail Joints
- Timber Joints – Finger Or Comb Joint
- Timber Joints – Shoulder / Rebate / Lapped Joint