If you are going to use wallpaper in your home you will need the right tools. As we have pointed out many times, get the best tools you can afford as this will save you a lot of time and hassle. In this project we will take you through the steps involved in how to wallpaper a room, wallpapering around windows and doors and how to hang wallpaper correctly.
Wallpapering Tools you will Need
You will need the following items:
- tape measure
- pencil
- spirit level
- paperhanging scissors
- pasting table
- paste bucket
- pasting brush
- paper-hanging brush
- seam roller
- sharp hobby knife or proprietary wallpaper trimming knife
- overlap adhesive if you are using washable or vinyl paper
Preparation Before you Start Papering
Make sure the surface of your wall is free from flaking paint or grease and never paper over existing wallpaper. The paste on the new wallpaper can soak through to any existing wallpaper, dissolving it and before you know it you will have both wall coverings on the floor. There is a problem solving section at the bottom of this project.
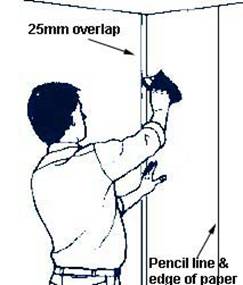
If the wall you are papering is already painted it’s a great idea to paint a line with a 25mm brush on the wall where it meets the ceiling or skirting. The line should be as close to the colour of the paper as possible so if your cuts are not 100% neat the backing wall does not stick out like a sore thumb.
Most wallpapers come in a standard size of 530mm wide and 10.5m long. Woodchip paper and lining paper along with a few other “specials” come in longer or differing width rolls.
Measure round the room for the number of rolls you need using the chart below. Make sure all the rolls of paper you buy all have the same batch number on them and do not be tempted to try and “stretch” the quantity you need.
If there are windows and doors in the room do not deduct rolls for them. There will be wastage and if you run out of paper it may be very hard to get 1 roll extra with exactly the same colour match. It is much better to buy 1 roll more than you need. You will always have some paper left over to patch up if necessary.
Calculate the Number of Wallpaper Rolls You Need
| Perimeter of Room |
Height Of Wall
|
||
| 2.3m – 2.4m | 2.4m – 2.6m | 2.6m – 2.7m | |
| 10m | 5 rolls | 5 rolls | 6 rolls |
| 12m | 6 | 6 | 7 |
| 14m | 7 | 7 | 8 |
| 16m | 8 | 8 | 9 |
| 18M | 9 | 9 | 10 |
| 20m | 10 | 10 | 11 |
Check the Pattern
Before you start to measure and cut, check the pattern on the paper (the label will help here). Some papers have a random pattern so it does not matter where you join the lengths.
Some have a pattern which only matches at specific distances so having cut your first length it does not necessarily follow that the next length will follow automatically; there may be a little more wastage with this type of match. Generally even a staggered match is repeated within 100mm.
Measure the Height of Your Room
Always measure the height of your room in a number of places. It will probably vary by a few mm. When you cut your paper to length add 100mm (more if the pattern requires it) to the longest measurement to allow for trimming.
Paper in a Clockwise Direction
We always suggest you wallpaper round the room in a clockwise direction in a room with no focal point, e.g a fireplace.
Where to Begin Wallpapering?
If the room has such a prominent point then begin there, especially with large patterned paper, by centering the pattern over the focal point. In both cases you will need to mark a vertical, plumb line to start your papering on.
Try and start the papering on a wall where no window or item of a similar exists then (Its important to remember that the corners of your room are extremely unlikely to be absolutely vertical or square so you need to make sure the very first strip of paper you put up is plumb) measure along the wall, from one corner of the room, the width of your wallpaper less 25mm and mark a vertical line from ceiling to skirting board with a spirit level.
This line is the leading edge of your paper and when the first strip is hung it will go round the corner by about 25mm.
Allowing for pattern repetitions, cut some lengths of wallpaper and lay them face down on the pasting table. The ends can be prevented from curling back up into a roll by tying a piece of string, across the table, to the legs.
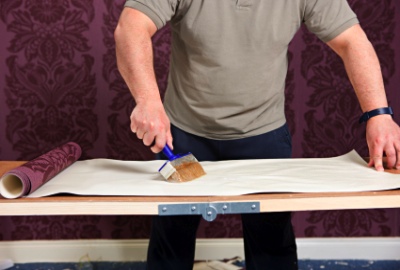
Pasting the paper with wallpaper paste
Mixing the Paste
Mix the paste in the bucket as per the instructions and tie another piece of string across the bucket at the point where the handle joins the top of the bucket. This will give you something to rest the brush bristles on to avoid getting the handle covered in paste.
Getting the Paste on the Paper
Paste the paper by working from the middle of each length to the outside and store by folding the wet sides together as shown. If you are careful and by lining up the lengths you have cut with the top edge of the table you should be able to paste 3 or 4 lengths at the same “sitting”.
Some papers need to soak for a while before hanging so check the instructions on the label.
While the paste is soaking in, mark the wall as described above.
Getting the Paper on the Wall
Take the first length and place the edge against the line on the wall. Unfold the paper gently onto the wall using your hanging brush to brush down the middle and out towards both edges. This brushing makes sure that the paper makes contact with the wall and at the same time brushes out any air bubbles which may have got trapped under the paper.
Brush the paper up to the crease between ceiling and wall and also the crease between skirting board and wall. Then double check the edge of the paper is on the line you drew on the wall and press the paper into both the creases with the back edge of your paperhanging scissors. This should give you a line to cut along.
Overlapping the paper
Pull the paper off the wall enough to cut and then brush it back into place.
Brush the paper tightly into the corner and you should have about 25mm overlap on the adjoining wall. This can be trimmed back to about 5 or 10mm and the length of wallpaper (which will be hung later) will overlap it.
The next length of paper to be hung goes on the line also so you are guaranteed to be hanging vertical lengths around the room.
Hanging Paper Round an External Corner
To hang paper round an external corner the same method is applied. The first length should turn round the corner by about 25mm (turnover) and the next length, on the second wall should be laid to a vertical line so it overlaps the turnover by as little as possible.
Extra care must be taken here when working to a pattern and sometimes a large overlap will be required onto the turn over as it will need to be cut back until it matches the pattern.
Cutting Wallpaper Round Switches and Sockets
When you get to a switch or socket, make sure you first turn off the power supply to that unit. Mark the four corners as shown in the diagram and cut diagonally across to leave an opening slightly smaller than the face plate of the socket or switch.
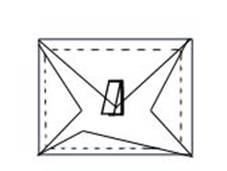
Cutting around sockets and switches
Cut off most of the four flaps as shown by the dotted line. Leave enough to tuck behind the socket or switch. Unscrew the face plate from the wall a little and wiggle it through the cut paper, pushing the paper against the wall as you do.
Tighten the faceplate back to the wall and turn the power back on when the adhesive is dry.
Papering Round Windows and Door Openings
The first overlap on a window should be cut as shown in the diagram. The flap of the cut fold round into the window reveal with the rest of the paper going over, and under, the window. There will be a slight cut out for the window cill.

Papering around window and door openings
Next the two top lengths are cut and pasted above the window folding down and under the head of the window opening.
The two corresponding strips are pasted under the window also. Strip number 3 is as strip 1.
When there is a window in the wall the cut widths may not work out evenly at either side of the window so measure to see if the joint between the strips of paper marked 2 in the diagram come close to the centre of the window.
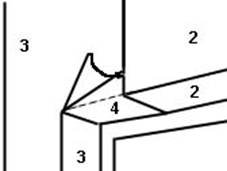
Papering around windows
If it does not then it is fine to start hanging paper at point 2, either side of the centre of the window and work out in both directions to the corner of the room. This way you should avoid silly strips of paper running down the window frame.
Finally pieces (4) are cut in under the head of the window opening. It is as well to cut and paste the pieces numbered 4 before finally pasting lengths 1 and 3. These pieces can then be turned up onto the wall above the window where lengths 1 and 3 will cover them.
Wallpapering Around Arches
The start of an arch is the same as a window. Paper up to, and over the arch (C). Then trim round the shape of the arch allowing a 25 -40mm overhang. Then cut small triangles out of the overhang, forming a series of wedges, or tabs, to allow you to fold it back under the arch.
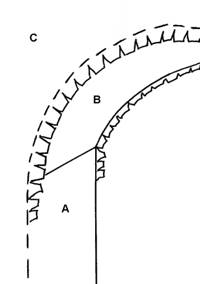
Wallpapering arches
If you just cut slits the paper will crease and possibly tear. When all tabs are folded in a strip of paper, just less than the width of the arch is stuck up under the arch and down the sides (A&B).
Sometimes the strip is cut first, with 25mm of overlap on either side of the arch and this is cut in the same way to allow it to be folded back onto the wall. Then the walls are papered and cut round the shape of the arch.
The drawback to this method is that it involves a very neat circular cut for the arch, nut if you feel up to it. It’s up to you!
Wallpapering Behind Radiators
Wherever possible take the radiator off after draining down the system if necessary. This make for a much better job. If this is not possible, cut the paper to the required shape to drop down over the radiator brackets, then smooth it out using a radiator paint roller.
Quick Wallpaper Hanging Tip
When your paste is mixed well into the bucket, tip it into a roller tray and paste the paper with a long haired roller.
Hanging Wallpaper Troubleshooting Guide
Q: My overlaps at corners will not stay stuck down?
A: If using washable or vinyl papers apply a special overlap adhesive. If using ordinary paper use some more of the original paste and go over the joint with a seam roller.
Q: Patchy stains are appearing through the wallpaper?
A: See the project on blocking water stains. Stains such as grease, soot, water, nicotine etc will keep “bleeding” through unless they are sealed.
Q: The paper has blisters all over it?
A: The paste may not have soaked into the paper for long enough or is not completely pasted. Check also that the walls are not damp or greasy.