Building steel stud or steel partition walls is fast becoming a normal method of providing division walls in domestic situations. The reason for this rise in popularity is that they have several advantages over the more traditional timber stud walls or brick or block stud partition walls, these include:
- They are much lighter in weight than timber stud walls or brick and block partitions
- They can be fixed more accurately than other partitions
- They do not split when cutting or fixing like timber can
- They can be built and installed much quicker than other partition methods
- More cost effective than timber or brick and block
- Provides better resistance to fire than timber stud walling
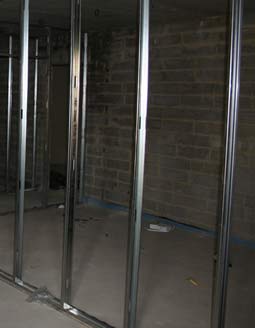
Steel partition framework
Making better use of existing space can often be achieved by the erection of steel partitions and if installed with a bit of planning they can also be fixed in a way that minimum damage is caused. This has the advantage in that if you need to remove the partition at some point in the future any repairs are kept to a minimum.
Different Installation Methods for Steel Partition Walls
The condition of the room you are installing a partition in will dictate the materials you can use. For example, if the partition is to be a permanent one and you have the time, money and space to do it a brick or block partition wall might be the best way to go, but only if your floor is solid enough to hold it.
If the ceiling or floor of the room you are partitioning is particularly wavey or not very level then you may be better off using timber as it will naturally bend and flex to follow the lines of a surface (within reason obviously!) better than using steel as steel is much more rigid and won’t flex anywhere near as much as timber.
In most homes you will be able to use steel stud work as the majority of wall, ceiling or floor surfaces will be flat enough. It can also be used in several different combinations:
- Full steel stud framework including top and bottom channels and vertical uprights
- Top and bottom steel channels and vertical timber uprights
- Timber top and bottom studs with steel vertical uprights
The methods that you use from the above options will really depend on the condition of your room space as you really want any fixings to be flush to the surface and solid. To these ends make sure you check the following with a spirit level first before deciding on which method to use by holding it flat against the following surfaces where you are going to build your partition wall and look for gaps between the level and the surface:
- Ceiling surface
- Floor surface
- Any upright walls that will be used for fixing to
It is also a good point to note that building control approval may be required from the local authority for the erection of partition walls so make sure you check this first! They can also advise you on thermal, acoustic and fire issues.
How to Build a Steel Partition Wall
The most common method when using steel in a partition wall in a domestic situation is to use two steel channels fixed at the floor and ceiling level of the room directly above each other and vertical timber studs usually at 400mm centres and boards (can either be plasterboard, timber or steel) fixed to cover both sides. To these ends the following instructions are geared towards using this method
The thickness of most partitions is either 52mm or 72mm depending on the width of the steel channel.
Advantages of Using Timber and Steel
- The top and bottom channels are easier fix in place
- They provide a good, solid base to build around
- If they are aligned directly above each other as they should be any timber uprights are absolutely vertical
- Using timber for uprights provides easier fixing and fitting of doors and windows
Disadvantages of Using Timber and Steel
- If the surface your fixing to isn’t absolutely flat then it may need packing slightly
- If the timber uprights are set inside a steel channel then you may need to compensate for the "lip" depending on thickness when fixing surface boards
The first task in erecting a steel partition is deciding on the location. The approximate position will already be known but the layout of the hidden ceiling joists that are covered by either plasterboard, plaster or what ever the chosen ceiling covering may be must be determined so that the top channel of the partition can be set accurately and also fixed securely.
Finding Ceiling Joists to Fix to
If the ceiling joists run parallel to the new partition its position should be adjusted to make it sit under one joist thus making the fixing of the top channel easier. If the joists run across the line then the channel must be screwed to individual ceiling joists.
You may also be thinking "How do I actually find the joists in the ceiling when they are covered?" Well in answer to this there is a very hand tool called a stud finder. You can find out more about this great piece of kit in our how to use a stud finder project.
When fixing to a parallel joist, mark the center of the joists at both ends and then draw a straight line along its length. Measure the width of the steel channel and mark its center at both ends. This will enable you to position it directly on top of the straight line ensuring that you will be fixing to the center of the joist.
When fixing across a number of joists use the same method but this time mark the start and finish of each joist along the straight line to ensure that you will be fixing to the joist and you won’t miss when screwing in to it.
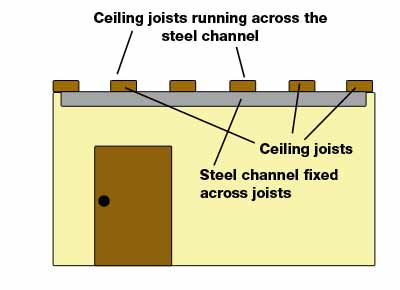
Steel channel fixed across joists
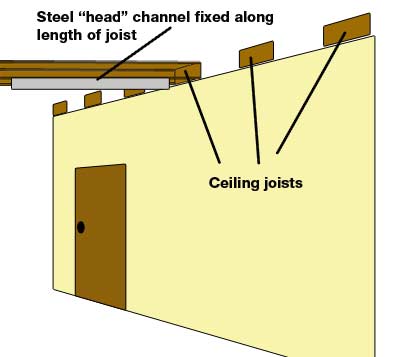
Steel channel fixed along joists
Fixing the Head Channel
After the head channel is screwed in place at 400mm centres (if parallel fixing or to all available joists if fixing across) the use of a plumb bob will determine the position of the floor channel which should then be fixed to the existing floor. Hold the plumb bob directly on the bottom edge of the channel along one side and mark the corresponding positions on the floor.
Now position your bottom channel up to the marks on the floor and fix at either end. At this point before you complete the fixing process it is a good idea to check that both channels are exactly aligned on top of each other. For this you can either use your plumb bob or if you have a long enough straight edge, place this against the side of each channel and use a spirit level.
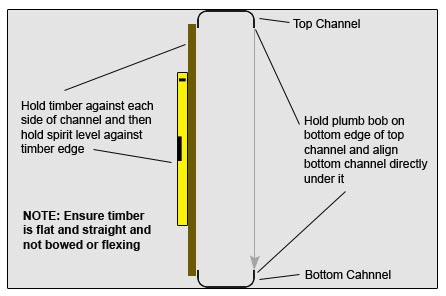
Aligning top and bottom channels directly above each other
In the case of uneven existing flooring, some packers may be needed or perhaps a sole plate should be installed in extreme cases.
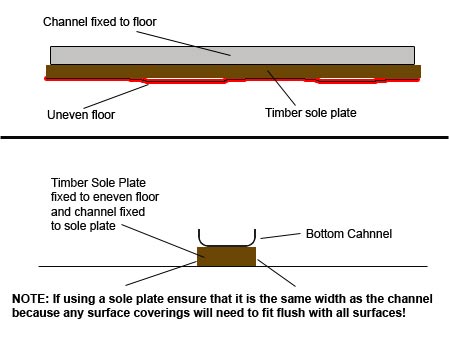
Using a sole plate
Fitting Vertical Studs
Each of your upright vertical timbers should be set at 400mm apart and timber noggins should then be set in between each upright ensuring a solid and sturdy construction.
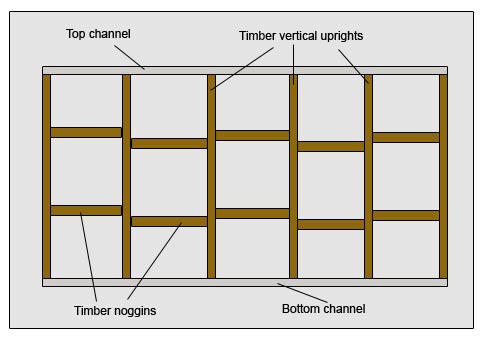
Upright vertical timbers fixed and noggins added
Each vertical stud must be cut to length and wedged between the head and floor channels. Cut your vertical timbers to the correct height between the top and bottom channels and then add on 1 or 2mm to ensure a snug fit. It is best to cut each timber as you go and not measure the first and cut them all to the same length as this as you will find that there will probably be at least a few mm difference between each.
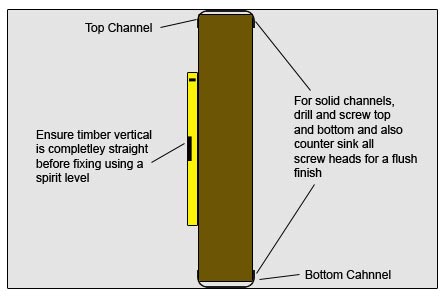
With your timber cut and in position ensure that it is absolutely upright by using a spirit level before you fix it.
When it comes to fixing, this will depend on the type of steel channels you have. Some come pre-drilled allowing you to screw in from the side and fix your timber to the channel and others will be solid meaning that you will have to drill a screw hole through the channel to secure your timber.
It is also a good point to note that you will need to countersink any screw heads into the channel as much as possible and also use screws with flat heads so that you can then fit your surface boards flush with the timbers and channel.
Fixing vertical timbers
Fitting the Boards
The boarding, what ever materials you decide to use should be fixed to the studs on one face only with a close fit against the ceiling because any gap that appears at the edge of the bottom channel can be covered by skirting board.
The board edges should meet at a vertical stud in the center of the stud. The board layout should also be arranged so that they avoid both sides of the partition being fixed to the same stud.
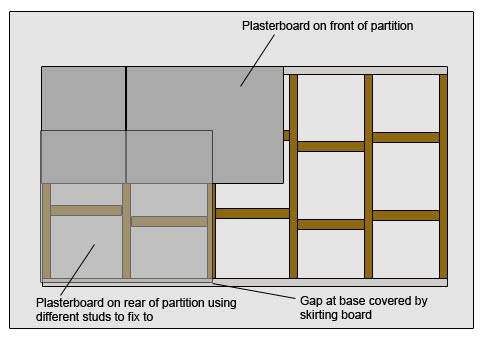
Fixing plasterboard front and back of stud framework
As mentioned above, depending on the type of steel channels you have used, you may need to compensate for the "lip". This can be overcome by fixing trips of timber (they will have to be the same width as the lip of the channel) to the fact of each of the timber uprights and noggins.
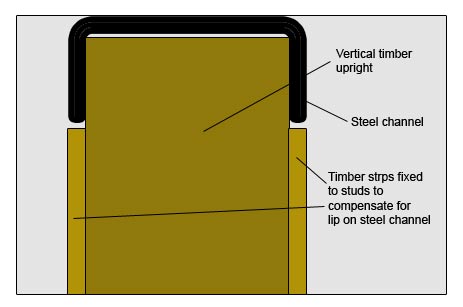
Timber strips fixed to stud to compensate for lip
Once the plasterboard has been fixed front and back and flush with the surface of the stud framework to ensure that non of the boards have been bent or are bowing then it can be taped and skimmed with plaster in the usual way.
I Need to Fit a Door or Window!
If you are building a stud wall then in most cases you will also want to fit a door as you will obviously want to be able to access your newly created room space.
Fitting a Door
These can be formed quite easily by using a length of floor channel cut to produce the correct size of opening needed – usually this will be the width of your chosen door. As you can imagine this introduces new issues in the fact that you then have to line up the channel each side of the opening but this can be achieved by using a spirit level or straight edge.
With your floor cannel cut to the correct length fix it to the floor using the process outlined above, making sure they are level, aligned above each other and fitted securely.
Next fix your vertical upright timbers into place as outlined above only this time you will also need to fit an upright flush with the end of each channel inside your opening as this will form the framework of your doorway.
As before, once the uprights are in place your noggins will to be fixed in place. When it comes to noggins, only fix these to the uprights outside of your doorway as you will need to take a slightly different approach within the doorway space.
For this you will need to fit a "header" that will be slightly higher than the height of your door and then you will need to fix noggins down from the top channel to the header.
As you are working through each step above ensure that you periodically measure the width and height of your door gap. This is so that once everything is fixed in place you don’t suddenly realise you fixed your header too low or even worse one of the vertical uprights to narrow and your door will no longer fit!.
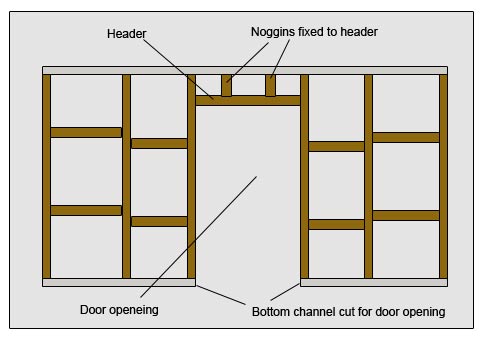
Making an opening for a door in a stud wall
Fitting a Window
If you are wanting to fit a window, this is a very similar process to that of fitting a door only this time you should not need to cut either of the steel channels.
Simply mark out the location of the window area within your framework and remove a section of one of the timber uprights. This time you will need to fit a header for the window and also a base. Again, note the height of your window frame and ensure that the space between the header and base are adequate. You may also need to move around some of the timber noggins.
The space that you have created may now be a little too wide for your window. In this case you can now add some upright noggins to produce the required width.
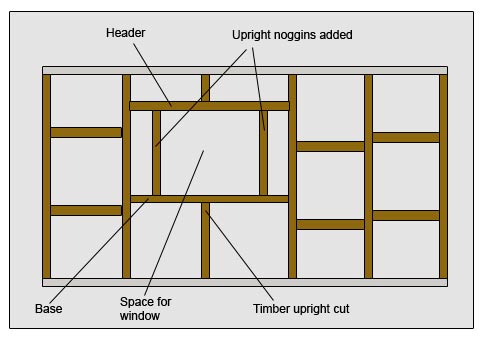
Making an opening for a window
As you can see from the above, steel partition walls can be built in a variety of different ways and can use different combinations of both the steel partition stud framework and timber.
In this DIY guide we have learnt how to build a steel partition wall using top and bottom steel channels and timber uprights but depending on the type and condition of room space you have one of the other construction types may be more suitable for you so you can take the principles and processes we have used here and apply them to your chosen method.
