Room dividers are versatile solutions for creating privacy, reducing noise, and managing light in any space. Whether fixed or movable, they help define areas within a room, offering both functionality and style.
Dividers can be made from various materials such as wood, fabric, metal, bamboo, wicker, glass, or even plants, making them adaptable to different aesthetics and needs.
As open-plan living becomes more popular, screens and partitions are essential for defining spaces, creating privacy, and adapting rooms to the changing needs of a household.
Modern homes often require flexible spaces, and room dividers are a simple, effective way to achieve this. They can be easily installed and moved as needed, providing a quick solution to privacy and space management.
Designers use zoning techniques to make large, open spaces more functional. Adding a screen or partition helps organise cluttered areas, making rooms feel larger and more purposeful.
In office settings, partition screens offer privacy and can serve as practical bulletin boards. While industrial options are common, we offer chic alternatives that blend seamlessly into home decor.
If you’re interested in a guide to installing permanent partition walls, visit our partition wall project.
1. Integrated Room Partition Screen with Storage
Maximise space by using your room divider as a storage solution. Consider adding bookshelves, wine racks, plant holders, or drawers to your partition to make it functional and stylish.
The example below shows how modular units can be stacked to separate living, dining, and sleeping areas while providing ample storage, all without sacrificing the open feel of the space.
This room divider stores everyday essentials: a microwave and bread bin in the kitchen area, files for the home office, and a built-in wine rack for evening relaxation.
By tailoring the partition to your lifestyle, you can create or purchase a versatile piece of furniture that not only declutters but also clearly defines each area’s purpose while keeping essentials within easy reach.
If you’re interested in building your own modular partition, explore our timber projects for guidance. To finish your project with a personal touch, check out our painting and decorating tips to protect and style your partition to fit your home.
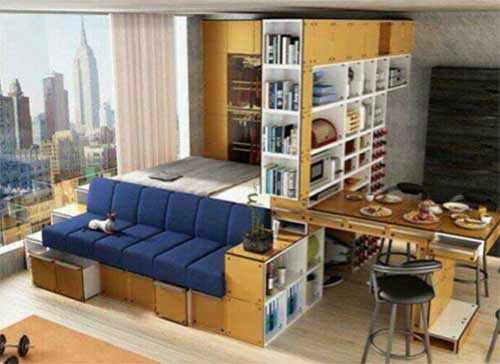
Divide a room using Storage Partitions – Image courtesy of George Clark’s Amazing Spaces
2. Shelving as a Room Divider or Screen
Even in larger spaces, using shelving as a room divider is a smart way to add storage and style. Shelves accessible from both sides create functional partitions while offering display space for personal items.
Bookshelves are ideal for this purpose, providing a sense of privacy while still allowing glimpses of the room beyond, keeping the space open and airy.
A designer tip for maintaining a spacious, light-filled environment is to hang the partition from the ceiling, stopping it short of the floor—see the example below for inspiration.
Before installing a ceiling-hung partition, ensure your ceiling joists can support the weight. Alternatively, consider units with ceiling fixings and slender legs to evenly distribute the load. For more on securing fixtures, explore our guide on fixings.

Shelves as partition screens – Image courtesty of LagoLinea Shelf designed by Daniele Lago for LAGO
3. Timber Divider Screens
Timber divider screens bring natural warmth and character to any room. Whether you leave the wood in its natural colour or treat it, proper protection is key based on its location.
In damp areas like bathrooms or kitchens, waterproof varnish is recommended. For high-touch areas, such as stairwells, a wax finish will protect the wood from handling marks.
Timber screens don’t have to be heavy or dark. For a light and airy look, take inspiration from Eastern design. Use natural-coloured wood supported by metal or rope to create a stylish partition that offers privacy without fully enclosing a space. The example below shows how to create an open ensuite in a large bedroom without building solid walls.
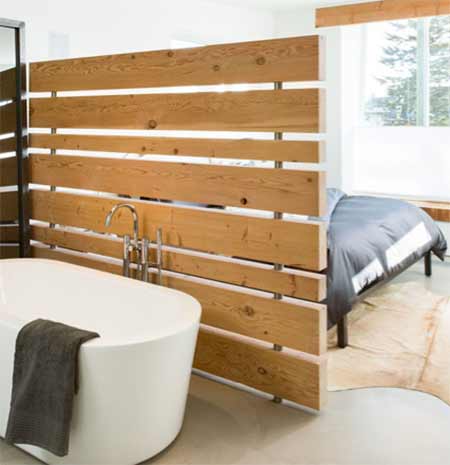
This Modern Wooden Screen Provides Privacy – Image courtesy of Pinterest
4. Vertical Timber Screens
Vertical timber screens are created by aligning upright timber planks in a row, effectively dividing spaces while still allowing glimpses of the area beyond.
This design works well in hallways and staircases, where movement changes the perspective, offering either a solid wall effect or a striped pattern as you walk by.
The example below shows a vertical timber screen with planks inserted into a timber frame.
If you plan to build a similar screen, ensure your timber is straight, unwarped, and stored flat before assembly to prevent twisting.
For guidance, check out our mortise and tenon joint project, which is ideal for constructing sturdy room dividers.
You can also secure the timber using brackets or decorative legs, especially in rooms with lower ceilings.
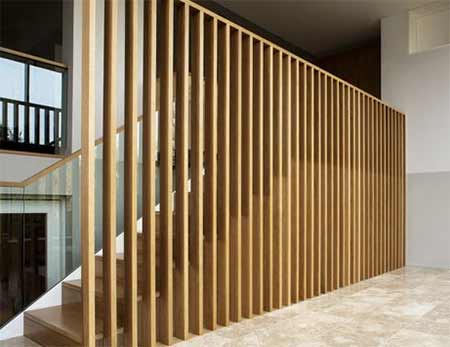
Upright natural timber screen creates an impact – Image courtesy of Liddicoat and Goldhill Architects
5. Glass Room Dividers
For those looking to divide rooms while maintaining an open-plan feel, glass sliding doors are an excellent option.
Glass dividers offer the advantage of letting natural light flow through while allowing different activities to happen simultaneously without disrupting one another.
These dividers provide some sound insulation, making them perfect for separating a TV area from a home office, or keeping kitchen smells contained in the kitchen.
To suit your style and budget, consider using coloured, frosted, or stained glass for a unique look.
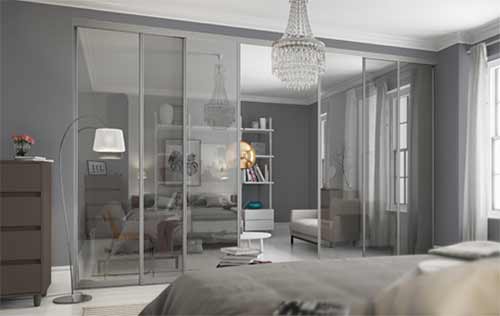
Glass room dividers allow natural light between rooms – Image courtesy of spaceslide.co.uk
6. Japanese Paper Screen
Japanese paper screens, or Shoji, have been used for centuries to elegantly divide spaces.
Shoji screens are made from translucent paper stretched over a wooden or bamboo frame, often mounted on sliders for easy movement. They provide privacy while allowing light to filter through, making rooms feel bright yet private.
Although lightweight and delicate, these screens can be easily repaired if damaged.
While not suited for exterior walls in Western climates, Shoji screens are a stylish alternative to net curtains or frosted glass for interior privacy, as shown in the image below.

Using Paper Room Dividers to Provide Privacy – Image courtesy of miyashoji.com
In traditional Japanese design, screens are installed on tracks, allowing them to slide open and create a spacious, unified area during the day. They can then be closed for privacy and to separate spaces for activities, sleeping, or bathing.
Inspired by these designs, modern freestanding paper screens are now available. They reflect the classic Japanese style but offer the flexibility to be moved wherever needed. When not in use, they can be folded and stored easily.
7. Bamboo Screen
Bamboo is a versatile, natural material that creates lightweight, warm screens, perfect for partitioning rooms without adding bulk.
Freestanding bamboo screens are easy to move, making them ideal for creating private spaces like dressing areas, home offices, or music corners in smaller rooms.
Bamboo screens can be left natural, lacquered, or decorated—often with Oriental patterns. They range from simple designs to more decorative, woven styles, like the vintage bamboo screen shown below.
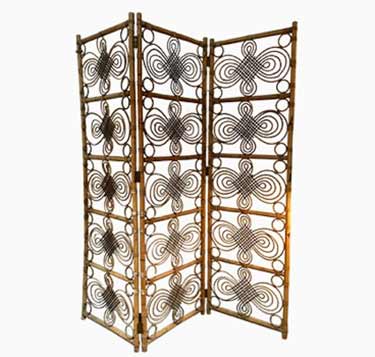
Screening bamboo room divider – www.pamono.co.uk
Bamboo screens are a cost-effective way to divide a room and can often be found affordably in second-hand shops. With rising popularity, it’s wise to act quickly to find a bargain.
Consider vintage reproductions or sleek, modern designs like the large freestanding bamboo screen below, which can be shaped as needed and easily rolled up for open-plan living.
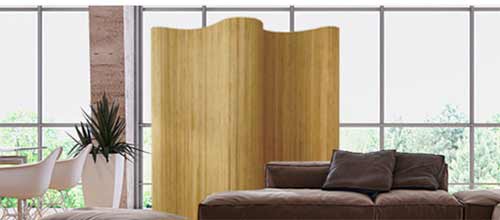
Large freestanding bamboo screen – Image courtesy of naturalliving.co.uk
8. Jali Screens
Jali screens are decorative, carved panels from India, named after the Hindu word for “net”. They feature intricate geometric designs, often inspired by calligraphy.
Traditionally made from wood, Jali screens can also be crafted from pierced metal, MDF, or stone. Originally, they were used to diffuse harsh sunlight or provide privacy within a home.
In any climate, Jali screens make stunning room dividers. The choice of material and color significantly impacts the screen’s style—dark wood or painted metal offers a traditional look, while white or natural wood feels more modern.
Contemporary Jali Screens used as a partition – Image courtesy of Pinterest
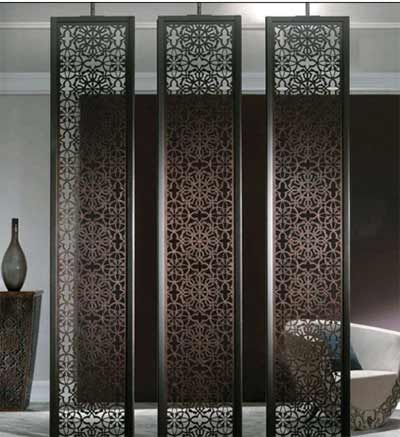
9. Metal Room Dividing Screens
Metal screens come in various styles, from traditional Jali screens with intricate cut-out designs to modern laser-cut patterns and even rustic, industrial looks suitable for gardens.
Metal partitions are strong and versatile, allowing for delicate and detailed designs without compromising durability. They can be crafted into nearly any shape or pattern, making them a flexible choice for room dividers.

Decorative metal room screen – Image courtesy of Mor Décor
10. Rope Screen
Creating a rope screen is an easy DIY project. You can use traditional jute rope for a natural look or synthetic rope for added durability. Rope screens are ideal for conservatories or gardens due to their weather resistance.
One simple method involves threading lengths of rope through painted timber, knotting the ends, and attaching the timber to the ceiling to create a vertical partition between spaces.
Rope screens are cost-effective, lightweight, and semi-permanent. You can find a variety of styles online, from simple designs to intricate patterns, allowing for creative personalisation.

Simple Rope Screen provides an office partition – Image courtesy of Pinterest
11. Curtain Room Dividers
Curtain room dividers offer a flexible and stylish way to separate spaces and easily update your decor. They can divide areas like a bedroom from a dressing room or bathroom, adding a soft, luxurious feel.
Curtains can provide privacy, block drafts, or let light through, depending on their fabric. For instance, heavy curtains offer insulation, while sheer ones allow light to filter in.
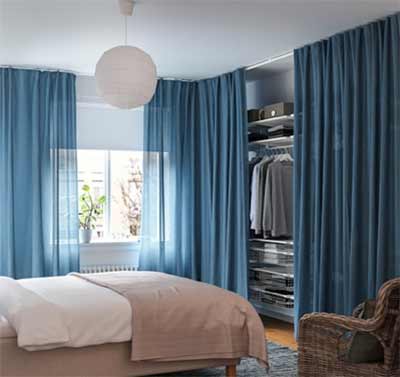
Curtain divider in a bedroom screens the windows and wardrobe – Image courtesy of IKEA.com
Once the curtain track is installed, you can easily swap fabrics to match your changing decor. Opt for bold prints or subtle neutrals based on your style.
With different fabrics on either end of the track, you can switch between looks effortlessly. Curtains can also be fully opened or removed when needed.
Learn how to install a curtain track in our Curtain Poles and Rails project.