The mortise and tenon joint is a staple in woodworking, known for its strength and versatility. It’s commonly used in projects like tables, chairs, furniture, windows, doors, and even timber-framed buildings.
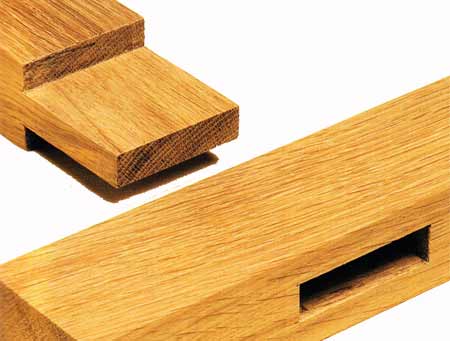
Standard through mortise and tenon joint
Its interlocking design makes it resilient against horizontal, vertical, lateral, and twisting forces. However, it’s less ideal for items like drawers that experience frequent movement, as the joint may loosen over time.
In this project we run through the process of how to make one, read on to find out how.
Types of Mortise and Tenon Joints
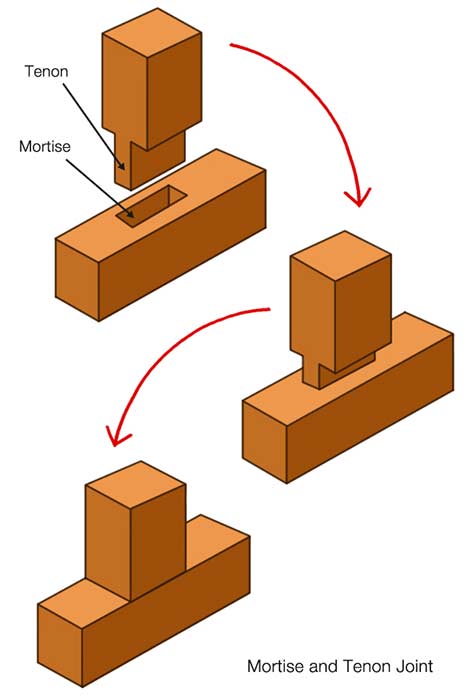
The mortise and tenon joint consists of a tenon that fits into a mortise, secured by your preferred method.
Variations in this joint come down to the depth, whether it extends fully through the mortise or stops midway and the shape of both the tenon and mortise, influencing how they connect.
Stopped or Blind Mortise and Tenon Joint
This joint hides the tenon by stopping it halfway into the mortise, creating a cleaner, more polished appearance.
Ideal for furniture like tables and chairs, it offers the strength of a traditional mortise and tenon while maintaining a neat and visually appealing finish.
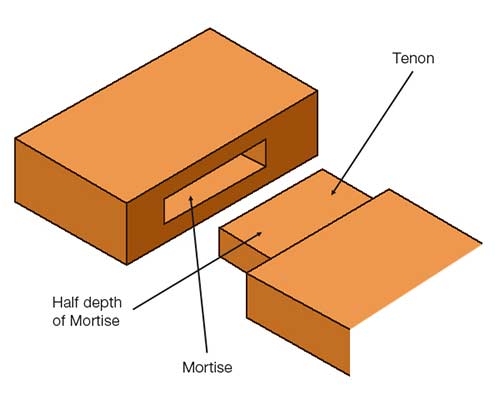
Stopped mortise and tenon joint
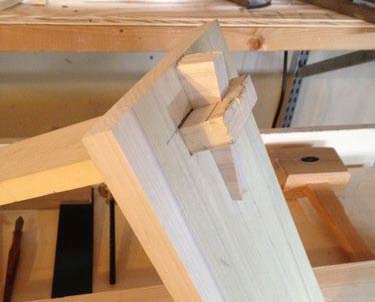
Through Mortise and Tenon Joint
Unlike the stopped joint, a through mortise and tenon joint allows the tenon to pass completely through the mortise, making it visible.
The choice between a through or stopped joint depends on your preference. When crafted with precision, a through joint can be as visually appealing as a stopped joint, especially with timber that has prominent grain patterns. It can also be slightly stronger due to the increased surface area for adhesive bonding.
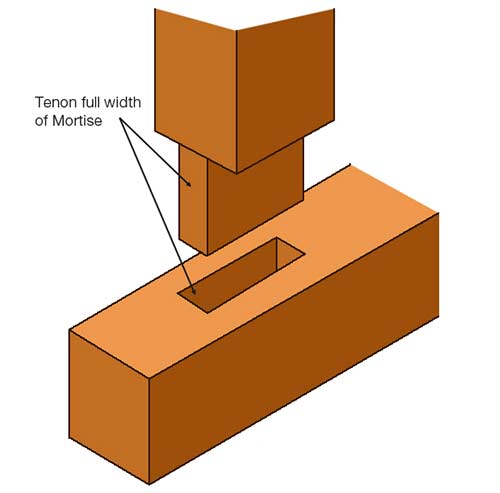
Through mortise and tenon joint
Dowelled Mortise and Tenon Joint
This variation replaces the traditional mortise and tenon with dowels. Instead of cutting a tenon, holes are drilled in both timber pieces (either stopped or through) to a set depth. A dowel is then glued or fixed into one piece, forming the tenon, which is inserted into the corresponding hole (mortise) of the other piece.
This method is popular in modern furniture making due to its efficiency and cost-effectiveness. While some may consider it less traditional, when done correctly with strong hardwood dowels like oak, it creates a durable and reliable joint.
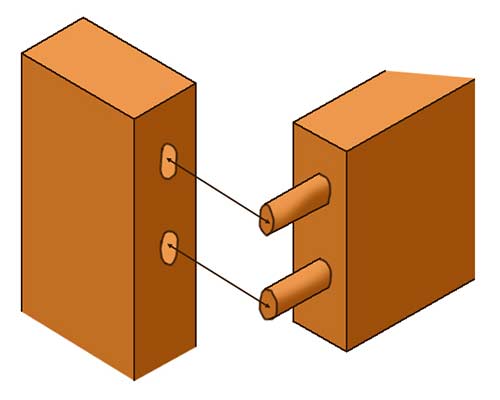
Dowelled mortise and tenon joint
Haunched or Secret Haunch Mortise and Tenon Joint
The haunched mortise and tenon joint adds extra strength by incorporating a sloped section, increasing the glue surface area, and preventing twisting. This makes it perfect for frames like doors, windows, and door frames, where dowels, wedges, or screws might not offer the desired durability or look.
As this joint is more complex to cut, it’s best to master traditional joints first. For a detailed guide on crafting this joint, check out this Popular Woodworking tutorial.
The strength of this joint hinges on precision. Ensure a snug fit, not too tight or loose, for a stable and long-lasting connection. While glue is essential, consider additional reinforcements to prevent the joint from loosening over time, especially in high-use furniture like tables.
Mortise and Tenon Joint Fixings
After crafting a perfect mortise and tenon joint, securing it permanently is crucial. The method you choose depends on the joint’s purpose and will determine its durability.
A strong fix ensures the joint remains stable and long-lasting. For example, when making a chair, a secure joint is vital to prevent any movement that could lead to collapse and injury.
Using Glue for Mortise and Tenon Joints
Even when using additional fixings like dowels, it’s essential to coat all faces of the tenon joint with glue, including the shoulder area.
Be mindful of the glue amount. A snug joint will force excess glue out, which should be wiped off immediately to prevent damage to the finish.
For through joints, apply a light coat of glue on all tenon faces using a small brush. Apply glue more liberally on the mortise faces. To avoid hydraulic pressure forcing glue out, cut the mortise slightly deeper than the tenon length.
When gluing, avoid applying glue to the visible ends of tenons or dowels, as excess can mar the finish.
Clamp the joint firmly while the glue dries, ensuring it remains square. Once dry, the bond is permanent, so use a strong, high-quality wood glue.
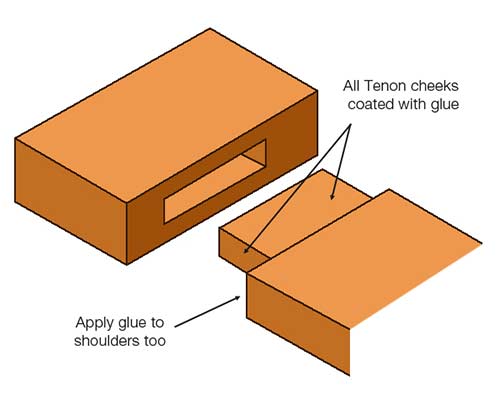
Apply glue to all faces of tenon joint, including lightly on the shoulders
Using Dowel Rods
To reinforce the mortise and tenon joint, insert a dowel rod through both sections. This adds strength and prevents loosening under stress, especially in furniture like tables and chairs.
Ensure the dowel is slightly larger than the drilled hole for a tight fit. There are two main methods to drill the holes:
- Clamp and Drill: Assemble and clamp the joint securely. Ideally, use a pillar drill for precise, straight holes. If using a hand drill, ensure the bit is straight.
- Separate Drilling: Mark and drill the mortise holes first. Assemble the joint, mark the tenon through the mortise holes, then disassemble to drill the tenon. This method requires careful alignment.
After drilling, dry-assemble the joint to check alignment. Apply glue to the cheeks, assemble, and clamp. Place the joint on a solid surface and gently tap the dowel through with a hammer. Sand any excess dowel flush.
A technique worth considering is drawboring. Drill the hole in the tenon slightly off-centre toward the shoulder, so the dowel pulls the tenon tightly into the mortise, enhancing the joint’s strength. Properly done, this can eliminate the need for glue. Learn more about drawboring here.
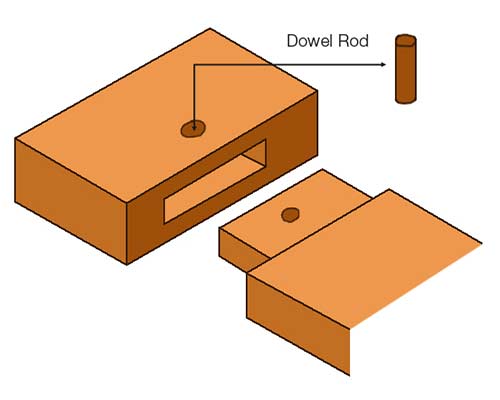
Using a dowel to joint a mortise and tenon joint so that it does not seperate
Using Wedges, Keys, and Tusks
Wedges, keys, and tusks are typically used in through joints due to the difficulty of inserting wedges in concealed joints. There are two main types of wedged mortise and tenon joints:
1. Outer and Inner Wedged Joints: In these, wedges are driven into the tenon within the mortise. Outer wedges expand the joint from the edges, while inner wedges are inserted into the tenon to spread it apart, securing the joint.
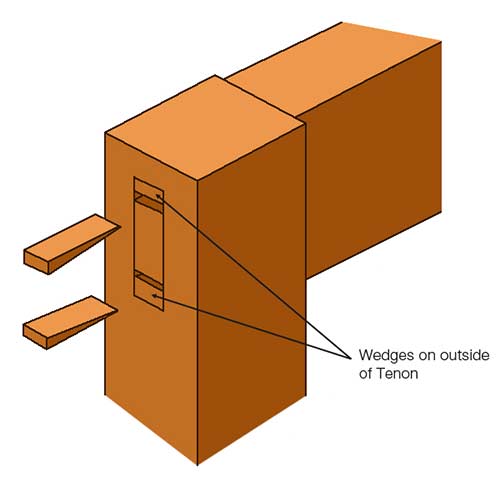
Outer wedged mortise and tenon joint
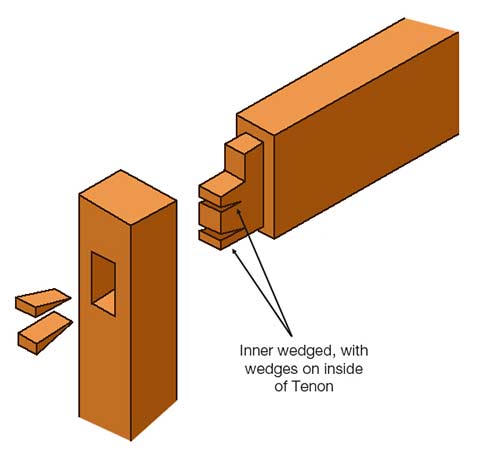
Inner wedged mortise and tenon joint
2. Tusk or Keyed Joints: A single large wedge, or key, is driven through the protruding tenon, pulling the joint together tightly. This method creates an exceptionally strong bond, often seen in structures like church pews.
Tusk or Keyed Mortise and Tenon Joint
These joints are incredibly durable, often lasting hundreds of years. For added strength, glue is also used alongside wedges, keys, or dowels to bond the joint and prevent separation under stress.
In earlier times, before the widespread use of glue, joints relied solely on mechanical fixings like wedges and dowels for strength and stability.
While screws can be used for extra strength, they are best reserved for purely functional joints, as they can detract from the visual appeal of furniture where the joint is meant to be a design feature.
Tools and Timber: Essential Tips
Choosing the right timber is crucial for your project. For a chair or table, select smooth, planed timber; for a workbench, rough-cut wood is suitable. Ensure your timber is straight, without bows, kinks, or warps, and as knot-free as possible to achieve accurate joints.
Invest in high-quality tools when possible. While budget tools are acceptable if they are sharp and level, higher-quality tools will offer better precision and durability.
In carpentry, the right tool can make a significant difference. A mortise gauge is particularly useful for precise marking. If you’re unfamiliar with this tool, check out this video tutorial on using a mortise gauge.
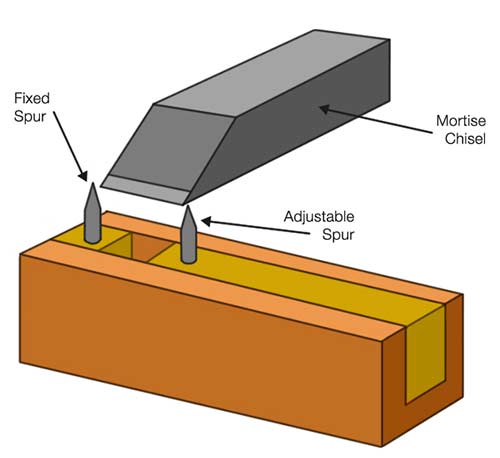
For optimal results, choose a mortise gauge with two marking pins: one fixed and one adjustable, along with a movable stock.
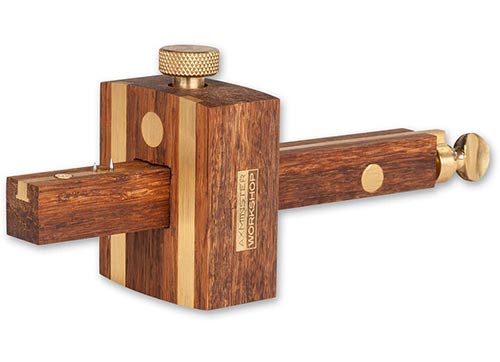
The mortise gauge is used to mark accurate mortise and tenon joints
In terms of what tools are required, here is a list:
- Set of sharp chisels
- Mallet
- Plane
- Selection of sand paper
- Drill/driver
- Selection of drill bits
- Carpenters square
- Pen/pencil
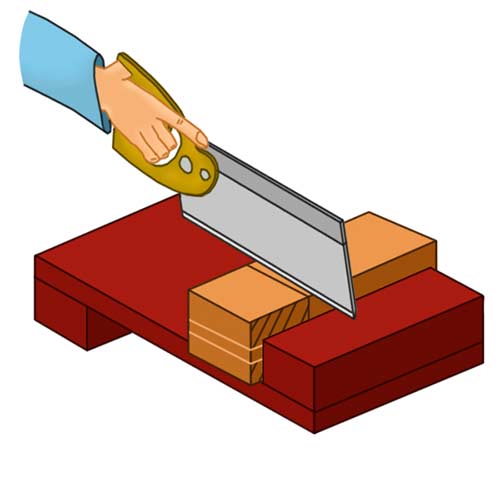
- Tenon saw/hand saw
- Suitable timber for form joints
- Mortise gauge
- Bench hook or clamps
- Workmate or other solid work surface
How to Create a Mortise and Tenon Joint
We’ve covered various types of mortise and tenon joints, but here we’ll focus on crafting a simple through mortise and tenon joint. This classic method is ideal for demonstrating the basics of this versatile joinery technique.
Step 1 – Marking the Mortise
To begin, mark the mortise section of your joint. Ideally, use a mortise gauge, but a pencil and ruler work too.
For sizing, consider:
- Large Timbers: For timbers like 3″x3″, divide into thirds. The mortise should be 1 inch wide, matching the tenon.
- Smaller Timbers: For 1″x1″ timbers, use the width of your mortise chisel or follow the thirds principle, aiming for a width about a third of the timber’s width.
For this guide, we’ll use the chisel width. Measure the chisel width with a ruler. Subtract this from the timber width, then divide by two.
If using a gauge, adjust the spurs to match the chisel width and lock them in place. This ensures your mortise is centred.
Setting the mortise gauge width
Draw a line across the timber’s width where you want the mortise to start. Use a carpenter’s square to extend the line along the timber. Measure from the edges, mark, and connect the lines to outline the mortise.
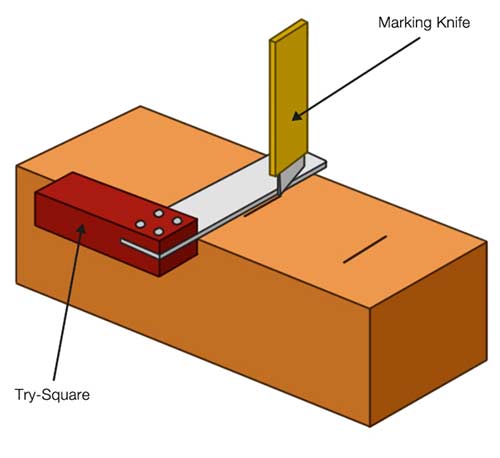
Marking the mortise on timber
Repeat the process for all lines to complete your mortise markings. If using a gauge, ensure the stock is set to the measurement used to centre the mortise.
Marking timber using a mortise gauge
Step 2 – Cutting the Mortise Joint
Now it’s time to cut the mortise joint. Start by sharpening your mortise chisel using a hand file, grinder, or dedicated sharpener for precise cuts.
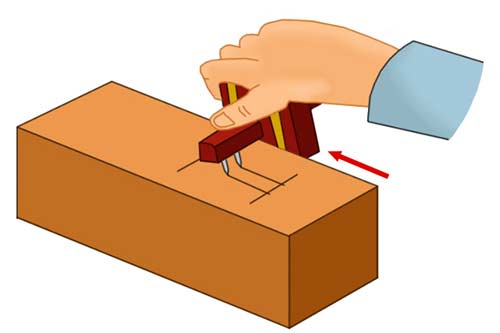
Place the chisel on one of your end lines and gently tap it with a hammer or mallet to remove excess wood.
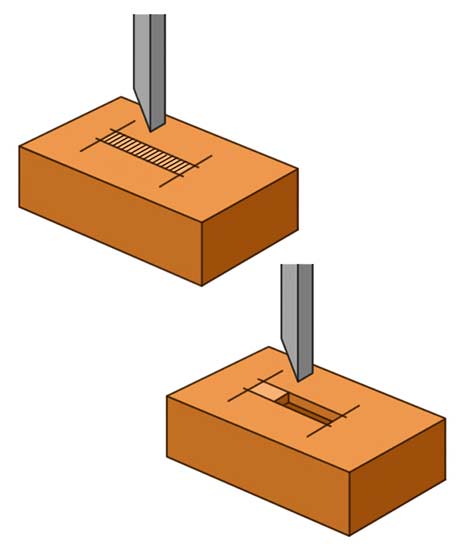
Removing waste timber from the mortise joint
Work carefully and take your time. A sharp chisel will help ensure accuracy. Rushing can compromise the joint’s fit.

Using a mallet to tap the chisel and clear the waste timber
Continue until the mortise is clean. Avoid tidying up too early; fit the tenon first to ensure the joint is correct before final adjustments.
Step 3 – Marking Out the Tenon
In this guide, we’ll work with timbers of the same size. Ensure the mortise is larger than the tenon for a proper fit.
Begin by marking the depth of the mortise around your timber. Use a ruler and a carpenter’s square to draw a line all around, or a marking knife followed by a pencil for precision.
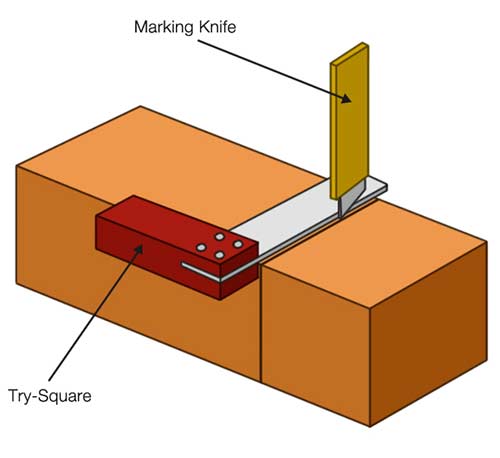
Mark the depth of the tenon on the timber
Next, mark out the tenon using a mortise gauge. Set the gauge’s adjustable spur to match your chisel width and position it so the tenon is centred on the timber, like the mortise.
If working with different timber sizes, adjust your measurements accordingly to ensure a proper fit.
Clamp the timber in a vice or Workmate at an angle. Hold the gauge with the stock against the timber and pull the spurs along the surface to mark the joint. Re-position the timber if needed to mark all faces. Enhance visibility by tracing your marks with a pencil if necessary.

Using a mortise gauge to mark out a tenon joint
Step 4 – Cutting the Tenon Joint
Now, let’s cut the tenon joint. Secure your timber in a vice or Workmate, standing upright.
For clean cuts, use a tenon saw. Its rigid spine prevents flexing and ensures a straight cut. While a jacksaw can be used, its flexibility might cause uneven cuts.
Start cutting gently along your marked line. If the line indicates the cut’s start, cut past it on the waste side; if it marks the end, cut before it; if it’s the exact line, cut directly along it.
Keep checking your cut to ensure it’s straight. Continue until you reach the shoulder. Flip the timber and repeat for the other side.
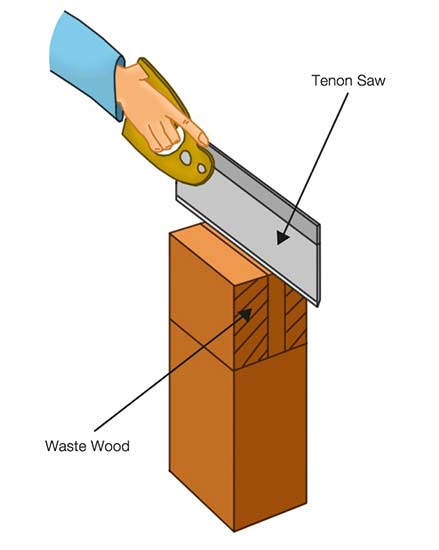
Cutting timber to shape the shoulder and tenon
To finish, cut away the waste sections and shape the shoulder. Use a bench hook if available, or clamp the timber in a vice. Make precise cuts along the shoulders, ensuring everything stays straight. The waste sections should fall away easily.
Cutting away waste sections to form shoulder and tenon joint
Fitting the Mortise and Tenon Joint
With your mortise and tenon prepared, start by performing a trial fit to check for any issues like tightness or looseness.
Insert the tenon into the mortise. It should fit snugly but still allow for some adjustment. If it’s too tight or loose, make minor adjustments as needed.
Examine the joint closely while fitting it. Look for any high spots that may cause binding. Use a sharp bevel-edge chisel and sandpaper to address these issues.
Secure the timber in a vice. Use the chisel to gently shave off any high areas, a process known as pairing. Re-check the fit frequently and make small adjustments until the joint fits perfectly.
For rough edges, smooth them with sandpaper, checking the fit each time to avoid over-removal.
Once you’ve mastered this technique, experiment with different sizes, shapes, and mitres to improve and develop your skills further.
Completed mortise and tenon joint
If you would like to find out more about all the other different types of timber joint, see our other projects below:
- Timber Joints – The Bridle Joint
- Timber Joints – Halved Joints
- Timber Joints – Mortise and Tenon Joints
- Timber Joints – Dovetail Joints
- Timber Joints – Finger Or Comb Joint
- Timber Joints – Shoulder / Rebate / Lapped Joint
Alternatives to Timber Joints
Mastering traditional timber joints requires practice and skill, which might not always be feasible. Fortunately, there are ready-made joint products available that simplify the process. These products allow you to cut your timber to length and fit it into pre-made joints.
To see how these joints can be used in a practical project, check out our guide on building a workbench with one of these ready-made solutions.