An arbour is a shaded seating area, open on only one side, and is a lovely addition to your garden. Offering support for climbing plants and a shady place to sit and relax, an arbour is also a focal point adding interest to the garden.
Designing Your Arbour
Arbour designs can vary widely, depending on the size of the area chosen, the materials chosen, and the design style. An arbour could be a simple three-sided pergola with a bench in it, but we’re going to look at creating a small bench arbour, with trellis sides and a pitched, felted roof.
Location
First of all, decide on where your arbour will be situated. Although the arbour itself will provide some shade and shelter, you want to place it in a sheltered area as the wind will still blow through it.
You will need to fix down your arbour securely, either by concreting the posts into the ground, or bolting it down to an existing patio or concrete base.
Materials
We will be creating an arbour 1.5m (5ft) wide by 600mm (2ft) deep and 2.4m (8ft) high. You can adjust our measurements to suit your garden. All wood used should be either hardwood or pressure-treated softwood.
For the corner posts use 75mm x 75mm (3” x 3”) timber, 1.8m (6ft) long if your are bolting your arbour down or 2.25m (7.5ft) long if you are concreting it into the ground. You will need metal brackets and bolts or concrete/post-crete for anchoring the posts.
For the sides you will need to buy two pieces of trellis 600mm x 1.8m (2ft x 6ft), and screws long enough to go through the trellis to fix it on to the upright posts.
For the seat, you need 1.8m (6ft) of 75mm x 50mm (3” x 2”) timber, to be divided into three 600mm (2ft) pieces for the cross-bars; and 9 pieces of 75mm x 25mm (3” x 1”), 1.5m (5ft) long, for the slats and frame. Use 50mm (2”) screws to fix together the seat frame and to screw down the slats, and at least 100mm (4”) screws to fix the seat frame to the upright posts.
For the back rest use 600mm (2ft) of 50mm x 25mm (2” x 1”), cut into two 300mm (1ft) pieces to support the ends of the back rest. You will need four pieces of 75mm x 25mm (3” x 1”), a little under 1.5m (5ft) long. The back rest fits between the two rear upright posts, so you will need to measure the exact length of the slats once the frame is built. Use 50mm (2”) screws to fix the slats to the back support battens, and 75mm (3”) screws to fix the support battens to the upright posts.
For the roof you need four pieces of exterior plywood, 12mm thick and 1.5m x 600mm (5ft x 2ft). You will also need two 1.8m (6ft) lengths of 50mm x 25mm (2” x 1”) batten and a piece of roofing felt. Use 75mm (3”) screws to fix the battens to the top of the upright posts, 40mm (1.5”) screws to fix the gable ends to the front and back, and 25mm (1”) screws to fix the roof boards to the battens.
Building the Frame
First of all you need to make up the seat frame – this will dictate the size of the arbour. Use two of the 1.5m (5ft) slats for the front and back of the frame, with the three 600mm (2ft) pieces of 75mm x 50mm (3” x 2”) placed one at either end and one in the middle. Screw through the slats into the ends of the cross-bars to form a secure frame.
Fix the seat frame to the upright posts, with the two ends of the seat flush with the posts left and right, but inside the posts front and back. Drive long screws through from the outside of the posts to hold the seat frame in place.
The seat should be about 450mm (18”) from ground level – if you are concreting in the posts be sure to allow for extra length below ground level.
Make sure the whole frame is square as you fix the seat on, it will help if you have some spare batten or off-cuts you can screw to the top of the posts to keep it square all the way up.
Fixing the Frame Down
If you are concreting in your upright posts, put the arbour frame into position and mark the ground where the posts sit. Move the frame out of the way and dig holes for each post, 300mm x 300mm (1ft x 1ft) wide and 450mm (1.5ft) deep.
Place the frame into place, ensuring it is level by adding or removing mud so that each post is the same height. Fill in the holes with a stiff mix of concrete, or ready-mixed post-crete, making sure the frame is level upright using a plumb line. See our Concreting Fence Posts project for more information. Let the concrete set for two days before continuing with the build. This time can be reduced if you are using ready-mixed, quick-drying post-crete.
If you are bolting the frame to an existing firm surface, place the posts in the metal bases, put the frame into position and mark where each base sits. Remove the frame, drill, plug and fix down the bases then put the frame back into place and screw through the bases to secure the frame in place.
Fixing the Seat, Back Rest and Sides
Place the seat slats onto the seat frame, making sure they are equally-spaced. Use a pilot drill bit to drill through each slat where it will be screwed to the cross-bars. This will stop the wood from splitting. Screw each slat into place.
For the back rest, measure the gap between the two back upright posts and cut your slats to fit inside the posts. Screw the slats to the supporting pieces of batten at each end, then fix the whole thing to the main frame by screwing through the support battens into the upright posts. Sit on the seat and tilt the back support slightly so that it feels comfortable before screwing into place.
Next you can fix your trellis sides into place. Hold each side up in place, level with the top of the upright posts so that there is a gap at the bottom. Depending on your trellis frame, you may need to cut out notches where the seat joins the posts. Mark and cut the notches, then fix the trellis into place by screwing through the side of the trellis frame into the upright posts. The trellis should sit inside the posts.
Fixing the Roof
Firstly, cut out two gable ends for the front and back. Lay down the piece of ply landscape so that the longest edges are top and bottom, and mark a triangle from the centre of the top edge down to the bottom corners.
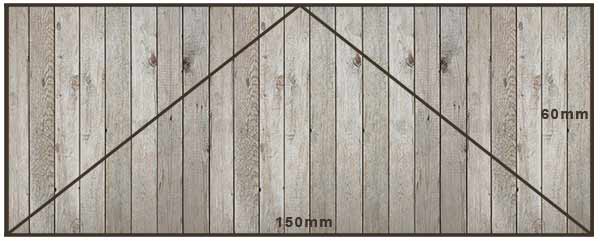
Gable ends for arbour marked out on a piece of ply board
It is a nice idea to cut a decorative arch out of the front gable piece. Draw on a shape to your liking and cut it out using a jigsaw. If you don’t feel comfortable in drawing a decorative shape, you can just cut out a smaller triangle. Sand all sawn edges smooth.
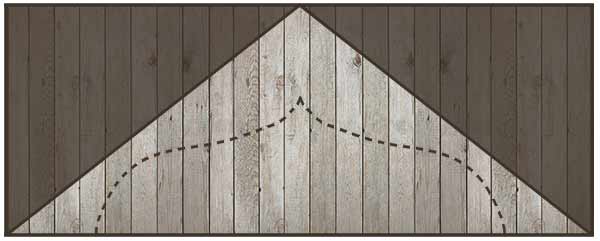
Decorative gable end for arbour marked out on ply board
Screw the four roof battens to the diagonal edges of the gable pieces, screwing through the outside of the ply into the batten. Cut angles onto the ends of the battens to make them fit better.
Fix the battened gables to the main frame by gluing and screwing down through the batten into the top of the upright posts, then screw the roof boards into place.
Cut a piece of roofing felt to size and fix to the roof using clout nails.
Paint or stain your arbour, allow to dry and then enjoy a secluded, shaded seating area!
One of our users, Dave, recently contacted us to say that he used the principles of the above guide and modified them slightly to produce the below results, what a great job, good work Dave!
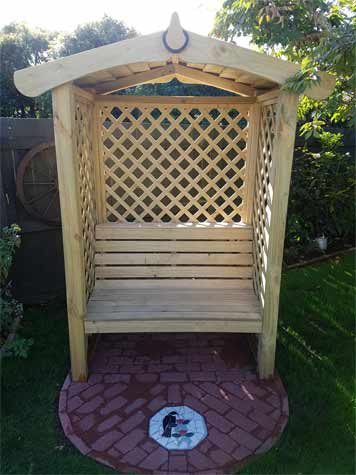
A modified arbour built by DIY Doctor user Dave