To keep your fence looking good and well protected from the elements, you need to stain or treat fencing and indeed any other exterior timber such as sheds, garden furniture etc every couple of years. When you buy your fencing the fence panels are usually dip treated or pressure treated with wood preservative to give them some protections from the elements.
Pressure treating alone will give any external timber decent protection from the elements but an additional coating or 2 of stain will protect it even further, so with this in mind, this DIY guide will walk you through everything you need to know about how to stain fences and other exterior timber.
Dip-treating Fencing and External Timber
Dip-treating fence panels is a industrial treatment and is exactly as it sounds- the panel is dipped into a vat of perseverative and allowed to dry. Effectively this is the commercial equivalent of painting the fence.
Dip treated timber is usually a mid-brown colour, but you can add your own stain or fence paint if you want to change the colour.
You can do this at any time to suit your own taste, but dip-treated fences usually need recoating with stain every 2 years or so – depending on your weather conditions. You will notice that the stain fades with time, and this is a good indicator that the fence needs treating again.
Pressure Treating External Timber and Fencing
Pressure treating wooden fences drives the preservative into the wood rather than just sitting on the outside. This gives a longer-lasting effect and will often protect the timber for several years before it needs treating.
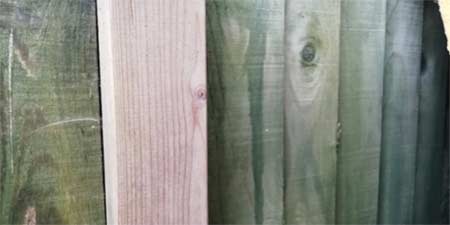
Pressure treatments usually stain the wood with a greenish or bluish tint. Because the wood is closer to the original colour it can be hard to tell by looking when it needs retreating so take advice from the manufacturer, usually every 5-10 years depending on conditions.
If you are going to stain or paint it to change the colour the fence then you will just recoat it when it next looks shabby.

Pressure treated Timber on a Close-Boarded Fence
Fence Staining Equipment (Fence Painting Equipment)
Make sure you wear old clothing and gloves, as it’s impossible to paint a fence without some stain transferring itself onto your person at some point!
Pressure Washer
Use a pressure washer to clean off the fence panels before you start painting, and leave to dry. If you don’t have access to a power washer then you can scrub down the fence with a diluted bleach solution (see “Preparation before Spraying or Painting your Fence” below).
Painting Tools
You need to decide on how you are going to apply the stain. You can use an old fashioned brush, a roller, or if you have a large expanse of fencing it may be worth investing in a pump or power sprayer.
Brush – What type of brush do I need for painting a fence?
If you are using a brush, a good wide (at least 100mm/4 inche) brush will cover the surface quicker, but you will also need a smaller (25-50mm/1-2 inche) brush to get into awkward gaps.
Even if you are using a roller or sprayer, you will need to use a brush to paint the harder-to-reach areas and edges where you need to be careful not to spray stain, ie where the fence adjoins a wall or if there are windows or delicate plants nearby.
Roller – What type of roller do I need for painting a fence?
Many people will use a roller for painting indoors but don’t think of doing that for fences or other outdoor woodwork. Choose a roller with a long pile to ensure it covers the uneven surfaces of your fence. (See our notes in ‘brush’ above about needing to use a brush too).
Fence Sprayer
You can use a pump garden sprayer to apply stain or paint to your fence which will give you a quick finish. Be sure to work the stain into all the nooks and crannies – you might find it helpful to spray a panel and then work over it with a large brush – it will still be much quicker than applying by brush alone, but it will ensure an even coating on the whole fence. There are also some products that combine a hand pump and brush.

Standard pump up pressure opperated fence sprayer
Paint Sprayers for Fence Paints and Stains
There are essentially two kind of paint sprayers you can use for fence stains and paints:
- Airless fence stain sprayers
- Compressed air fence stain sprayers
An airless sprayer sprays the material out of the nozzle of a spray “gun” without the need for compressed air.
On a hand pump model you pump the handle to build up pressure in the cylinder and then when you press the trigger it releases the stain a fine spray.
Hold the nozzle about 30cm away from the fence and work left and right from top to bottom aiming for an even coverage. Electric models are also available.
Sprayers that use compressed air are rather noisy and can be a bit cumbersome however an HVLP (high-volume, low-pressure) sprayer can give you more air in the mix with less actual pressure to make the spray fly out of the nozzle, which reduces overspray and makes it easier to direct the spray to where you want it.
Paint sprayers work well on long expanses of fences which are clear of vegetation – covering large areas quickly – but they can be a bit messy and the spray can be hard to direct accurately.
With this in mind, be careful to mask off paths, walls and shrubs. Also be really careful not to spray over the fence into next-door’s garden or onto your own front garden, driveway and any cars that might be parked up!
If you have a very big expanse of fencing to cover you can get a model on a trolley or cart which means you can transport large quantities of stain and just keep going.
You can buy or hire these and if you are only staining every few years you might find it sensible to hire one and get the job done quickly.
Three tips when using fence sprayers
- Make sure you are using stain that is suitable for spraying – or that you have thinned your paint or spray in line with the manufacturer’s instructions
- Make every effort possible to only spray where you want your stain or paint (warn neighbour of your plans and protect anything in the vicinity that might get caught in the overspray).
- Clean your equipment as soon as you have finished – taking note of the instructions for the sprayer and the stain.
Fence Spray Guns make fast work of large expanses of Fencing
Choosing the Right Stain for your Fence
There is such a wide choice of wood stains available now that it can be quite bewildering. Just make sure the one you choose is suitable for exterior applications. Check on the tin for coverage to make sure you buy enough.
When it comes to colour, make sure you think about how the whole fence is going to look. A bright gold might contrast well with one of your plants, but when you’re looking at 20 metres of it you might not like it as much.
Light colours will reflect light into the garden and make bright colours pop, whereas dark colours will retreat into the background allowing a feeling of space behind the foliage. Other than that you can let your imagination rule your palette.
Try applying a small amount of stain to an area of fence that’s not too obvious first, and let it dry to make sure it comes out the colour that you want.
If you are using a sprayer to apply the stain, make sure you buy a stain that is compatible with a sprayer.
Preparation Before Spraying or Painting your Fence
You must make sure your fence is clean before applying the stain, or it won’t adhere or soak into the wood.
Use a pressure washer or a bleach solution to clean fence panels before you apply stain or paint
If the fence is sturdy enough, you can use a power-washer to wash it down before you start. If there is any green or black mould on the fence, scrub well with watered bleach and a stiff brush before you start.
Wear protective equipment to avoid splashing the solution onto your skin. Let the timber dry completely before you start painting the stain on.
Move any garden furniture out of the way before you start, and if possible cover nearby plants with a dust-sheet or tarp to protect them from splashes.
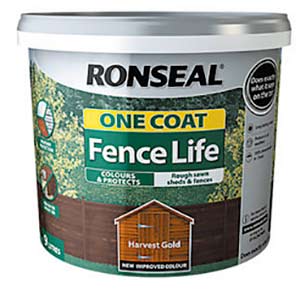
Ronseal standard one coat fence treatment
When to Stain a Fence
You can paint or stain your fence whenever you want to change the colour, smarten it up, or whenever it needs more protection from the elements.
If your garden is exposed to high winds and driving rain or long hot periods of sun then you will need to paint or stain the fence every 1-2 years. In more sheltered areas you can get away with recoating every 2-5 years.
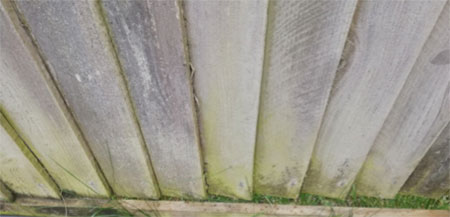
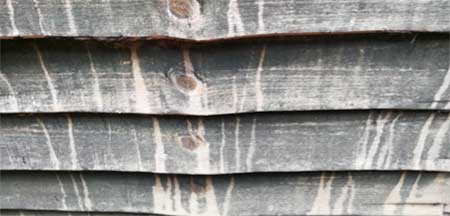
Weather stain on featherboard fencing
If you are putting up a new fence, it is a good idea to apply the stain to the panels and posts before you put the fence up – it’s a lot easier to cover all surfaces, and it will be less awkward reaching the high bits and avoiding spiky shrubs!
Treating the fence posts the whole length of the timber before you put them up will provide some extra protection from rot. Failing fence posts is the most common reason fence falls down.
If your fence is already in place then choose a dry, mild day which will allow you to get your fence treatment on, and for it dry without streaking due to rain or drying too quickly in hot sun.
Check the weather forecast before you start staining your fence – if it is too cold the stain won’t dry, and you obviously don’t want it to rain for a few hours. If it has been raining recently, wait for the wood to dry before you start work – the stain won’t take to wood that is already wet.
Painting timber in wet weather will cause the stain to run
Try to wait until the fence is in the shade before you start work – if the wood is too hot, the stain will dry too fast and won’t get a chance to soak into the wood properly.
The stain can only protect the timber fully if allowed to soak in. There is also the chance that depending on the stain you use, harmful gasses could be released if it overheats.
If you have to stain or paint a fence in very hot weather you can do it at a time of day the fence is in shade, treating areas in the early morning or late afternoon.
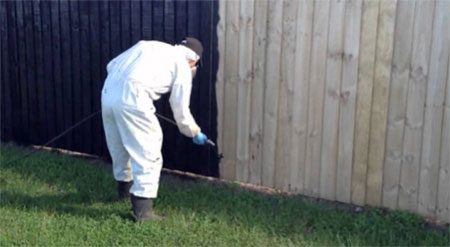
How to Apply Fence Stain
Use a brush to paint the top edges and any trellis, then carry on with your implement of choice. Always paint in the same directions as the grain of the timber.
Maintain a wet edge by brushing into a wet area and back brushing, to avoid uneven coverage and darker areas where you’ve overlapped.
If you are using a roller or sprayer be sure to check that you haven’t missed any hard-to-reach gaps. Use a brush to make sure you get stain down into the small spaces between panels and posts etc.
Apply the stain fairly liberally, making sure there is enough to fully penetrate the timber but be careful not to leave drips. Start at the top and work your way down – this way you can catch any drips.
If your fence is constructed from lap panels, be careful to make sure there are no drips escaping down the other side of the fence.
If you have an agreement with your neighbour to each take care of your own side of the fence, it is a good idea to find a colour that you both like so that any stray drips don’t look too obvious!
Follow the stain manufacturer’s instructions on how many coats are needed, and how soon subsequent coats can be applied. A minimum of two coats are usually required to give your fence full protection.
First coat of fencing stain applied to fence. The more coats applied, the better protected the fence
Cleaning Up After Staining Fences and Timber
Make sure you clean up quickly after you have finished your job. Follow the manufacturer’s instructions and any local recycling guidance on disposing of unwanted materials.
Store any unused stain or paint in line with the manufacturer’s instructions for safety, and to ensure you can use the stain or paint again in the future if needed.
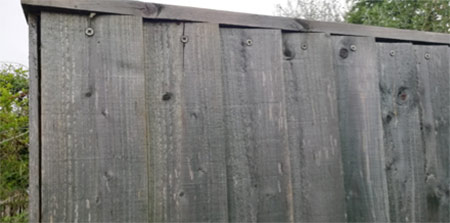
Why Paint a Fence?
Using fence paint or stain will protect the wood against rot, insect damage and weather. The fence in the image above is weathered and, although it is relatively sound and undamaged, it is in need of treating before it becomes too late to save it.
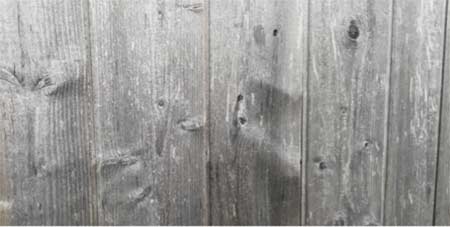
Fnce panels need re-staining every 1-5 years to remain protected from the elements
As you can see in the image below, eventually you will have to replace an untreated fence when it succumbs to the elements.
It is definitely worth applying timber treatments to your fence on a regular basis because it will last so much longer.
Although staining fencing and timber is a bit of a tedious job, the cost replacing fencing, especially long runs of fencing can run into the 000’s, so for the sake of the cost of some stain and your fence stain applicator or choice, this is almost always the best way to go!
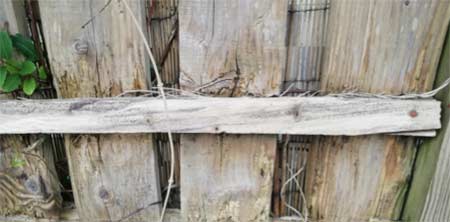
Untreated softwood timber will not be protected against weathering rot and insect attack