The type of lock DIY Doctor would recommend fitting to a garden shed or any type of outhouse is called a Brenton Lock or bolt.
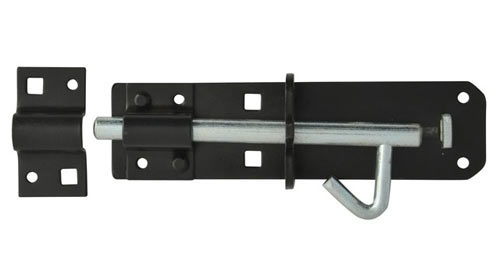
Brenton lock and keep for using on sheds and outbuildings
A Brenton lock is a barrel bolt with additional staples to allow a padlock to be fitted and secure the bolt.
As you can see from the image above, once the bolt is closed into the keep, the handle is pushed down and a padlock is snapped closed preventing the bolt from being opened.
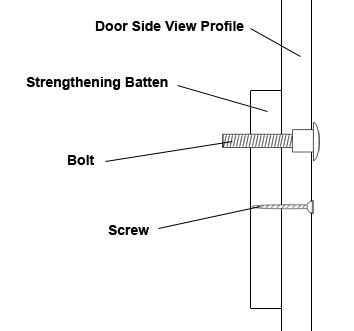
This type of shed lock is easily fitted and is made additionally secure by the fact that 50% of the fixings pass through the door and are bolted on the reverse. The heads of these fixings are dome shaped and do not feature any screwdriver slots or other means of undoing them.
This then prevents any potential thieves from being able to unscrew all the fixings from the outside and remove the lock to gain access.
The nuts that screw on to the bolts on the inside of the shed or outbuilding are also accompanied by large washers. This then also prevents the bolts being pulled through the door and the entire latch being levered off.
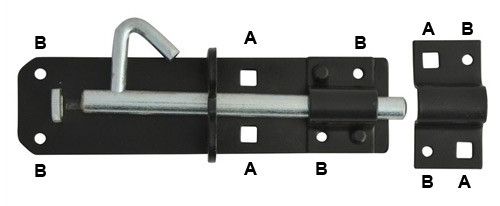
Brenton lock bolt holes and screw holes
The bolt heads are shown as (A) in the image above and the ordinary screws (which make up the remainder of the fixings) can be seen as B. As you can see it is impossible to get any leverage on the heads of these bolts to be able to undo them or pull them through the shed door.
How to Fit a Lock to a Shed or Outbuilding Door
Position the Bolt on the Door
Firstly place the bolt on the door in the position where you would like it to go. Make sure it is at a decent height as you don’t want to have to stoop each time you want to open it up.
In most cases there will be large supporting battens top, middle and bottom (ledge and brace door) on the reverse of the door that will help give the door its rigidity. You should aim to fix your bolt to the middle one as this will provide a solid fixing point. Align the edge of the bolt as close to the edge of the door as possible to ensure the bolt reaches into the keep as much as possible.
Just before you start drilling holes, make sure that the bolts and fixings you have are long enough to go through the door and the batten on the reverse and still give enough thread to screw a nut onto. If they are not then it may be worth popping to your local DIY store and getting some longer ones as moving the lock and fixing to a thinner part of the door won’t provide anywhere near as much security.
Check that any fixings and bolts are long enough to go through the door
Insert Your First Screw
Mark the top left fixing hole of the bolt on the door with a pencil and then put the bolt to one side for a moment. Next, drill a tiny pilot hole around 2 – 3mm where you have made your pencil mark.
Take the bolt and position it back on the door and screw in a screw where you have drilled your pilot hole. Don’t screw it all the way in yet, just leave it loose as this will allow you some movement to get the bolt level.
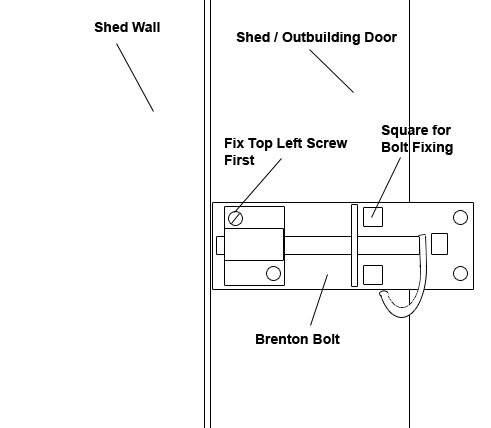
Insert your first screw into the top left of the bolt or the corner nearest the edge of the door
Get the Bolt Level
With the first screw in place swing the bolt up and then put a spirit level on the flat top edge of the bolt and get it level. Once level, use your pencil to put a mark on the door in the top right hand screw hole. Once marked, let the bolt swing down out of the way.
Drill a small pilot hole in your new mark and then swing the bolt back up and add a screw. This time screw the screw up tight and then also do the same for the first one. Your bolt will now be in place and level.
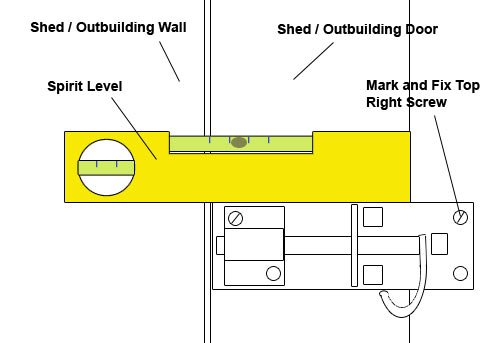
Get the bolt level on the door and fix the top right screw to hold it in place
Insert the Remaining Screws
With the bolt fixed and level, drill pilot holes in the remaining fixing points for your bolt and then screw in some screws, again, tightening them all up fully.
Make sure that you also drill pilot holes where the bolts are going to go. You will need top drill these out more in a moment, but its always a good idea to start larger holes with a small pilot hole first.

Drill and insert the remaining screws to secure the bolt on the door
Drill Holes and Fit Bolts
The holes in the Brenton Bolt which will take the fixing bolts can now be drilled. The hole in the metal is always square and larger than the thread of the bolt. This is because the underside of the bolt head is also square (See A in the image left) and this piece of the bolt fits snugly in the hole to stop the head of the bolt turning when you are tightening the nut on the other side.
Measure the diameter of the bolt thread (usually 6mm) and drill this size hole through the square hole in the body of the Brenton bolt and through the door.
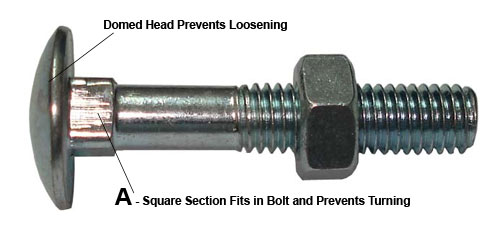
Domed bolt used to fix lock to door – The domed top prevents anyone undoing or loosening it from the outside and the square section prevents turning when tightening
As you can see from the image below, the bolts pass through the door and, before the nuts are put on, a large washer is placed over the bolt. This makes it impossible for the bolt to be pulled through the door.
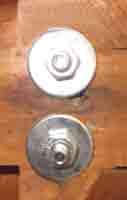
Washers used on bolts on the reverse of the door that prevent the bolts from being ripped through the door and the lock levered off
Position the Keep and Get it Level
The final job is to now fit the keep. This is the section that goes opposite the bolt on the door, that the bolt extends into and prevents the door from being opened.
Close the door up and then extend the bolt out as if you were locking it up. Take the keep and place it over the bolt so that the bolt section is totally covered. Ensure that there is a little movement top and bottom within the keep so that bolt does not bind and make it awkward to close/
Once in position, use your pencil to mark the top screw hole. Remove the keep and then drill a pilot hole in the mark you have just made.
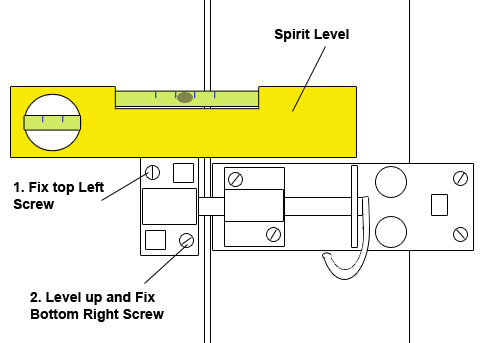
Place the lock keep in the correct location and level it up securing it first using screws
Now, take the keep and place it back in position and screw in a screw. As before, don’t do it too tight yet. Take your spirit level and level the keep up. Make sure that there is still a nice bit of space around bolt so that it won’t bind and then use your pencil to mark the bottom screw hole. Drill a pilot hole and then insert a screw, tightening it up. You can now also tighten the top screw.
Drill Holes and Insert Bolts to Bolt Keep
The task is now to drill the holes for the bolts. As above, check the diameter of the bolts (should be around 6mm) and drill the same size hole through each of the square holes in the keep.
Insert each bolt and then on the inside, add your large washers and nuts. Tighten each nut up securely using a spanner or socket and you should now be done! Close the door up and extend the bolt so that the door is locked to test your skills.
Shed and garden security offers a very good return for your money as insurance premiums can be lowered if you have adequate security on any out-buildings as most insurance companies consider out-house equipment to be the most vulnerable when it comes to thieves.
Now that you have learnt all about fitting a shed lock you may be interested in seeing our other security projects such as fitting a fireproof safe and home and garden security.
For more security projects around the home you can also see fitting a security chain – fitting a night latch – changing lock barrels and fitting a mortice or mortise latch