• Skip to primary navigation
  • Skip to main content
  • Skip to primary sidebar
  • Skip to footer
DIY Doctor

Main navigation

      • Project Type A - E
      • All Projects
      • Brick, Block, Masonry and Concrete
      • Damp, Condensation, Rot and Woodworm
      • Doors, Windows and Conservatories
      • Electrical
      • Project Type F - G
      • Fencing, Decking, Paving and Patios
      • Floors, Walls, Ceilings and Lofts
      • Garages, Sheds and Outbuildings
      • Gardening and Landscaping
      • General Building, Self Build and Renovation
      • Project Type G - J
      • General Repairs and Cleaning
      • Green Living and Eco DIY
      • Ground, Foundations and Drainage
      • Heating, Central Heating and Boilers
      • Joinery and Carpentry
      • Project Type M - P
      • Materials, Fixings and Fixing
      • Painting, Decorating and Finishing
      • Planning Regs, Project Management and Safety
      • Plastering, Plasterboard and Rendering
      • Plumbing
      • Project Type R - T
      • Roofing and Gutters
      • Tiling and Tiles
      • Tools, Appliances and Access
      • Useful Tips
      • DIY Tips
      • Find a Tradesman
      • Contract Download
      • Working With Tradesmen - Ultimate Guide
      • Home Improver Protection
      • Price Doctor
      • About DIY Doctor
      • What we do
      • Trade Shows and Exhibitions
      • Master Classes
      • Book Store
      • Contact Us
      • Feedback
      • DIY Competitions

Home > DIY How To Projects and Tutorial Guides > Fitting Waste Pipes for Sinks, Baths, Basins and Showers

Fitting Waste Pipes for Sinks, Baths, Basins and Showers

How to fit the water pipe on a sink, basin, shower or bath. It is a tough job to connect wastes to basins and sinks and this project helps you to understand waste systems and the potential problems you might have. All homes and their various waste pipe systems differ, but if you understand the principles you'll be able to fit and work through any problems with all sorts of waste pipes.

TwitterFacebookPin ItBuffer

Don't want to do this job yourself? Let us help you find a tradesman local to you

Project Page Menu
  • How to Tutorial
  • Video
  • Find Tradesmen
  • Help

Fitting waste pipes to sinks and basins is often the hardest part of plumbing in a kitchen and likewise fitting waste to baths and showers in a bathroom. First you have to figure out where you are going to run the waste for the washing machine and dishwasher, bath, basin etc. and if they are going to be included in the under sink waste system. Then it’s the problem with drilling through the wall with the right equipment and in the right place. Then it’s the problem of what and where to connect to when it is outside.

The two pages of this project will show you firstly in this page, how to connect your waste pipe under the sink or basin, then what to do and where to take it in the second page.

Not every home is the same of course but using these guidelines you should be able to work out where to site your waste.

Firstly its important to know why you need to fit the waste pipe the way you do. This can be seen in our project on how waste traps work.

Types of Waste Pipe Trap and Fitting Them

There are a number of different types of waste trap and you can find out here if you have the right one. The waste traps shown in the images below are P traps and they are one of the most commonly used under kitchen sinks.
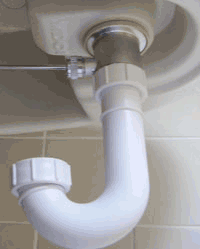
Half of a P trap
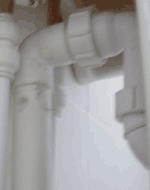
Half of a P trap

Complete P trap

Complete P trap

Usually, when buying a kitchen sink it comes with a waste kit. There will be parts of this kit which can be fitted into your undersink waste system which will allow you to connect a washing machine, dishwasher or both directly to the pipework. These fittings are called appliance fittings and are very handy if space is tight and if you can get your machines close enough to the sink waste.

If you cannot you will need to deal with waste from them separately and this is covered in our washing machines and dishwasher plumbing project.

P trap wastes, such as the one shown above, usually come in two parts. It’s a great idea, in most circumstances, if you can get the down pipe back against or close to the wall.

There is never much room in kitchen cupboards or behind baths and sinks so keeping it out of the way is a good idea. There are usually enough parts in the waste kit to achieve this but if not you can buy every conceivable waste from your local DIY store just in case you have to change plans quickly.

You can see from the image below we have extended our waste and got the down pipe back to the wall. There is also the option of taking the P trap outlet straight outside, but in most cases these days people have 1½ bowl sinks which makes the waste pipe adaptation a little more difficult.
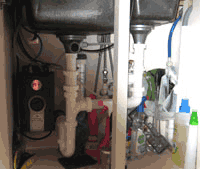
Under the kitchen sink image

Under the kitchen sink image

The image above it shows how a 1½ bowl waste fits together. In this case we have put the P trap at the bottom so it can run straight out of the wall. You can see the mixture of fixtures and fittings we have used here to get to where we needed to be and this is an important point. There are no rules! As long as the pieces you fit together, do actually fit together, and do not leak, it is acceptable.

If there is a blockage in any part of this pipework, disconnecting the pipes at the sink will be sufficient to unblock it. Most of the waste pipe systems under a sink are screwed together so are not difficult to undo.

It’s only when we start dealing with push fit and solvent welding it becomes really important to keep access in mind in case of blockage. Using a sink strainer will help avoid food waste going down the plug hole and causing blockages.

Drilling Through a Wall to Fit a Waste

Now it’s time to mark and drill the wall. We do not recommend any other way other than to hire a strong electric drill for the day, together with a diamond core 50mm drill bit. These two pieces of apparatus will have the hole drilled in under 5 minutes whereas you could be messing around all day trying to knock a hole with a hammer and chisel.
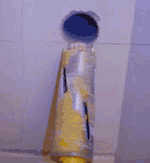
Drill through the wall

Drill through the wall

Obviously you will need to cut a hole in the back of the unit if needed in order to get at the wall and we suggest using a hole saw for that. A 100mm timber hole saw will give you plenty of room to get the 50mm drill bit through afterwards.

When you hire the diamond core bit you will need an arbor. The arbor connects the drill bit to the drill as core bits have no shaft which can be placed in the drill chuck. You will also need an extension piece to allow you to drill through the full thickness of your wall.

When drilling do not push the drill hard as you go through the wall. Diamond tipped bits will cut through most materials easily and when you get close to the outside face of the brickwork you should be very gentle otherwise you could blow the face off the brick as the drill goes through.

Push the pipe through the wall when you have made the hole, connect it to your waste inside, then go outside and mark the wall face on the pipe with a pencil, then take the pipe out again. It’s now time to move on to part 2 of this project, click the link below.

Part two – How to Fit Wastes.

All project content written and produced by Mike Edwards, founder of DIY Doctor and industry expert in building technology.

TwitterFacebookPin ItBuffer

Video

Back to the Top

Apologies, but we don't seem to have a video for this project yet, but we will do our best to get one up soon

Find a Reliable Local Tradesman

Back to the Top
Don't fancy doing this project yourself? We work with the industries best to ensure that we recommend only reliable and trustworthy tradesmen.
Let DIY Doctor help you find a tradesman

Find a tradesman now!


More Help

Back to the Top
Related Projects That May Help You:
  • How to Use Push Fit Waste Pipe Fittings
  • How to Fit Plastic Waste Compression Joints
  • How to Use Solvent Cement to Join Plastic Waste Pipes
  • How to Fit a New Soil and Vent Toilet Waste Pipe System
  • How to Fix Water Hammer and Noisy Pipes
Give us Some Feedback!

We love feedback on our DIY tutorials it helps us to make them the best they possibly can be so if you have any comments you would like to share with us, click the button below and let us know.

Primary Sidebar

Master Basic DIY - By DIY Doctor

Our Book - Master Basic DIY

Grab your copy now for all the DIY help you need right at your finger tips!

Buy it Here!

Signup for our Newsletter

Keep up to date with our DIY projects, tips and latest deals

Sign Me Up!

Our Sponsors

Find out about advertising on DIY Doctor

Advertisments

Other Similar Projects
  • How To Change Cast Iron Waste Pipes For Plastic
  • How To Fix Noisy Waste Pipes
  • How To Fit Plastic Waste Pipe Compression Joints
  • How To Solvent Weld Plastic Pipe For Your Sink, Shower Or Bath Waste
  • How To Use Push Fit Waste Pipe Fittings

Footer

DIY Doctor company logo

Here at DIY Doctor, we offer completely free DIY and construction help and advice to any and all, from professional tradesmen, exactly as they would do it.

We have hundreds of DIY project tutorials covering all aspects of building and DIY that provide step by step instructions on how to complete your given task.

If you need a little help then we also have an active question and answer forum and a find a trademan service and much more.

Site Menu

  • DIY Doctor Ltd,
    The Workshop,
    Newbury Works, Somerset,
    BA3 5RX

  • 0845 6342 179

  • Contact Us

  • Company Number: 05863375
  • VAT Number: 811134774

Other Stuff

  • About DIY Doctor
  • Contact DIY Doctor
  • Media and Press
  • DIY Projects
  • UK DIY Forum
  • DIY Doctor Suppliers
  • DIY Webinars

DIY Doctor Social Channels

  • Advertise
  • Competitions
  • Terms and Conditions
  • Privacy Policy
  • Cookie Information
  • NHIC
  • Sitemap

DIY Doctor are members of:

© DIY Doctor Ltd 2025 All Rights Reserved