When it comes to waste removal, dealing with drainage smells and pressure changes within the pipes the waste travels through is normally dealt with using a soil and vent pipe, however this isn’t always possible.
When they aren’t, to fix any issues that arise, a handy product called an Air Admittance Valve is used, find out all about them and how they are used below.
What is the Purpose of an Air Admittance Valve?
The air admittance valve (AAV), or Durgo valve as it’s also known helps to regulate the air pressure inside waste pipework and soil pipes, stop any smelly gas from escaping and also ensure solid waste is allowed to drain away to the main drain correctly.
All pipework contains air and in it’s natural state it sits in the pipes at the same atmospheric or neutral pressure that any other undisturbed air sits at.
When a toilet is flushed or waste water flows into a pipe, as it flows forwards it pushes the air in front of it along creating positive pressure and behind it negative pressure is created as it sucks the air along.
This can create 2 major problems:
- Positive Pressure: Where waste travels vertically down for a long way, a huge amount of pressure can be created in front of it and if it’s not balanced out then it can force water and waste back up through toilets, out of plug holes and back round and out of U-bends and P-traps
- Negative Pressure: More common than positive pressure issues, as waste flows and pulls and sucks the remaining air along with it, if more air isn’t allowed in to the pipework through a purpose made solution such as an AAV, it will be pulled in from other sources such as plug holes and this can cause the water seal in U or P-trap to be emptied. This is commonly known as siphoning. When this happens foul gases from the drain can escape into the property

Common U-Trap found in most homes under the sink or bath
When an air admittance valve is introduced into either of these scenarios, excess positive pressurised air can easily be pushed out and the additional air required to balance negative pressure can be sucked in. In either case, it results in everything remaining perfectly balanced.
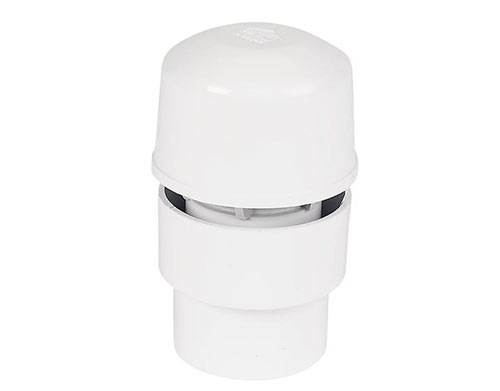
Air admittance valve or Durgo valve
In the majority of cases and in most homes in the UK, the balance of pressure within a waste pipe system is maintained through a soil vent system. This is just a vertical extension of the soil pipe system that stops beyond the highest drainage point in the property.
As the pipe is not capped and left fully open, air can easily be pulled down through to ensure the correct balance is maintained in the pipework. An added bonus is that any gases can also escape up and out if needed.
When a soil vent system is not included or can’t be for whatever valid reason, an air admittance valve is then used in its place.
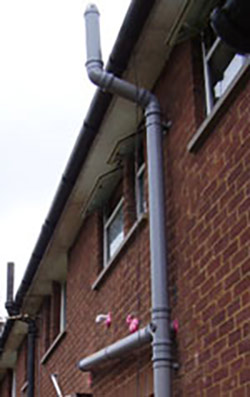
Soil vent pipe for maintaining balance in soil pipework
One final point to mention is that there are 2 different types of air admittance valve; the large 110mm valve for use with soil pipework and a smaller 32mm or 40mm version for use on sink, bath, basin etc. smaller bore waste pipes.
Essentially they both perform the same task of maintaining a pressure balance in a waste system and stopping gurgling etc. but the larger 110mm versions also ensure that any foul air sitting in the pipework is sucked away when a toilet is flushed.
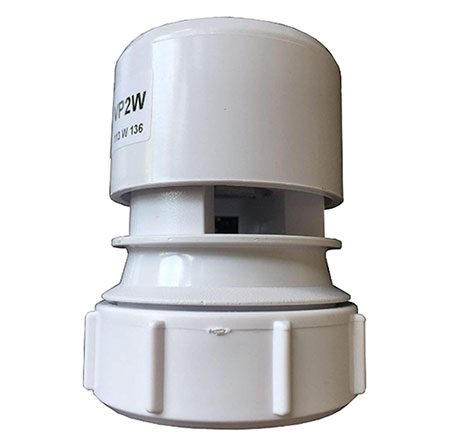
40mm air admittance valve for use with 40mm waste applliance wastes
110mm air admittance valve for use with 110mm soil pipework
Where Should an Air Admittance be Installed?
How air admittance valves are used and installed is governed by Building Regulations Document H and as such, before one can be installed these rules need to be checked.
In most cases installing one in a standard home should be fine, the Building Regulations mainly cover extreme situations such as high-rise buildings, where there may be many waste pipes and different levels that require a fine balance to be maintained.
In almost all instances they are installed internally. Only those made especially for use outside can be used externally as they need to be weather and frost proof to prevent them freezing up and stopping working, in which case the above issues can occur.
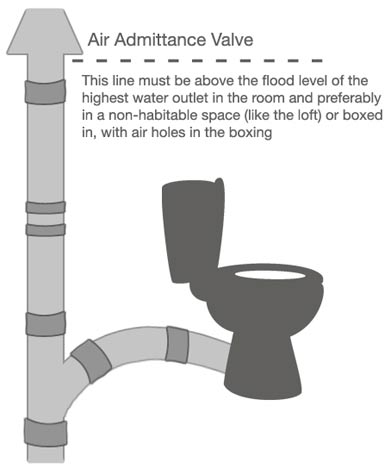
When installing a 110mm valve, pretty much all air admittance valves of this type are installed at the very top of the soil pipe stack, normally in the upstairs bathroom next to the toilet or in the loft so they are at least 200mm above the highest water/waste entry point.
Air admittance valve fitted to soil waste pipe for toilet
When it comes to the smaller 32 and 40mm valves, the installation rules for these are slightly different in that they are generally specific to one object or appliance. For example if you have had an additional sink installed but now you are getting gurgling noises from other appliances when you run a tap, by installing an AAV this will usually resolve the issue.
However, like the 110mm versions, the smaller ones must also finish above the highest flood level of the room the valve is in e.g. in the case of the basin above, it must be higher than the overflow of that basin.
In most cases, the following rules apply to air admittance valve installation:
- Always install inside, unless you have no other choice and you’re using a special external valve
- Install a minimum of 200mm above the highest point that any waste water enters the soil pipe/pipe
- Ensure there is adequate surrounding air and ventilation so that it can easily draw air
- Place them so they can be easily accessed for cleaning and replacement if needed
- They should only ever be fitted to vertical pipe runs. If they’re fitted on they’re side this can cause the seal to fail
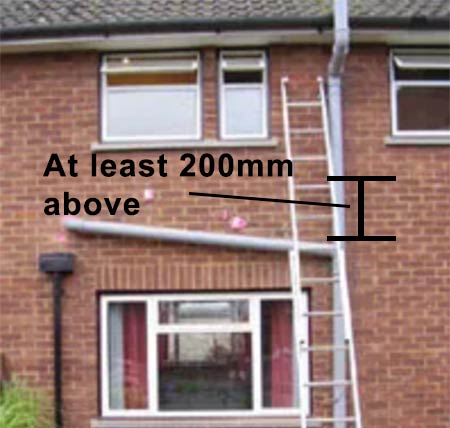
Install air admittance valves at least 200mm above the highest waste water entry point on a 110mm waste pipe
Note: One final point to establish is that a 110mm air admittance valve will only need to be installed if the soil pipe itself isn’t vented e.g. can’t run up and out of the roof or external wall as it normally would do.
With the case of smaller valves, as mentioned, they only need to feature where localised siphoning issues occur.
How do Air Admittance Valves Work?
As we have mentioned, AAV’s are used to control the pressure within soil waste pipes and ensure that positive and negative pressure forces caused when waste is flushed does not effect any water seals (U and P-traps) or cause waste water to flow back up through plug holes etc.
In terms of how an air admittance valve works, the whole system revolves around a spring loaded valve. The valve labeled D in the below image is held under the pressure of a light spring which holds the valve closed during times of non activity.
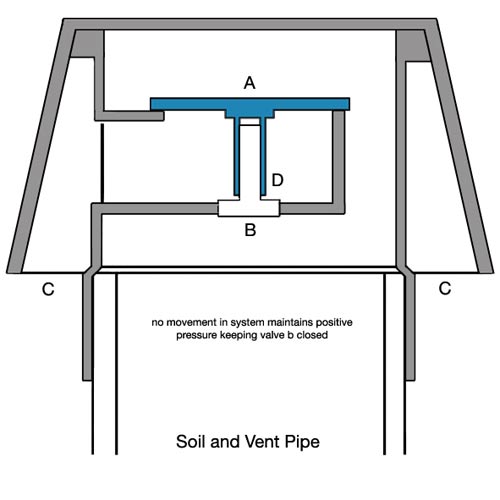
Cross section of air admittance valve
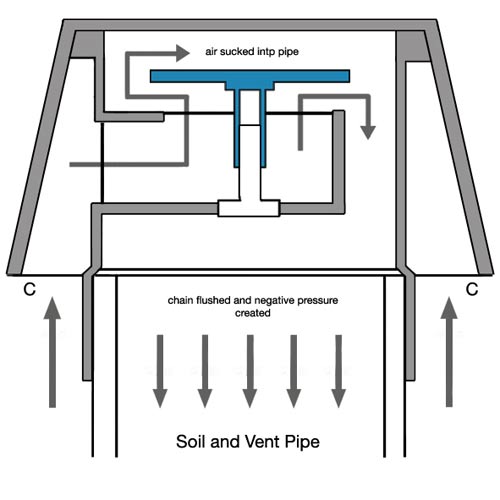
In its normal state, the positive air pressure of the room holds the valve down as well as the spring. When the toilet is flushed, the turbulence and gravitational pull of the water and waste causes negative pressure within the pipework.
This opens the Diaphragm A and valve B allowing fresh air to be sucked in through the side vents C and down into the pipework.
This equalization of pressure prevents the foul air in the pipework from escaping as any and all water seals e.g. U and P-traps remain intact.
Open air admittance valve
Issues Caused by Air Admittance Valves
As good and useful as air admittance valves can be they can also cause some problems, especially when they become old and worn.
One of the most common issues is that the valve itself can get stuck open and when this happens it can allow foul smelling odours into your home, absolutely not what you want.
However when this does happen in most cases an application of pipe lubricant or easing fluid can loosen it and it will spring back into life again. This issue only tends to occur with cheaper versions so it’s worth spending a little more and going for quality.
Likewise, if the valve becomes stuck closed this can have the same effect as not having one at all.
With this in mind, as this does happen, it’s essential that your valve is placed in a location that can be easily accessed.
Another related issue is that pipes can become blocked and if a blockage occurs just after an AAV is installed this can have the very same effect as not having one at all and again all the associated issues can occur.
One final very common issue, especially with the 110mm valves is that they are installed in the wrong place, below a point of water or waste entry. When this happens it can’t draw in the required air to balance the system and negative pressure is created along with all of its associated problems.
Are Air Admittance Valves Installed Internally or Externally?
In almost all cases, air admittance valves should be installed internally. This is mainly due to the fact that they have fairly delicate internal moving parts and being exposed to extreme weather and cold can cause them to fail quickly.
By installing them inside they are fully protected from the elements and should hopefully go on for many years.
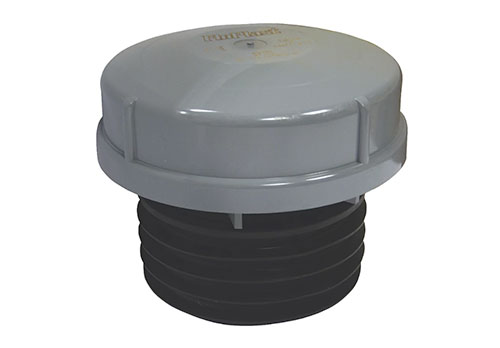
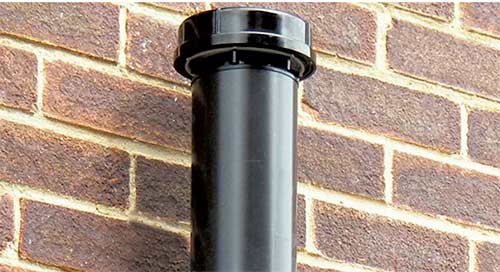
In some very rare cases there may be absolutely no choice but to install an AAV externally and in these cases you can only use a specific model built to be used outside.
External air admittance valve for use outside
Tools Needed for Installing an Air Admittance Valve
To instal an air admittance valve you will need to the following tools and products:
- Chosen air admittance valve
- Pen to mark cutting point on pipe
- Hacksaw or PVC pipe cutters
- 120 grit sandpaper or file for removing burrs
- Solvent weld pipe cement
- Bowl to catch any spillages
- Old clothes or rags for cleaning up
- Suitable lengths of UPVC pipework
- T-piece or equal-T joiner
- Tape measure
- Pipe clip for vertical pipe
- Washing up liquid
How to Install an Air Admittance Valve
As we have looked at above, there are 2 different types of air admittance valve. In the majority of cases the one that you’ll be fitting will be the smaller version to take care of localised pressure issues.
With this in mind we will concentrate our example around this, however we will also take a quick look at installing the larger 110mm version after.
Find Install Location
There are two scenarios to installing an AAV, the first being installing it into existing waste pipework and the second as part of a brand new installation of a sink, bath or the similar. In the majority of cases it will be into existing pipework after a pressure issue has been identified.
The first job to do is to select a length of existing waste pipe where the valve can be installed. Choose an area with enough space to work in comfortably and also one that will allow you enough height to install the valve so that it is above the highest water inlet.
This can be tricky to do and in most cases will involve finding an area where you can easily run a length of pipe vertically from the existing waste, to take the valve above the highest drain point in the room.
This can be in the actual room or in the case of a loft conversion, this may also be in the eaves behind the room and appliance. A popular choice is under the sink with the valve extended up behind it so it’s well above the plug hole.
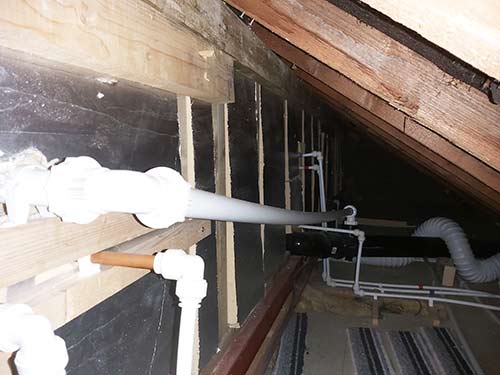
Space in eaves of loft conversion
Cut Pipework for T-Piece Adaptor
Once you have found the ideal install location the next task is to cut the existing waste pipe so that you can fit a T-piece or equal-T as it’s known to run the vertical pipe to fit your AAV.
First, mark the exact point on the pipe that you want the T-piece adaptor to go and then use a tape measure to measure the body section between the 2 collars. This is how much of the pipe you will need to cut away.
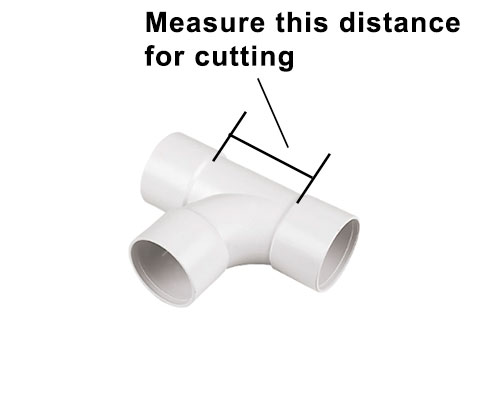
Amount to remove from pipe for T-piece
To make the cut, you may find it easier to remove the entire section of pipework from its current location and do the cutting somewhere with a bit more space. This will ensure your cuts will be much straighter, however if all the fittings are solvent welded this isn’t easy as you will still have to cut the section of pipe out and then use straight couplings or joiners either end to refit it once complete.
There are several tools that you can use to cut the pipe including a hacksaw or a pair of PVC pipe cutters. Both will produce the required end result but you may be better using the pipe cutters if you have some or can get hold of them as the cut will be cleaner and straighter. See our solvent welding project here for tips on cutting PVC pipe.
When using the hacksaw you will have to make sure that you cut in a dead straight line, which can be tricky and then remove any "burrs" with a file or sandpaper.
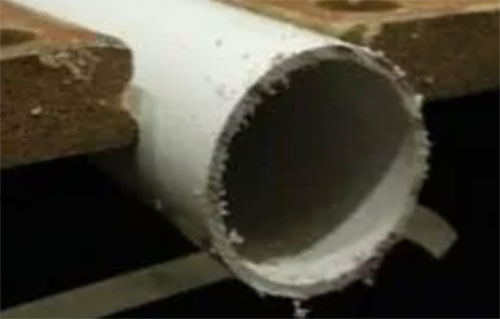
Burrs to remove from cut pvc pipe
Fit T-Piece Adaptor
If you are fitting into existing pipework, you will need to install a "T-piece" or equal-T as it’s known. The T-piece will allow the existing drainage to still work plus provide a spur for the section of vertical pipe the valve can be fitted onto.
In pretty much all cases it’s best to use solvent weld fittings as once they are fitted and the adhesive has dried they are pretty much guaranteed not to leak.
You can use compression fittings if you wish but they tend to be big and bulky. See our project here on UPVC compression fittings for more help.
Before gluing anything in place, first test fit the T-piece to make sure it fits correctly and is not too tight.
Once tested and all well, apply a good coating of solvent weld adhesive to the inside of each collar at each end of the T-piece and then a coating around the cut end of each pipe for about 20mm and then push it on to one end of the pipes and wiggle the other end in, pushing both sections right up to the base of each collar. See the solvent weld project mentioned above for any additional help.
To get the ends of the pipe in easily, if you’re working in situ, you may need to remove the pipe from any clips or push it to either side a little to create some wiggle room, however when doing this ensure you don’t strain or bend anything that could potentially create leaks.
Adjust the spare top inlet using a spirit level so that it is pointing directly upwards so when the vertical pipe is fitted it is upright and square.
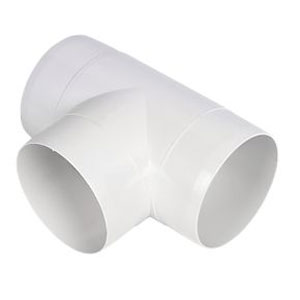
T-piece or equal-T used to create spur for air admittance valve
Assemble Pipework
If you removed all the pipes to cut them, then it’s now time to get it all back together and make sure everything fits nicely, with nothing too tight, stressed or strained.
Before you progress any further you will need to leave the solvent weld to cure for the manufacturers specified time. Refer to the packaging for guidance on this.
In most cases, after an hour or so it will be cured enough to be solid, however it will need to be left for at least 24 hours before you can start passing water or waste through it.
Fit Air Admittance Valve
The final task is to now fit the AAV in its location on top of the T-piece, but before this can be done you will need to cut and fit a vertical section of pipe that will sit the valve above the highest point that waste water can enter the waste pipe.
Locate the highest point in the room, in most cases this will be the sink plug hole and use a spirit level to transfer the height of this point over to your install area and then mark the wall.
Next, use a tape measure to measure up 200mm and then mark the wall and then measure from the base of the collar of the T-piece up to the top mark and this is how long your vertical pipe needs to be.
Cut a piece of pipe to length, clean any burrs off, apply some solvent weld and then push it into the T-piece and ensure it’s vertically upright.
If the section of vertical pipe is fairly long, you will have to add at least 1 pipe clip to secure the pipe firmly to the wall.
When it comes to fitting the actual valve, there are two common types:
- Solvent Weld Fixing: This basically involves the same methods as when you cut and joined the T-piece in the steps above. Take the solvent weld and apply it to the top of the vertical pipe and also inside the collar of the AAV. Place the AAV on top of the pipe and ensure that it is pushed down and seated correctly. Leave it to cure for the manufacturers recommended time (normally around 24 hours)
- Screw on Fixing: With the screw-type fixing, the coupling supplied with the AAV will have a thread within it and on the base of the AAV itself will be a thread. Simply fit the coupling to the top of the vertical pipe and then screw the valve down into the coupling until it is tight
With all the pipework in place and the valve securely fitted, allow enough curing time for the solvent adhesive and then give the valve a test to make sure all is working ok and the issue that caused you to install the valve in the first place has now been resolved.
Installing 110mm Air Admittance Valves
As we have stated above, fitting a larger 110mm air admittance valve is usually a case of installing it at the top of a section of soil pipe when it’s not possible to vent it externally as you normally would.
By fitting the valve, in this scenario it will prevent any foul smelling gases from escaping into the inside of your home as the valve seals the top of the pipe when closed and only opens to draw air in.
As with the smaller valves there are several different fitting types:
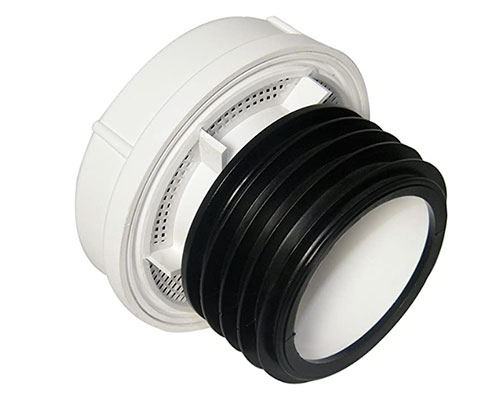
- Solvent Weld: The base of the unit features a collar that slips over the top of a 110mm pipe and is then glued in position using solvent weld adhesive. This will ensure a firm fitting but if the unit fails the only option for removal is to cut the top of the pipe off
- Rubber Finger/Push-fit: The bottom of the valve features fairly stiff rubber banded bellow-like belt. The “fingers” of the belt are pushed down into the top of the pipe and grip the inside holding it in place. To ease fitting some washing up liquid is often used to help it slip down into place. As it can be easily pulled out, if there are any issues it can easily be removed for repair or replaced.
Air admittance valve installed on top of soil pipe
If you are suffering from positive or negative pressure issues in your waste plumbing pipework it is essential to get this resolved to avoid any nasty gases from entering your home or indeed any annoying gurgling noises and in pretty much all cases this can be done by installing an air admittance valve which is a pretty straight forward job.