One of the most common problems encountered in the home is a dripping tap and it remains one of the most misleading as the go to solution is to just change the tap washer, but this isn’t always the cause. The problem in some cases is the valve seat that the washer sits on when the tap is closed.
In this project we look at both potential causes, the tap washer and the valve seat, and see how both can be easily fixed.
Ceramic Disc Cartridge or Rubber Tap Washer?
There are in essence 2 different types of tap that you will encounter in kitchens and bathrooms; the old style single pillar tap and the more modern monoblock tap.
Older style pillar taps tend to use washers to control the flow of water from a tap whereas modern monoblock taps use a ceramic disc cartridge.
So, if you have a single tap that looks like any of the taps below the below image then read on, this project is for you. However if you have a monoblock tap that looks like the image directly below, see our project here on ceramic disc cartridges for help on how to resolve leaks with these.
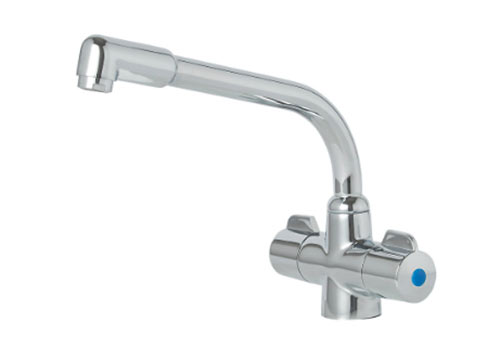
Modern monoblock tap with ceramic disc cartridge
Where is the Washer in a Tap?
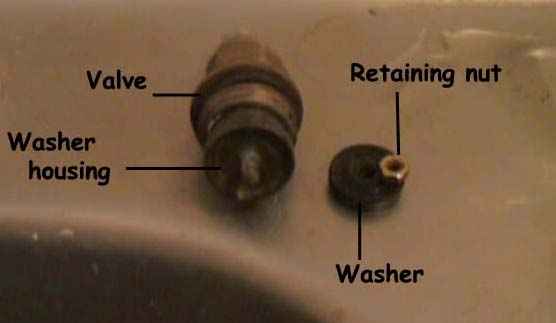
The washer in a standard pillar tap can be found on the end of the valve at the end of the spindle below the jumper as can be seen in the image below.
In a pillar tap, when the handle is turned to turn the tap on or off, the washer is either raised or lowered by the spindle on to the seat. The seat is a ledge in the base of the tap body that the water flows through. When the washer is closed down on to the seat it creates a seal stopping water flowing, but when raised the seal is broken and the water is allowed to flow.
The exact location of the washer can be seen in the diagrams below, along with the names of the other various parts of 2 common different types of pillar tap.
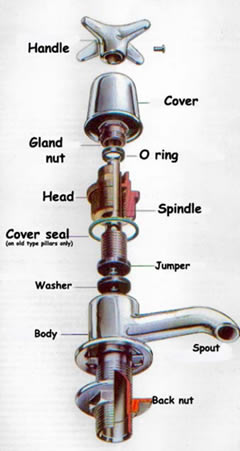
Individual elements that make up a pillar tap
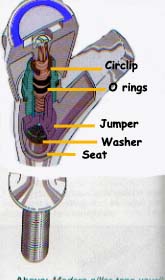
The main internal elements of a tap including the circlip, jumper, washer and seat
What Causes a Dripping Tap?
In the majority of cases the cause of a dripping tap will be due to a failed washer or O-ring or where the tap washer valve seat has become pitted so the washer no longer creates a full seal when it’s engaged.
Traditionally tap washers used to be made out of compressed fibres but these never lasted that long, so rubber was used instead which lasted much longer. However, over time, rubber can perish and become brittle and crack and when this happens it then leaks.
Leaks can also be caused by the valve seat in the body of the tap. Over time, due to the pressure of the water it tries to force its way under the washer and little by little it erodes the brass from which the seat is cast. Tiny little canals are formed in the seat which allows water to pass under the washer and out through the tap.
These can be removed by grinding the rest of the seat down to level of these canals. This will produce a flat, smooth seat for the washer to sit on and seal the flow of water. More on this below.
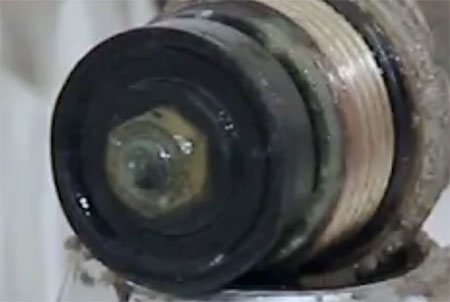
Failed tap washer
How Much Water can a Tap Leak?
Depending on how bad the drip is, a leaking tap can waste anywhere between 1/2 a litre and 1 litre of water an hour.
This may not sound like much but with a bad leak of 1 litre an hour, that’s 168 litres a week and a massive 8736 litres in a single year!
With today’s emphasis on caring for the environment, any form of leak, no matter how small, should be sorted immediately. If you are on a metered water supply then this will also be costing you a small fortune, so save yourself some money and get it sorted!
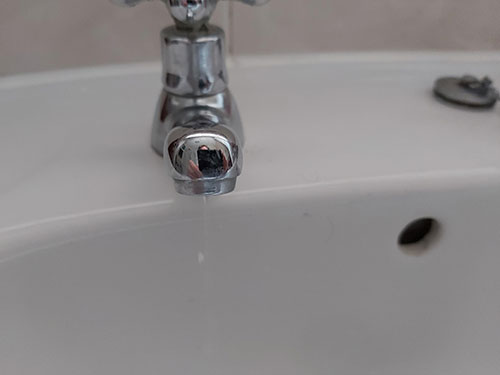
Leaking tap wasting water
Tools and Products Needed for Changing a Tap Washer
In order to change a tap washer and reseat a washer valve seat you will need the following products and tools:
- Selection of tap washers
- Selection of O-rings
- Tap reseating tool
- Large and small Philips screwdrivers
- Large and small flat blade screwdrivers
- Adjustable spanner
- Pair of Stilson grips
- WD40
- Old clothes, tea towels or similar
- Block of wood height of tap head (if tap head stuck and you need leverage)
- Large open ended spanner
Choosing the Right Washers and O-Rings
There is a huge amount of different types and sizes of washer and O-ring for all of the various appliances and applications they could be used in and this is no different when it comes to taps.
With all the different manufacturers, most taps differ slightly in size and due to this often the size of washer that’s needed to ensure an adequate seal and prevent any leaks.
This is also the case when it comes to O-rings. Again depending on the type of tap you have will depend on what size O-rings are used, if any are used at all.
To ensure that you have the correct size in either case for your particular tap it’s a great idea to keep a selection box of both types.
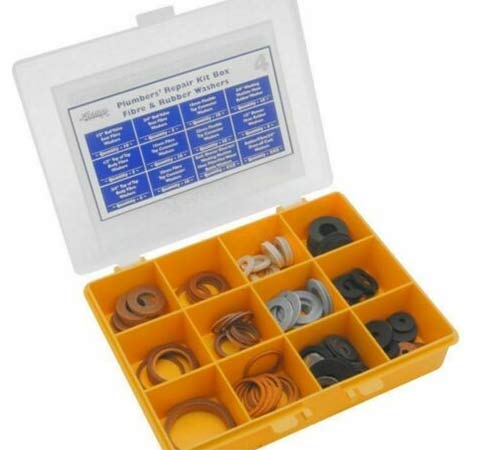
Selection box of washers and tap washers
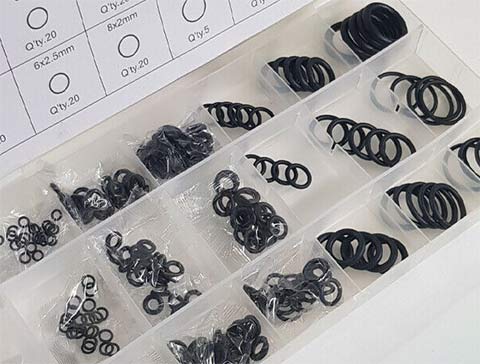
Selection box of O-rings and seals
Failing this, the only option you have is to measure the washer or O-ring(s) using a tape measure or calipers and then go to your local plumbing merchants and get the correct size.
To ensure a correct seal it is essential that you replace any washer or O-ring with one of the exact same size!
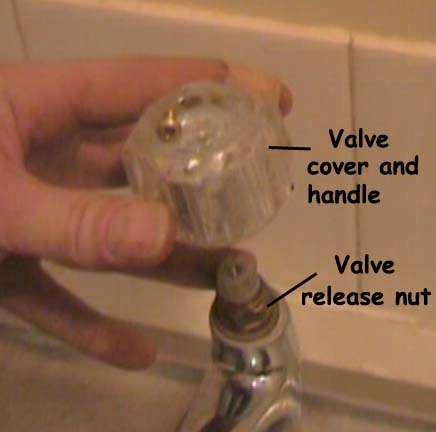
Tap Indicator Covers
Most modern taps have the hot (red) and cold (blue) indicators on the top of each tap head. These usually hide the screw which holds the handle or head on. The handle or head also acts as a cover for the valve.
On most tap indicator covers, if you look closely around the edge you will see a little recess. Using a flat edge screwdriver, insert the flat edge into the recess and wiggle it under the cover and prise it up. In some instances there won’t be a recess so you will just have to use a very small screwdriver and gently slide it under the indicator cover to prise it off, being careful not to damage it.
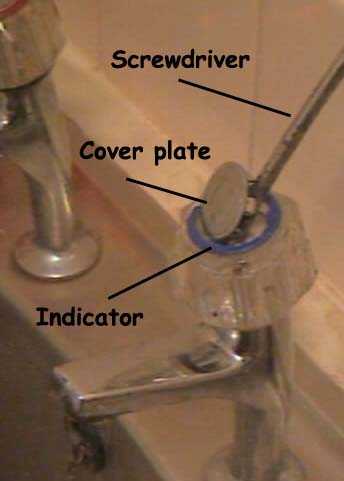
Prise off the top cover with a screw driver to expose top screw
How to Remove Jammed or Stuck Tap Heads
Occasionally, once the retaining screw has been removed the head of the tap will still not come off as over time the head of the tap can stick on the tap spindle and become jammed.
In this instance it’s always a good idea to get some WD40 or other easing fluid and spray down into the area where the screw fixes in and into any other areas around the tap handle/cover and also up under the bottom edge of the cover if possible. Leave for ten minutes or so to allow the fluid to penetrate and try to remove the head of the tap again. If you are still unable to get it off try applying more easing fluid.
The last resort, if after trying the easing fluid option, is to lever the tap head off. As you might guess this can be quite tricky to do and the potential for damaging items is high so proceed with care and caution.
Using a large open-ended spanner (or similar), wrap a tea towel or cloth around the largest open end (to prevent damaging the tap or tap head).
Now find or cut a block of wood or similar sturdy object to the height of the base of the tap head from where the block of wood will be resting on the worktop or edge of the sink and wrap this in a tea towel or cloth. Position the open end of the spanner underneath the tap head and the block of wood under the shaft of the spanner (keeping it as close to the tap as possible).
Push gently down on the other end of the spanner, pushing the tap head up. Keep the spanner as close to the main body of the tap as possible so the force you are using is as vertical as possible.
Be very careful when doing this and also ensure that wherever force is being applied you have added additional support to compensate.

Levering off a jammed tap head
How to Change a Tap Washer
Now that you know all about the different causes of a dripping tap and how to access the tap valve inside it’s time to strip your tap down and find out what’s going on. We have detailed below the full procedure for changing a tap washer and re-grinding the seat if that is also required.
Step 1 – Turn off the Water
First, turn off the water and isolate the supply to the tap you’re working on. This can be done at an isolation valve or at the mains stop tap if not. Turn the tap on and run any remaining water out of it.
If you’re working on an upstairs tap, open one of the taps downstairs to drain the pipes.
Isolate water to tap at isolation valve or mains stop tap
Step 2 – Protect the Sink
Before you start to dismantle the tap, place the plug in the hole. This will stop you losing anything down the waste.
Also, lay out a cloth or tea towel in the sink to protect the porcelain or enamel from getting chipped if you accidentally drop anything in it.
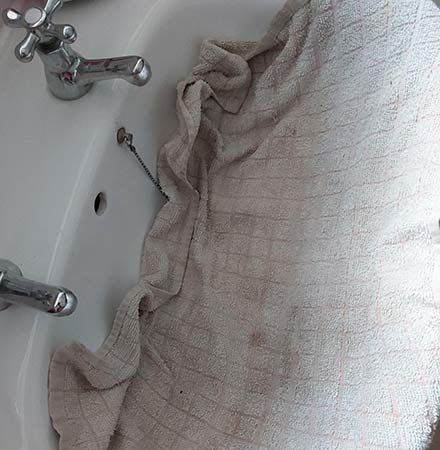
Lay a cloth or tea towel over the sink to protect it
Step 3 – Remove Tap Headgear
To remove the tap head, simply prise off the tap indicator cover and remove the retaining screw beneath it. Once the screw is removed the tap head should then simply pull off.

Removing the cover and indicator will show the screw which can be undone
Once screw removed the handle should then pull off
If is doesn’t and it’s stuck then see the tips above in the “How to Remove Jammed or Stuck Tap Heads” section for tips on how to lever it off.
Step 4 – Remove Tap Valve
The next step is to release the valve, but first make sure the tap body is wedged firmly in position. If the body of the tap that sits on the sink or basin moves while undoing a tight valve nut, it may loosen the water connection underneath causing more leaks.
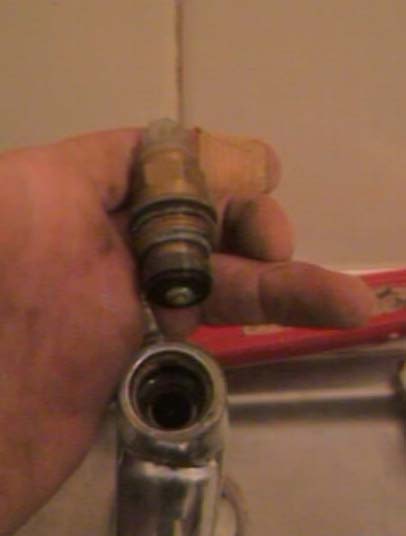
The traditional method of doing this is shown in the image below. It works by placing a cloth over the spout of the tap to avoid scratching the metal and gripping it with a pair of Stilson Grips. As you turn the spanner on the valve you can then hold the whole tap steady and stop it moving with the Stilson Grips.
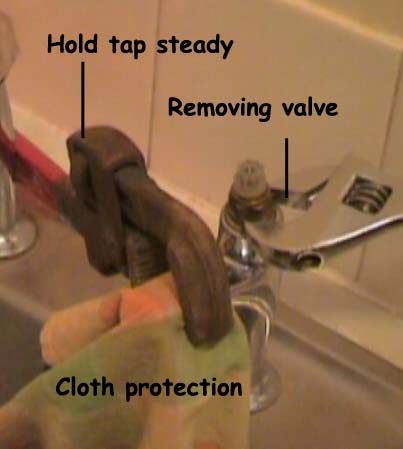
Undo the tap valve completely and remove. Don’t allow the tap to move while undoing the headgear
As soon as you get the valve moving and break the initial thread seal you should then be able to easily unscrew it. If it’s stiff apply a little WD40 or easing fluid.
Tap valve removed
Step 5 – Remove and Replace Washers and Check O-Rings
Some valves have a small retaining nut for the washer, as the one in the image below has. Some have the washer simply pushed on to a centre lug. Either way, now you have got this far, you may as well change the washer weather it’s worn or not. Most washers are symmetrical and turning the old one over will give you a new surface to work with so don’t do this.
However if after visual inspection the washer itself looks badly worn, pitted or has deep indentations on its surface then it will need changing. When changing a tap washer, make sure that your new washer is exactly the same as the old one so that it functions the same.
Also ensure that your new washer is made of rubber. Some older tap washers are made of fibre and don’t tend to last as long as their rubber counterparts.
To change the tap washer simply hook the old washer off if it is pushed on to the centre lug and replace it with a new one or if it is held on with a retaining nut, undo the nut taking note of how tightly it’s done up so that you can re-tighten it the same when reassembling and remove the old washer, replace it with a new one and replace the retaining nut and any other washers that may be present.
If there are any O-rings present make sure you change all of these also. Simply hook them off using a small screwdriver, measure the exact size of each one and then replace with those of the exact same size.
Loosen the retaining nut holding the tap washer in place and replace it with new
Step 6 – Check Tap Seat
Once the washer has been changed then the next job is to make sure that the seat in the base of the tap it sits down on is flat and has no channels or wear in it that could cause leaks.
If the valve seat is pitted and scored then it will need to be ground back down until it’s flat. Issues such as these are fixed using a Tap Reseating tool. See below for help on how to do this.
Step 7 – Refit Valve and Headgear
Once your have checked and changed the tap washer and re-ground the valve seat if needed you can then reassemble the tap and if all is well there should be no leaks anymore!
To put the tap back together, simply screw the valve back in and pinch it up finger tight. Take the Stilson Grips and hold the tap body steady and tighten the valve up using a spanner, but not too tight, just a few pinches.
With the valve back in place, push the headgear or handle back on, do up the retaining screw that holds it in place and push the cap back on, if there is one and you’re done!
Turn the tap fully off and turn the water back on and you should find there are no leaks at all.
How to Reseat a Tap Valve
If when inspecting the valve seat you find that there are scores and pits in its surface then these will undoubtedly cause leaks so they need to be removed using a tap valve seat grinding tool as seen in the image below.
Tap valve seat grinding tool
Damage to the valve seat is very often caused by hard water and can quite often be eliminated in the future by softening this hard water using a water softener.
Step 1 – Remove Headgear and Tap Valve
Flip the cap off the top of the headgear or if you have a handle, locate the retaining screw and then remove it and then pull off the headgear or handle exposing the valve.
Using a cloth over the spout and a pair of Stilson Grips to hold the tap body still, use a spanner to undo the valve and the unscrew it from the tap body as done in the section above.
Step 2 – Check Tap Seat
With the tap valve removed you can then closely inspect the valve seat. If there is no damage then this will be perfectly smooth, however if there is then you will be able to see channels, scores and pits in the surface, all of which can easily cause leaks.
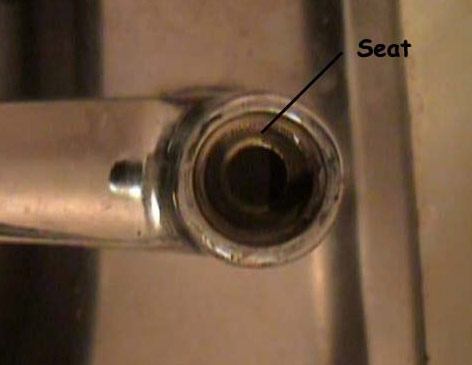
Tap valve seat inside pillar of tap
Step 3 – Grind Tap Seat With Valve Seat Grinding Tool
If you have found damage to the valve seat then you will need to grind it back down flat again.
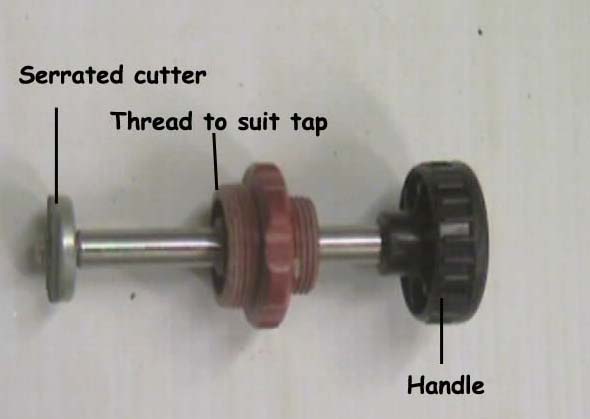
Unscrew the grinding blade from the re-seating tool and pull off the threaded section in the middle. Try each fitting to find out which threaded section fits your tap and then pop it back on the cutter shaft again with the correct thread at the base nearest the cutting blade.
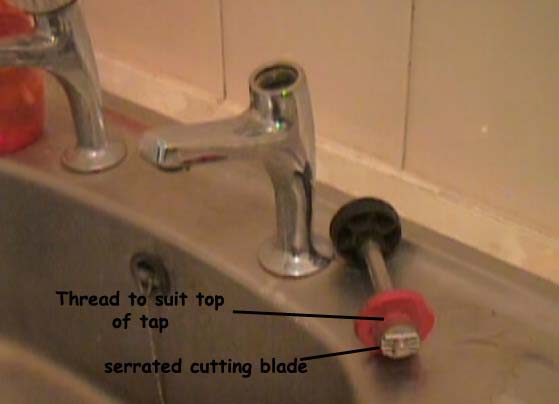
Individual parts of a tap seat grinding tool
Next, find the correct size serrated cutter for your tap from those supplied with the kit. It will be the one that just fits through the opening.
Insert the grinder into the tap body and tighten up the threaded section into the top thread. To start cutting, push down on the handle twisting as you do.
Some plumbers prefer to make a full revolution with the grinder, others prefer to twist back and forth to grind the seat down. Always finish with a few, full revolutions to get the seat as smooth as possible.
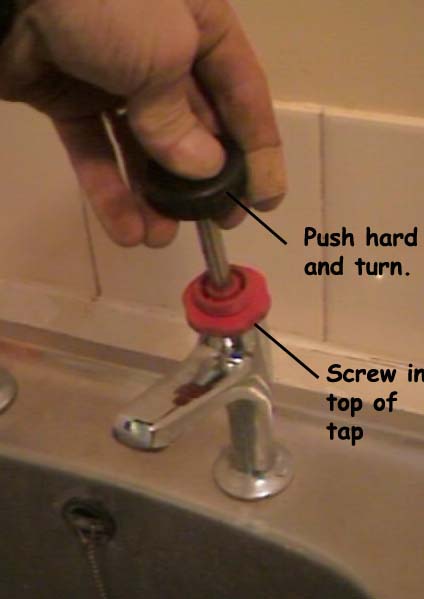
Tap valve seat grinder inserted into tap stem ready for cutting new valve seat
Remove the grinder periodically and run your finger around the top of the seat, you will feel any remaining indents. Keep grinding until it is smooth.
Once completed, replace the valve and screw it up, making sure you hold the tap body still while you do so using the tips stated above and then replace the headgear or handle and any retaining screws and caps.
Turn the water back on and test for any leaks (Don’t forget you may have a tap open downstairs).
Leaks at the Top of a Tap
A dribble from the top of the tap is usually a result of the Gland seals being worn. Sometimes there is a gland nut, which can be undone to reveal the O-ring sealing the gland to the head. (see “Individual elements that make up a pillar tap” image at top). Other times there is a circlip holding the spindle to the head. This can be removed carefully as shown below.
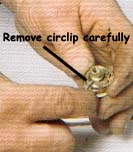
Circlip on tap valve
In both instances an O-ring seal or seals will be revealed and these can be changed by rolling them from the spindle and fitting new ones. Again, make sure they are the exact same size. Measure them to check if needed.

O-rings on tap valve
How to Fix a Dripping Mixer Tap
If you have a mixer tap in your kitchen or bathroom that’s leaking, the chances are that this is due to wear with the ceramic disc cartridge, if it is a more modern tap.
However if it is an older tap then it may still have a washer in place that may be worn or there may be wear in the valve seat.
For help with changing washers and ceramic disc cartridges and fixing leaking mixer taps see our project here.
Fixing a dripping tap is an absolute must as it can waste a huge amount of water which is both bad for the environment and for your wallet so use all of our tips above and fix any leaking taps right away!