Calculating angles and cutting items such as timber, bricks, blocks, boards etc to fit at an angle is an extremely common job in the building trade.
If you have done any DIY in the past, chances are that you have needed to either cut a piece of skirting board or coving at a set angle to form a mitre joint. This essentially involves cutting the two joining items at 45° at each end where they meet so that they form a 90° corner.
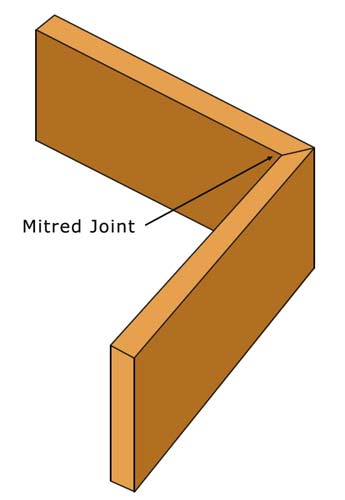
90 Degree mitre
Some of the most common DIY jobs that involve cutting angles are:
- Putting up coving
- Cutting and fixing skirting
- Fitting dado and picture rails
- Stud walls and roofing
- Plasterboarding or drylining
- Tiling
As you can see from the above, pretty much every area of construction and DIY involves calculating an angle of some sort and ultimately, the overall quality of the finish will depend on how accurate the angles are cut, so it’s imperative that you know how to both work out an angle and then how to cut it.
How to Find a Cutting Angle
Before we can actually cut anything, the first job is work out the exact angle that you need to cut to.
In almost all situations, the surface you are working with will not be square, although it may appear to be. For example, if you are mitreing two pieces of skirting board together in the corner of a room, chances are that the corner you working in will not be at a perfect 90°
We get hundreds of questions from people about how they can fill big gaps between skirting boards caused because the walls of the room are not exactly at right angles.
With this in mind, it’s essential to firstly work out the exact angle you’re working with.
There are several ways and tools that you can use to do this:
Use Good Old Mathematics
If you are a dab hand with the old maths then it should be easy enough to calculate the internal angles of a triangle that you can create from the area you are working in.
For example, you can measure equally each side of a triangle and then also the longer hypotenuse line that joins the 2 other lines together and then from that, work out all the internal angles.
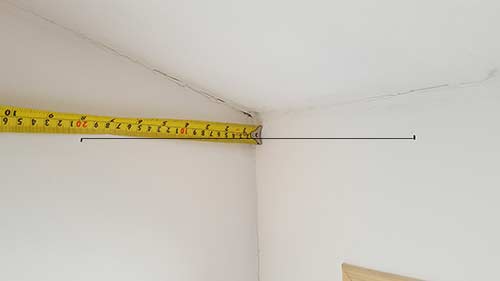
Measuring and marking the corner of a room to create a triangle to work out angles
We won’t go into the exact calculation required her, but a great explanation on how solving sss triangles (side, side, side) can be found on the Maths is Fun website here.
Use Specific Angle-Finding Tools
As good and accurate as the above maths solution is, sometimes it’s just not practical to spend precious minutes performing a calculation, especially if you are out on site, where time is money.
To this end, there are plenty of manual and digital angle finders available that can very quickly and accurately find any given angle for you, here are some common ones:
- Standard protractor
- Digital angle ruler or digital angle finder
- Site protractor
- Angle measurer
- Angled bevel
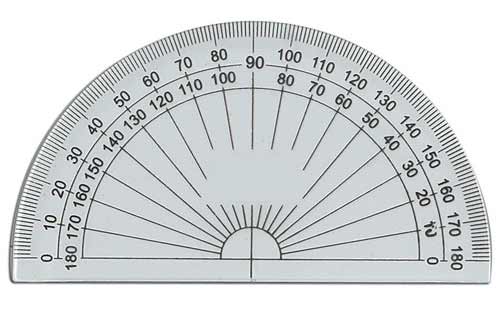
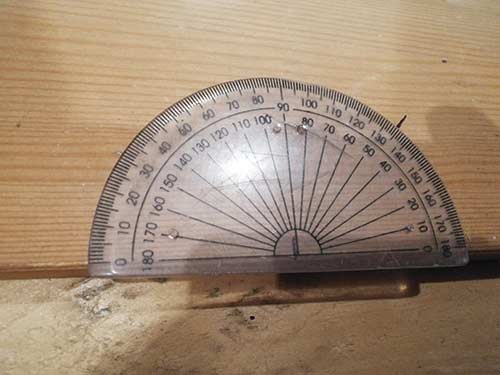
Standard protractor used to find and mark angles
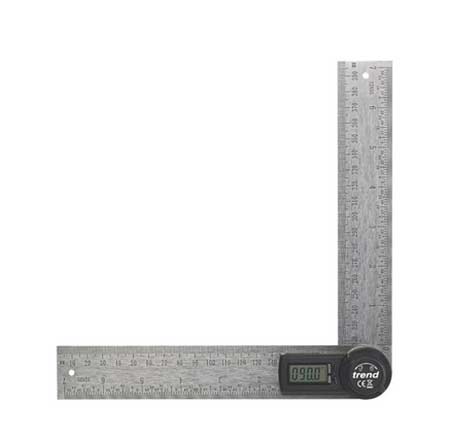
Digital angle rule used to quickly calculate and find angles
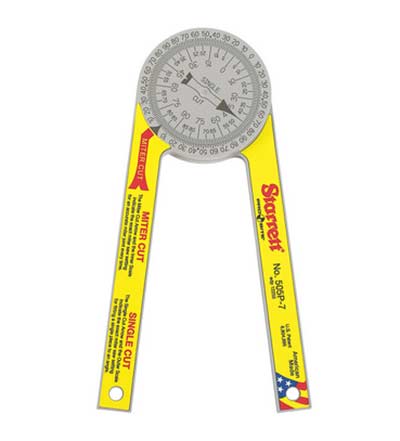
Starrett large site protractor used for quickly finding and marking angles

Angle measurers feature both a protractor and ruler for quick and easy angle finding and marking
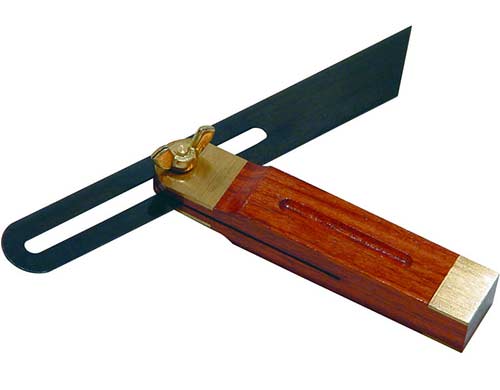
Angled bevels can be used to quickly find and mark cutting angles
Each of the above tools can be used to accurately mark a given angle on pretty much any surface. However, if you also want to know what the angle you are dealing with is, some tools may be better than others.
For example the angled bevel will allow you to set and mark and angle, but does not feature any form of visual gauge to tell you what the angle is.
Likewise, a standard protractor is a great tool for marking an angled cutting line onto a given object, but trying to use one to find out what the exact angle of the corner of a room is would be pretty much impossible.
With the above in mind, if you are looking to purchase angle finding tools, make sure you invest in the correct tool that will fulfill all of your requirements.
Internal and External Angles
On important point to mention concerns the type of angle you are needing to mark and/or cut – is it an internal angle or external angle?
To explain, the internal angle will be the smaller angle on the inside of the object you are working with and the external angle will be the larger angle on the outside.
To understand exactly what we are talking about, lets imagine we have a stud wall that’s been built at a diagonal from an existing wall.
As we are coming off of the existing wall at an angle, we will have a larger angle on one side of the wall than we will on the other, giving us a smaller internal angle and a larger external angle.
At this point, we should already know which side of the object we are working on e.g. fixing our skirting to or fitting our shelf in etc and now that we know our 2 types of linear angle, all we need to do now is measure our angle.
Tip: Once you have measured one angle e.g. the internal angle you can then easily work out the external angle.
As we are dealing with a straight linear line, however many angles we have must add up to 180°. On measuring our internal angle, we find that this is 35°, simply deduct this from the overall total of 180° and this will then give us our external angle, in this case 145°
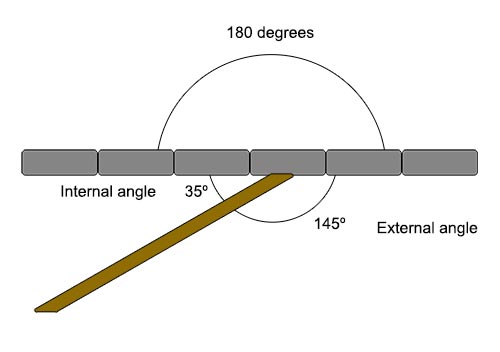
Working out internal and external angles along a linear line
How to Calculate Cutting Angles
Now that we know how to either work out an angle using maths or indeed measure it using a specific tool, it’s time to actually put this knowledge into practice and measure a cutting angle.
To do this we are going to use one of the most commonly used tools in the building trade, specifically in carpentry – the angled bevel.
For the purposes of this example we are going to be measuring the angle between an existing wall and a stud wall so that a shelf can be cut to fit.
Set Angled Bevel to Desired Angle
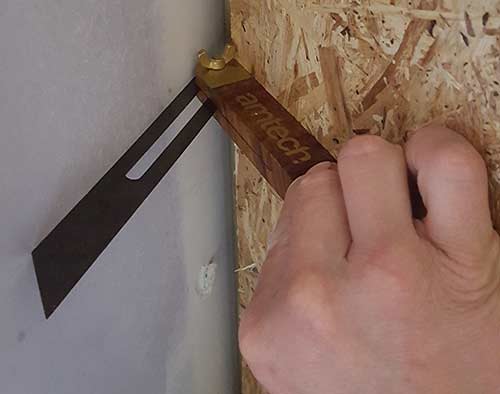
Firstly, take your angled bevel and place the stock against the flat surface and then loosen the retaining screw and move the blade so that it is flush against the angled surface.
Check that both the stock and blade are totally flush and flat against their respective surfaces and then tighten up the retaining screw to hold the angle.
Angled bevel in place and tighten up fully to hold angle
Measure set Angle
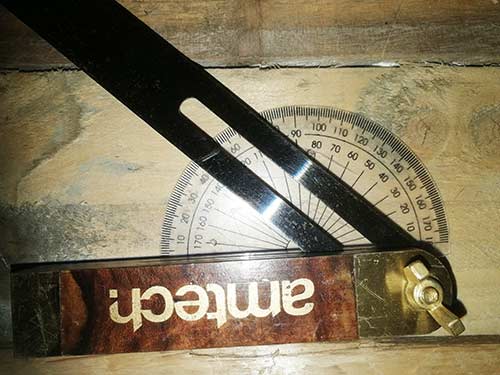
With our angle set, the next job is to actually measure it to find our angle. To find the angle set by your sliding bevel, the best tool to use is a standard protractor.
Place the bevel onto a flat surface with the stock at the base.
Place the flat edge of your protractor on top of the stock of your bevel and slide it along until the centre point of the protractor is directly inline with the point that the blade starts to angle upwards.
Finally, look up and along the blade of the bevel and the scale on the protractor and at the point the blade stops over a scale marking, this is your angle reading – in this case the angle in question is 135°
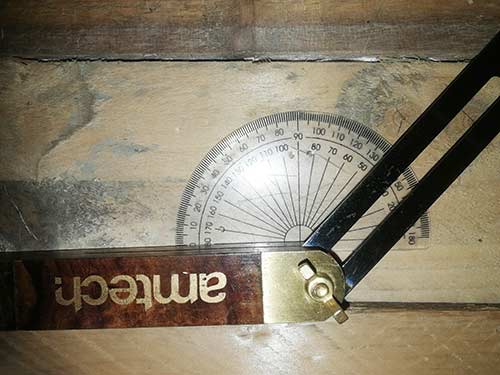
Measuring the angle set by the beveled angle using a protractor
Check Angle Measurement is Correct
Using the belt and braces “measure twice, cut once” approach, it’s always a good idea to do a final check before measuring and cutting anything.
Using the maths principle we outlined above e.g. the angle we have just measured and the angle on the other side of the stud wall, both of these angles should add up to a total of 180°
As we now know our first angle, in this case 135°, we can again use our angled bevel and protractor to measure the second angle, which should, in this case, be 45°
Use your angled bevel to set the internal angle on the other side of your object, in this instance, our wall.
Using the angled bevel to set the opposing angle on the other side of the wall
As we did before, lay the angled bevel down with the stock horizontal, place the protractor on top and then side it over until the point at which the blade starts to angle is over the centre point.
As before, read around the scale on the protractor until you get to the point where the blade intersects a scale point and this is your angle.
As we guessed it might be, our reading is 45°, meaning that our initial reading of 135° for our other angle is correct.
Measuring our opposing angle to check if our first measurement is correct
How to Accurately Mark an Angle
Now that we have accurately measured our angle and also checked to make sure this measurement is correct, the next task is to mark our angle onto the surface we wish to cut.
As mentioned, for this example we are going to be cutting a shelf to an angle so that it fits flush against our angled stud wall when the back edge is flush with the flat wall behind.
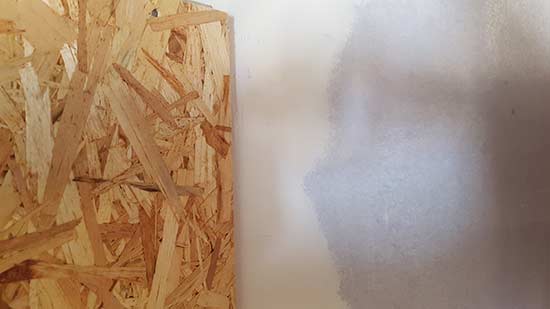
Area for shelf to be fixed to, with flat wall to the rear and angled wall to the left
There are two solutions that can be used to mark our shelf:
- Use the angle set on an angled bevel
- Use our protractor
Using an Angled Bevel to Make a Cutting Mark
This is probably the quickest and easiest solution of all.
On your object, in this case our shelf, measure and mark the point at which the angle should start. Make sure that you make your mark in the correct place!
As our angle is already set on the bevel itself, we can simply place the bevel onto the item we want to mark so that the lip of the stock is flat against the objects surface and that the point at which the blade starts to angle is directly on the mark on the object that we made above.
Using a pen or a pencil, simply draw your cutting line from the point on the object along, using the blade as a straight edge.
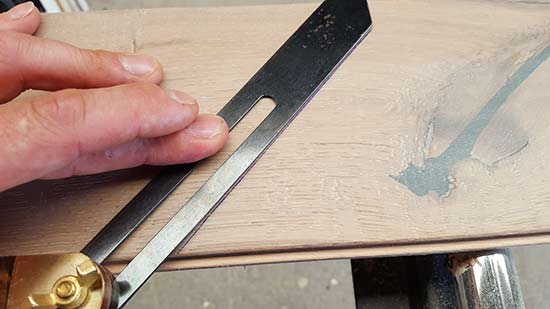
With the angled bevel in position, mark along the edge of the blade
Your cutting line has now been clearly marked, ready for actually cutting.
Using a Protractor to Mark Cutting Line
We can also use our protractor to mark our cutting lines and points.
Firstly, place the protractor so that its centre point is directly over the mark we made above that depicts the start of our angled cut.
Next, work around the scale on the outer edge of the protractor until you get to your desired angle in degrees. In this case 135° and then mark this point with a pen or pencil.
Using a protractor to mark an angled cutting line
With our marks now made, it’s simply just a case of joining them up using a pen or pencil and we should then be left with a clearly defined cutting line.
Joining up marks to create a cutting line
As said, arguably the quickest and easiest method is to just set the angle using your sliding bevel and then mark against the blade, but if you want to mark the exact angle as set by a protractor then go with this method.
How to Accurately Cut an Angle
Once you have accurately measured and marked your desired angle on to your object, the next job is to cut it. To do this you again have a few choices.
If you are fairly practiced in using a hand saw then by all means use a hand saw to make your cut.
It does take a bit of practice to get a decent straight cut with a hand saw, but if you feel confident, go for it. Just make sure your chosen saw is nice and sharp as this will give you the best chance at getting the cut as straight as possible.
However, if you have a compound mitre saw, mitre saw or similar powered saw with a flat cutting table to rest your object on while cutting, go for this choice.
Using a power saw will ultimately give you the best chance of getting a straight and accurate cut as you can push your object up flat to the cutting fence, allowing you to apply some force to it to prevent it moving while cutting.
Additionally, as the blade if fixed it will cut a perfectly straight line, allowing no chance of any movement or wobbly cutting lines.
To set the correct cutting angle, if you know the exact angle you need cutting, simply use the mitre scale on the saw table to set the angle.
However, if you have used an angled bevel to mark your angle, you can simply lay the stock flush with the cutting fence and then adjust the mitre scale so that the blade recess on the cutting table is aligned and flush with the edge of the bevels blade.
Using the angle set on an angled bevel to set the correct angle on a compound mitre saw
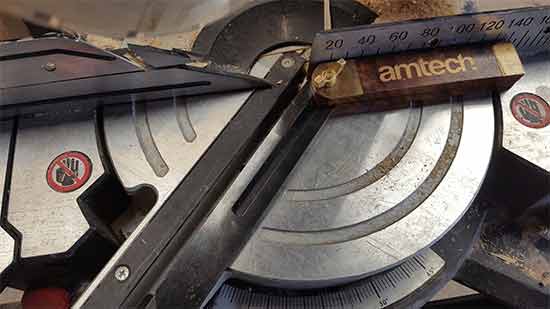
With the correct angle set on your mitre saw, place your object on the saw table, with your cutting line lined up dead centre of the blade recess.
Cutting line lined up on saw table ready for cutting
Without turning the saw on, drop the blade down and see where it falls. If all is well, it should rest right next to your cutting line, but if not or you need to cut in a slightly different place, move your object to suit.
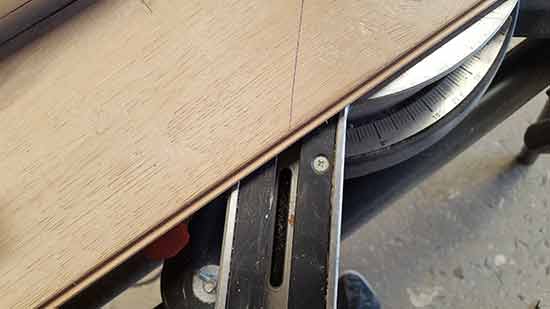
Shelf cut to fit perfectly against flat back wall and
Cutting Mire Joints to Fit an Angled Surface
As we now know exactly how to find or measure an angle and then accurately mark on to a given object ready for cutting so that it will fit perfectly against an angled surface, there’s one more point concerning cutting angles that you should be aware of.
To explain this in full we need to look again at the humble mitre joint. As we have mentioned, one of the most common jobs in carpentry and also the building trade as a whole is making sure that where two items meet at a corner, they are finished nicely, e.g. are mitred.
To ensure that this happens, knowing the angle they are fitting into as a whole is only one part. As the two objects meeting will form the whole angle, each object will need to be cut at half the angle of the whole angle.
To explain a little more, the image below shows 3 walls along which you can imagine placing skirting. On the first wall, if you had to join the skirting on the dotted line, you would need to make two cuts at 90° to get a tidy joint.
On the middle piece, two mitre cuts of 72.5° would need to be made to get a perfect joint and on the last piece, two mitre cuts of 45°.
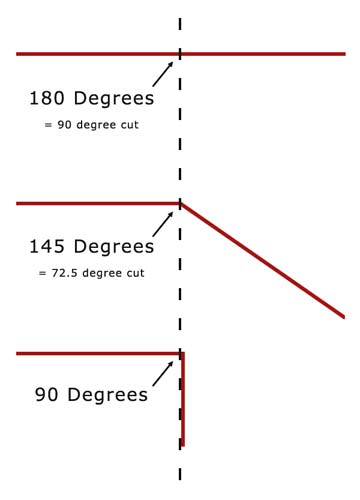
3 different shape walls and what angle each mitre needs to be cut at for a perfect joint
So, with this in mind, to work out the angle for your mitre joint, simply divide the angle as a whole by 2!
90 Degree mitre joint
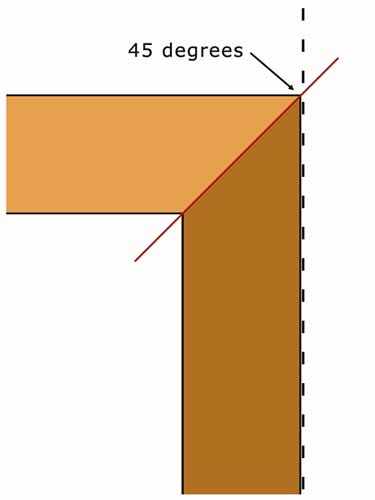
45 Degree angle

45 Degree cut
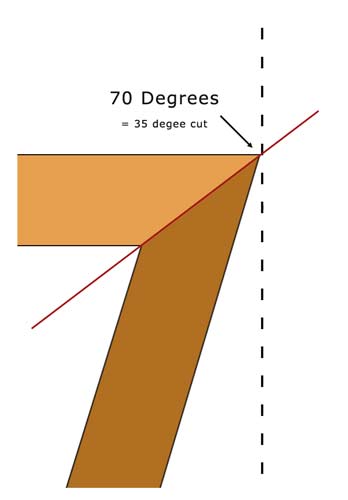
70 Degree angle = 35 degree angle cut
Finally you can see from the image below how the principle can be applied to a staircase dado rail.
First mark the height and position you want the dado. You can do this with a pencil and spirit level or ping the lines with a chalk line.
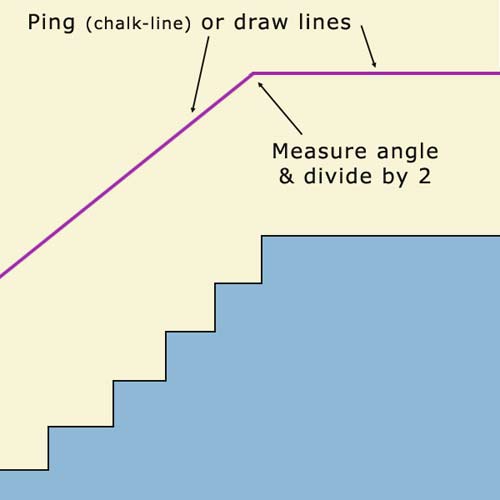
Dado rail angle diagram
After reading through the above, you should now be able to see how important and common angles are in the building trade as a whole and how common the need to work out an angle is.