There are many different roof truss designs used in modern construction, and the style of roof on your property will determine which truss system is in place.
In the guide below, we explain the most common types of roof truss, how each one can fail, and the most effective methods to repair them.
What is a Roof Truss?
A roof truss is a strong timber framework made from interlocking pieces that are nailed, bolted or pegged together to support the roof structure. Because each part relies on the others for strength, never cut or alter a roof truss without professional advice, doing so could cause the roof to collapse!
Trusses are engineered to handle several loads: the weight of the roof materials (Dead Load), plus Wind Load, Snow Load and a Safety Factor. A Structural Engineer calculates these forces and specifies the correct truss design for the property and location.
If your roof needs repairing or altering, you must hire a Structural Engineer, this type of work should never be attempted without one.
Roof trusses are available in many shapes and sizes to suit most roof designs. If a standard truss is not suitable, a carpenter may build a traditional ‘cut roof’ on site using individual timbers.
Even if your current roof trusses are damaged, modern construction techniques allow them to be repaired without removing the entire roof, saving a lot of time and hassle.
Types of Roof Trusses Available
To cope with the great many different types of roofs that are available and they’re different configurations, there are in fact many different types of roof truss. Here follows some of the most common:
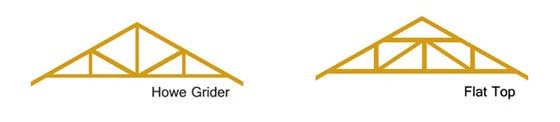
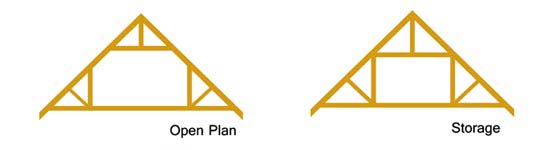
Fink and Bobtail roof trusses Double W and Fan Trusses Howe Grider and Flat Top Trusses Raised Tie Scissor and Scissor Trusses Parallel Chord and Low Profile Trusses Clerestory and Raised Tie Trusses Open Plan and Storage Trusses Asymmetrical and Double Bobtail Trusses A-Frame and King Post Trusses Top Hat and Queen Post Trusses Extended Tie and Warren Trusses Flat Top Hip Mono, Mono A, Mono B and Inverted Trusses


How Are Roof Trusses Made?
Roof trusses are usually manufactured off-site in specialist workshops to ensure accuracy, strength and compliance with building regulations.
The process starts with a Structural Engineer or designer calculating the loads the truss must support, including the weight of the roof covering, wind pressure and snow.
These calculations determine the exact truss shape, size of each timber and the fixings needed to keep it structurally sound.
Once designed, high-quality, kiln-dried timber is selected to prevent twisting, warping or shrinkage. Each piece of timber is then cut to precise measurements using computer-controlled saws for accuracy.
The timbers are assembled on a flat jig that holds them in the correct position, ensuring every angle and joint is perfect.
To secure the joints, metal connector plates or gusset plates are pressed into the timber under high pressure. These plates grip the wood on both sides, creating a strong and reliable connection that allows the truss to carry heavy loads without movement. This method is far stronger than traditional nails or screws alone.
After assembly, the trusses are quality-checked, labelled and delivered to site ready for installation.
Because they are pre-engineered and factory-made, roof trusses allow faster construction, better consistency and greater structural integrity compared to building a roof entirely on site.
What Makes a Roof Truss Stand Up?
A roof truss stays strong because it is carefully engineered to distribute weight evenly and resist movement. Each part works together to support the roof safely and altering any component can seriously weaken the structure causing failure.
The strength of a truss relies on three key factors:
- Quality of the timber – Modern trusses use lightweight but structural-grade kiln-dried timber (e.g. C16 or C24). This timber is often pre-treated to prevent rot and insect damage, ensuring long-term durability.
- Correct load distribution – The truss shape is designed so that loads are shared across all members. If one part is removed, cut or weakened (even notching for pipes), the whole structure can become unsafe.
- Secure connections – Metal plates, bolts, screws or pegs lock each section together. These fixings must never be altered or cut without professional guidance, as they are essential for structural stability.
When all three elements are correctly designed and installed, the truss forms a strong, reliable framework that supports the roof safely.
What Causes Roof Truss Failure?
Roof trusses are designed to be strong, but certain issues can weaken them over time. One of the most common causes of failure is water damage, especially when combined with poor maintenance or inappropriate alterations such as cutting or drilling by tradespeople.
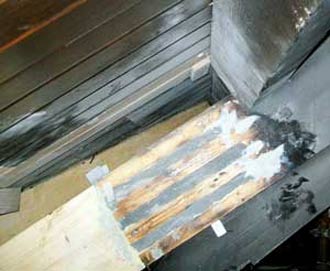
- Penetrating damp (water leaks) – Moisture seeping into the roof causes timber to soften, rot and become vulnerable to insects. Even treated timber may only be protected on the surface so deeper layers can still decay. This is especially common in older roofs where rafters or beams sit directly in walls. Once affected, the timber should be treated with a high-quality preservative to prevent further damage.
- Rot and insect attack – Most often seen in pre-WW2 properties with solid or stone walls. Timber ends can stay damp for long periods, making them ideal for woodworm and fungal decay. Historically, bitumen was used to protect these areas, but modern wood preservatives are more effective. Always inspect bearing points with a torch and prod with a screwdriver. If unsure of strength, drill a small auger hole to test the core.
- Joint failure – Modern trusses use metal nail plates or plywood plates fixed with screws, nails or glue. Older roofs rely on mortise and tenon joints and wooden pegs, which can loosen as woodworm eats away the timber. When joints open up, the structure becomes unstable. Resin repairs with tie bars and injected resin can restore strength without removing the roof.
Regular inspection, proper treatment and avoiding unapproved alterations are essential to prevent roof truss failure.
How to Repair Roof Trusses
Damaged roof trusses, rafters or joists can seriously weaken your roof structure and lead to issues such as sagging ceilings, uneven roof lines and increased load on other timbers. If left untreated, the problem can spread to surrounding materials, for example, woodworm can move from one timber to another, or damp and dry rot can affect adjoining woodwork.
Before carrying out any repair, always identify and eliminate the root cause. There is no point fixing the timber if the issue (such as a leak or infestation) continues, as the damage will simply return.
Thoroughly inspect all nearby areas including roof tiles, flashing, brickwork, mortar and pointing, chimney stacks, water tanks, pipework and heating or plumbing systems. Check the timber itself for signs of movement, rot or insect attack until you find the source of the problem.
Once the cause has been resolved, you can repair the damaged truss using one of three main methods:
- Full truss replacement – Used when the structure is severely damaged or unsafe.
- Timber resin splice repair – A modern method that removes only the damaged section and replaces it with new timber bonded using structural resin.
- Joist end repair plates – Metal plates used to reinforce weaker sections, often at bearing points or joints.
Choosing the right method depends on the extent of the damage, so always seek advice from a Structural Engineer or qualified contractor before performing any kind of work. Timber-Resin Splice Repair Kits for roof trusses available from Property Repair Systems
Replacing an Entire Roof Truss
Replacing a whole roof truss is pretty much the last resort, however it has to be done when the timbers are too damaged to repair safely and fully. If the structure has lost its strength or poses a risk to the rest of the roof, full replacement is the only reliable option.
As you might imagine, this process can be hugely costly and disruptive, as large sections of the roof covering may need to be removed to allow safe access. In most cases, cranes or lifting equipment are required to install the new truss accurately and securely.
Despite this, in some situations, the truss can be removed and rebuilt from inside the loft, but this depends on the truss design and the construction of the roof.
As we have stated several times already, but will do again due to its importance, always consult a Structural Engineer or specialist contractor to determine exactly what needs to be done and how the work should be carried out. Badly rotten timbers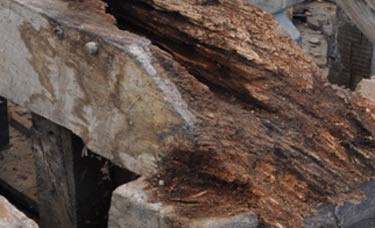
Timber Resin Repairs for Roof Trusses – Joist Ends
In older homes, roof trusses, joists or rafters can sag or drop when damp causes the timber to rot and compress. In the past, the only option was to remove and replace the entire timber, which was expensive and disruptive.
Today, timber resin splice kits offer a smarter solution. This system lets you repair and replace damaged sections in-situ, without removing the whole truss or roof. It saves time, reduces cost and avoids major structural work. Repairing joists in-situ with timber resin splice kit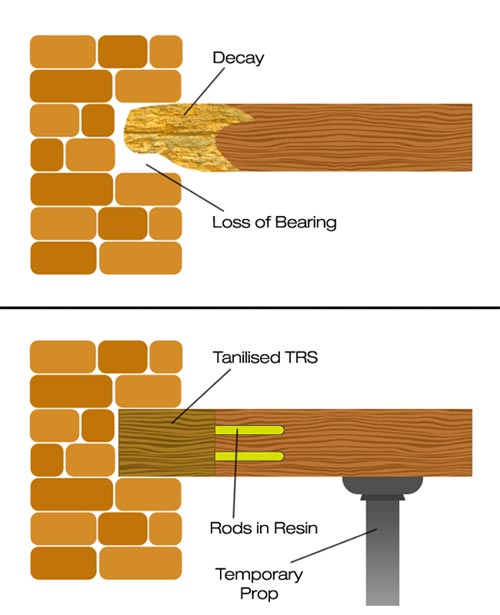
The repair process is straightforward:
- Identify and assess damaged timbers to confirm they are suitable for repair.
- Locate a solid section of timber where the resin splice can be safely applied.
- Support the joist or truss with props to carry the roof or floor load during repair.
- Lift floorboards or loft boards to access the top of the timber.
- Cut away the damaged section, leaving only sound wood.
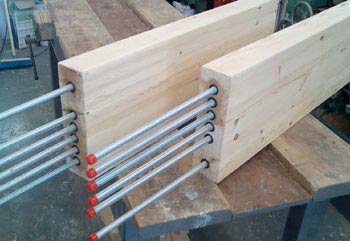
- Measure and cut a new timber section. Drill holes in the end and insert high-tensile threaded steel bars, bonding them in place.
- Cut a U-shaped slot into the existing timber to match the length of the steel bars.
- Fit the new timber section so the bars sit in the slot and all faces align. Bond the surfaces together.
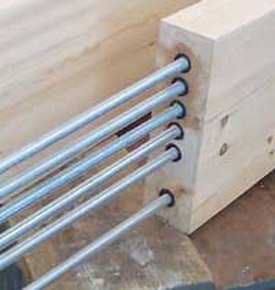
New joist or truss section with threaded steel bars inserted and bonded
- Mix the resin as instructed and pour into the slot until level. The resin self-levels and hardens to form a strong structural bond.
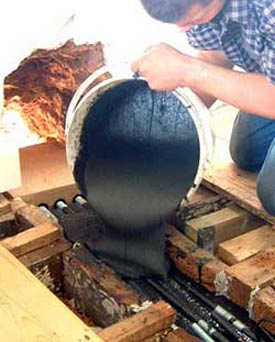
Pouring resin into slot in timber
- Allow the resin to cure fully, then remove the props and reinstate floor or loft boards.
Hardened resin in slots in timber
- Repeat the process one timber at a time if multiple repairs are needed.
This modern method restores structural integrity and strength without replacing entire trusses, making it an efficient and long-lasting repair option.
Joist End Repair Plates for Roof Trusses
Joist end repair plates offer a simple and reliable way to fix damaged roof trusses without full replacement. The process is similar to resin splicing above but uses galvanised steel plates to securely join the new and existing timber sections.
Here’s how such a repair is carried out:
- Inspect the damaged timber and mark where the sound wood begins.
- Support the joist or truss along its length with strong props, such as Acro props.
- Cut away the rotten or weakened section, leaving only solid timber.
- Measure and cut a new timber section matching the original size (e.g. 8×4 inches).
- Fit the new timber into the galvanised repair plate or plates. Depending on the manufacturer, plates may be “U” or “L” shaped. Ensure the timber sits flush in the plate before securing with coach screws.
- Position the new section so the non-plated end rests on the wall as the original did. The plated end should overlap the existing timber, ensuring both pieces are tightly butted together.
- Use an additional prop beneath the joint to hold the plate firmly in place before securing it to the existing timber.
- Once all fixings are tight and the joint is secure, remove the props gradually.
- Note: Always use repair plates approved for structural loads and follow the manufacturer’s installation guidelines.
This repair method provides a strong, long-lasting joint while avoiding the cost and disruption of replacing entire trusses. Joist end plate fixed to new timber section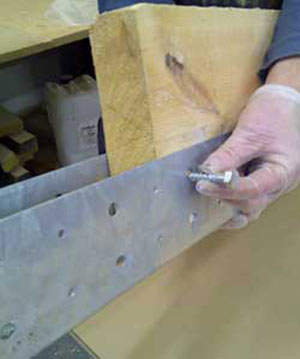
Before attempting any repairs to structural elements in your home, always consult a qualified builder or structural engineer. Professional guidance is always advised in situations such as this and ensures safety and prevents further damage.