Fixing architrave around doors is an essential part of finishing any internal decorating job and provides a simple and neat solution to the problem of dealing with the gap around a door frame.
In this guide we take a look at how to correctly cut and fix architrave, read on to find out how.
What is Architrave?
Architrave is the decorative moulding that is fixed around door, window, or other openings in your home and its primary job is to cover the gap between the wall and the door or window frame, giving a neat and tidy finish.
Architrave helps hide any rough edges or unsightly joins, while also adding a touch of style to any room. Typically made from wood, MDF, or PVC, architrave can be found in various designs to suit any interior whether it’s traditional or modern.
The main purpose of architrave is a functional one, to cover gaps, however it also serves an aesthetic role. It enhances the look of doorways and windows, creating a more finished, professional appearance.
It’s also important to mention that skirting also performs a similar role, however its role is to hide the join between a wall and a floor. Similarly, coving is used at the opposite end to hide the joint between the top of the wall and the ceiling.
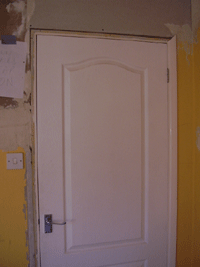
Door frame
Different Types of Architrave
There are various types of architrave, each suited to compliment a different taste or style and what particular type you go for will depend on the style of your home. In terms of what these types are, the most common are ogee, bullnose, and chamfered.
- Ogee Architrave: This is one of the most popular styles due to its decorative, curved profile. It features a classic “S” shaped curve, making it perfect for traditional and period homes or spaces that require a touch of classic style.
- Bullnose Architrave: This type offers a more subtle, rounded edge and is ideal for modern or minimalist interiors, where clean lines and simplicity are the principal aim. Bullnose is less traditional than ogee, making it a great option if you want something understated yet stylish.

Classic Ogee architrave

Bullnose architrave
Chamfered Architrave: A very popular choice for more modern and contemporary homes. This style has a slanted, angled edge, giving it a sharp, clean finish. Chamfered architrave works well in modern settings, as it adds a sleek and streamlined look. Its simplicity makes it versatile, suitable for a wide range of interior designs.

Chamfered architrave
How Much Architrave do I Need for a Door?
How much architrave you need for a particular door will very much depend on how tall it is and how wide it is.
In the UK, the standard height of an interior door is 1981mm or 6 feet 6 inches and the standard width can vary, but the standard width is 762mm or around 2 feet 6 inches.
So, with the above in mind, for a standard internal door you would need 2 lengths of at least 2m (rounding up) and 1 piece around 800mm.
As architrave tends to come in either 2.4 or 3m lengths, to account for all 3 sections, one 2.4m length and one 3m length should cover all the bases with a little extra allowance for any discrepancies.
Do You Nail or Glue Architrave to Fix it?
The standard practice when fitting architrave is to nail it to the edge of the door frame to fix it in place using small panel-type pins, lost head nails or the similar, so that when the nail is knocked in and painted over, it’s then invisible.
As architrave is periodically replaced with new, the fact that it’s nailed in place allows it to be removed with little hassle.
In some cases, it can indeed be fixed using glues and construction adhesives, but it would still need a few nails here and there to hold it in place while the adhesive cures.
Also by gluing it, this makes it much harder to remove as often the adhesives used are so good, the bond they create is stronger than the actual timber!

Architrave nailed in place around door frame
Do you Fit Architrave up to the Edge of the Door Frame?
The standard practice is to fit your architrave 6mm in from the edge of the door frame as this practice ensures that the door can open and close on its hinges correctly.
This also ensures that the edge of the architrave is not damaged or worn too quickly by those entering and exiting the door.

6mm gap between frame edge and architrave
What if my Walls are Uneven?
In many homes, especially more period properties, the walls are very rarely flat and level and often feature many undulations, however it is still more than possible to fit architrave around any doors, as the gap between the wall and the frame still needs to be finished and covered.
Although once fixed in place there will be many visible gaps between the architrave and the face of the wall, this can be easily delt with by using decorators caulk to fill the gaps.

Gap between wall and architrave filled and covered with caulk
Tools and Products Needed for Fitting Architrave
In order to successfully install architrave around a door frame you will need the following tools and products:
- Enough architrave of chosen style
- Tape measure
- Pen/pencil
- Lost head nails
- Hammer
- Mitre saw
- Fine grade sandpaper
- Caulking gun and caulk
- Carpenters square
- Correct PPE gear
- Straight edge or spirit level
How to Cut and Install Architrave
Now that we have explored all the different types of architrave and the various things to think about when fitting it, it’s now time to lokk at actually getting some fixed to a door frame and how this is done.
New Architrave is fitted by cutting the top corners at an angle, so they butt up to each other tightly to form, in most cases, a right angle. If your door frame is twisted or leaning over, a right angle may not be appropriate so see our project on angles used in carpentry to work out how to cut the angle you need for your door frame.
For the sake of ease, we are basing this guide on using a powered sliding mitre saw, however is you done have one you can use a mitre box and hand saw or similar.
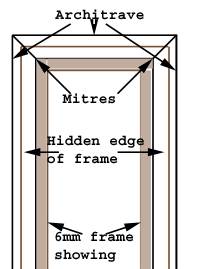
Frame diagram
Step 1 – Check Frame is Square
The very first job is to check that the door frame itself is square as this will determine what angle you will need to cut your architrave to.
Using a carpenter’s square, open the door and place it into the 90° corners at the top of the frame. If all is well and the frame is square, both edges of the square should touch both sides of the frame.
Next, take your spirit level and place it on the external edge of the frame uprights and the top section. This will tell you if the frame is leaning in, out or is vertically level.
If not, then the frame is not square and you will need to visit the Carpentry Angles project mentioned above.
If the property you’re working in is fairly new, then all the door frames should be square, if it’s an older, period property, then this may not be the case.
Step 2 – Measure and Mark Frame
Firstly, using a tape measure and pen/pencil, measure and mark 6mm in from the internal edge of the door frame on its edge in several places up both verticals and also along the top horizontal section. Using your spirit level, join these marks together all the way around.
This now defines where on the frame the architrave needs to be fixed and the length each section needs to be.
Now, tape your tape measure and measure each vertical upright from the floor to the top of the 90° mark on each side and then from the same top points along the top.
This is now long each section needs to be.
Step 3 – Cut Architrave to Length
Using the measurements taken above, measure and mark on a piece of architrave the first measurement for a side section and then place the length of architrave in your mitre saw or mitre block and then set the correct angle which should be 45°.
The key to cutting here is to make your cut so that the start of the mitre starts at the mark and runs out away from the actual length of the architrave. Repeat this for the other upright also.
Finally, take the long off-cut section that should have a mitre already cut on one of the ends and measure from the internal mitre point already cut, along and mark the length of the top section.
Again, place this in your mitre saw and cut the mitre to the correct direction to fit with the upright.
Note: When measuring, marking and cutting, also make sure that your architrave is the right way around e.g. the bullnose, chamfered section etc. is facing the right way, in towards the centre of the door.
Step 4 – Fit Architrave in Place
It’s now time to get the sections fixed into place around the door. Lay each section out on a flat, solid surface and then tap in, but not all the way through, 3 nails, roughly spaced along each section.
Next, pin each piece in place in position but do not bang panel pins in all the way, ensuring it sits tightly on your line around the door frame. If the mitres are not perfect you can move the side pieces slightly to get a good joint.
When you are happy, pin the three sections into place, adding 3 or 4 further nails and then use a nail punch to sink the panel pin heads below the surface of the timber.

Finished mitre joint
Step 5 – Finish up
The final job now is to finish up but running a bead of caulk around the joint between the architrave and the wall and also a little over each nail head to completely hide it.
If you’re using filler instead of caulk, allow it to fully cure and then sand it back flat. Ensure you overfill the joint slightly as shrinkage does occur with filler.
Once happy that all is as it should be, the architrave can then be painted.
Removing Old Architrave
Removing old architrave is an easy way to refresh your home’s look. Start by inserting a sharp chisel between the frame and the edge of the architrave. Gently pry it loose, working your way along the frame until the entire piece is removed.
Be careful not to force it or lever too hard in one place and you can easily create dents and gauges.
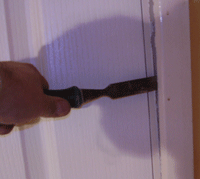
Removing architrave
Fitting architrave around a door frame is a fairly basic DIY job and one that can be done by anyone with only a few basic tools and provides a neat and tidy finish, hiding any unsightly gaps or joints.