When running any electrical cables externally any cable that’s used has to be both safe for use outside and able to resist the elements and also needs to be able to resist any potential damage, especially if it is buried underground.
To these ends the regulations state that in these situations special cable known as “armoured” or “SWA (steel wire armoured)” cable must be used as it’s both resistant to the elements and it’s protective steel casing ensures resistance to any impact damage.
In this guide we will take a look at SWA cable and how it’s used.
Note: Installing SWA armoured cable is Part P notifiable work and not something that can be done on a DIY basis and should only be done by a qualified electrician with the necessary experience to fully test the install once complete!
What is Armoured Cable and How is it Made up?
SWA or steel armoured electrical cable (British standard BS5467)is a type of electrical supply cable that as you may have guessed has it’s own in-built armoured sheath that protects the electrical charge-carrying conductor cable at the core.
The cable itself can be used in a variety of different ways. It can be used both on the interior or the property and the exterior and it can either be clipped to a solid secure surface such as a wall or it can be buried in the ground and hidden away.
In terms of the conductors (the charge-carrying copper wire), domestic armoured cable comes in a range of different cores including 1 core, 2 core, 3 core and 4 core and 5 core to suit different install situations. There are however others but these are generally reserved for more specialist industrial applications.
When it comes to the core wire colours these are generally as follows (depending on the number of cores):
- Single core = single brown
- 2-core = 1 brown and 1 blue
- 3-core = 2 different types: 1 brown, 1 blue and 1 yellow/green (earth) or: 1 black, 1 grey and 1 brown
- 4-core = 1 brown, 1 black, 1 grey and 1 blue
- 5-core = 1 brown, 1 grey, 1 blue and 1 yellow/green
To cover the potential range of different installs armoured cable is also available in a range of different size cores that include 1.5mm, 2.5mm, 4mm, 6mm, 10mm, 16mm and more specialist 25mm.
As to how armoured cable is actually made up there are essentially 5 different levels that includes the conductor or conductors ate the core, the insulation around each conductor, a layer of bedding around the conductors, the armouring layer around the bedding and then finally a protective PVC outer sheath.
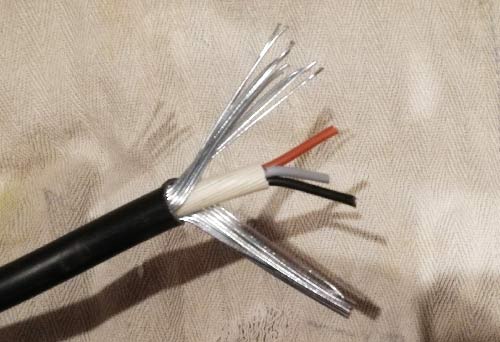
Cross section of armoured cable showing all the different cores
This may seem like a lot but then if you consider the potential for damage that could occur from any number of install situations and from the elements and the potential injuries that could result if the cable is compromised in any way then the number of layers is about right.
When Should Armoured Cable be Used?
When it comes to exactly what situations armoured cable should be used in, generally if the cable itself is going to be exposed to the weather and needs to be fully sealed and water proof e.g. used externally then armoured cable should definitely be used.
Likewise if there is also a chance that it could get damaged by impact force e.g. digging in the ground, pinching or crushing e.g. heavy weights being rolled over or pushed into the cable it needs to be able to resist these forces and a standard domestic grey electrical cable would simply not be up to the job and if it became damaged would pose a huge risk and potential for injury.
In summary if a cable is to be run externally, regardless of whether it’s buried or surface mounted or is going to be used in industrial locations around heavy machinery then armoured cable should always be used.
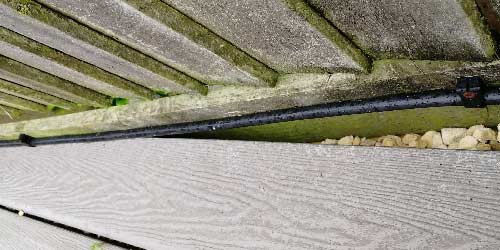
Armoured cable running externally from a house to a garage
Burying or Surface Mounting Armoured Cable
The choice of whether armoured cable is surface mounted or buried depends on several factors including the preferences of the homeowner who’s having the cable installed, the install location and the budget.
If the homeowner isn’t too bothered about visual appearance then in pretty much all cases it’s much cheaper and easier to surface mount the cable along any nearby walls or fences.
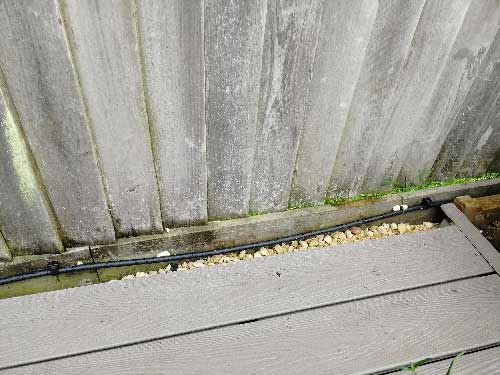
Armoured cable surface mounted
If however the homeowner or customer is particular about how visible the cable maybe then burying it is the way to go for sure, however this can in some cases be costly and involve a fair amount of work.
When it comes to surface mounting armoured cable it should be clipped up securely to a sturdy solid surface using the correct cable cleats. To keep the cable in place and prevent any drooping or possibility of snagging a cleat should be placed at least every 450mm.
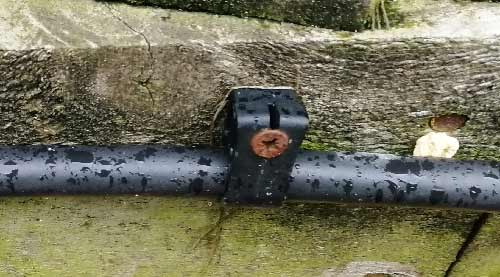
Armoured cable mounting cleat
In terms of burying armoured cable, it should be buried at 450mm down from the surface with ideally a layer of sand in the base of the trench. The cable is then laid on the sand and then to yellow cable marking tape is then laid over the cable to signify to anyone digging in the ground that there is a cable present. The trench is then back filled with soil.
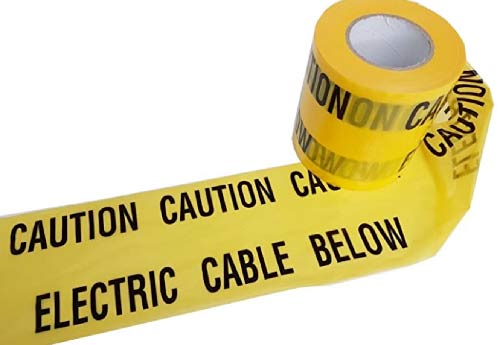
Yellow electrical cable trench warning tape
Earthing Armoured Cable
One important consideration when using armoured cable is how it’s earthed. In most cases this is done in the same way that any other electrical cable is earthed by using one of the inner cores.
Unlike standard electrical cable, armoured cable inner core wires are coloured slightly differently than standard electrical cables. With a 3 core armoured cable you will have brown, black and grey inner cores and they are often used as follows:
- Brown = Live
- Grey = Neutral
- Black = Earth
As you can see from the above, the black is generally used as the earth and it should be sleeved with earthing sleeve to indicate this. The same is the case for the other cores, if using other than standard then you need to indicate this through the use of tape or sheathing for the correct colour e.g. brown for live, blue for neutral etc.
If for example you are using a 3-core cable but you need all 3 inner cores for other uses e.g. in a 3-phase setup then it is also possible to use the steel armour section of the cable as the earth.
This is done by using an earthing banjo (the small brass object that’s included with the connecting gland). During assembling the gland and cable, once it’s pushed through the item you are connecting to e.g. patress box, weather proof enclosure, consumer unit etc. the large hole of the earthing banjo is slipped over the gland before the retaining nut is screwed down. The earthing banjo can also be slipped over the gland before it’s inserted into your enclosure or consumer unit.
Earthing banjo slipped over threaded sleeve
The banjo is then positioned so that the small end with the small hole is situated in a place that a hole can then be drilled through your enclosure away from any other items. A small bolt is then pushed up through from the base and through the small end of the banjo.
With the screw in place a length of earth wire is cut and a crimp ring is crimped on and then it’s slipped over the bolt and then a nut is screwed down and tightened.
The opposite end of the wire is then stripped and then connected into the earth bar of the consumer unit or earthing in the item you are using.
In terms of the earth cable, you should use this should reflect the size of armoured cable you are using e.g. is using 6mm armoured cable you should use 6mm earth cable etc.
One other item to be aware of when it comes to earthing armoured cable using the steel armouring as an earth is that the belt and braces approach is to earth the cable using the method described above at both ends however the regs state that it can be earthed at only one.
We would always recommend earthing at both ends however.
One final point to note is that even if you are using one of the inner cores as an earth you must still earth the steel armouring at one end to bond the armouring.
How to use Armoured Cable
In the majority of cases when installing armoured cable it is to run from a property outside to supply either a garage, shed or other outbuilding or to supply an exterior waterproof plug socket box. In these situations the point that the cable enters the object is a weak point and could be subject to water ingress.
To prevent issues such as these occurring special joints known as “glands” must be used. So that you know the different parts that we will be referring to below here follows a quick breakdown of the different parts of a gland:
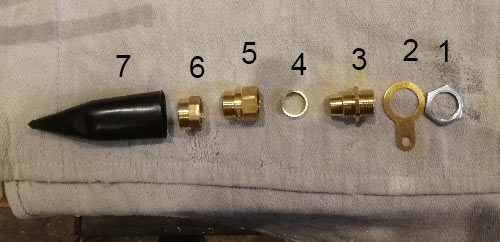
Different parts of a gland
- Threaded sleeve retaining nut
- Earth tag
- Threaded sleeve
- Cable retaining collar
- Collar retaining nut
- Sealed nut
- PVC cover
In the example below we are going to run through what’s involved in running an armoured supply cable from a property out to an outbuilding via an exterior weatherproof enclosure in a porch.
Install Weatherproof Enclosure
The first job is to prepare the weatherproof enclosure so that it can be fixed in place. In this case it will be fixed inside a porch area.
The reason for using a weather proof enclosure was that the main electrical feed would be taken from the consumer unit to the weather proof enclosure via a 10mm cable and the connection between this and the armoured cable would then be made in the enclosure.
Using a drill and holesaw, drill out the knockout hole at the base of the enclosure and also any other areas that you intend to have cable entering and exiting.
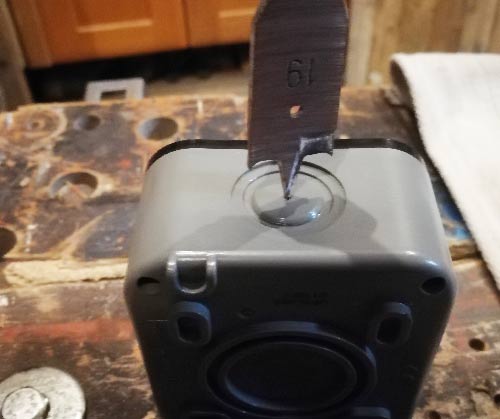
Drilling out knockout using a 19mm flat drill bit
Install Gland in Weatherproof Enclosure and Fix in Place
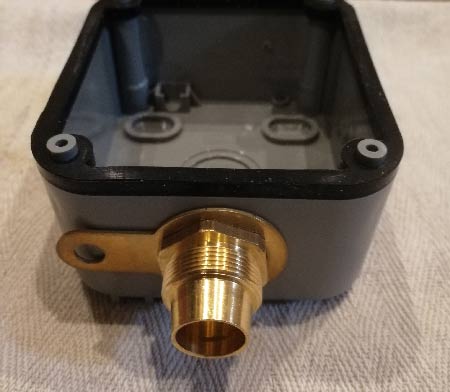
With the hole created the next job is to install the gland in the base of the weatherproof enclosure.
First slip the earth tag over the threaded sleeve and then push the sleeve up through the base of the enclosure and then pop the threaded sleeve retaining nut on the shredded sleeve and then screw it down and tighten fully with a spanner.
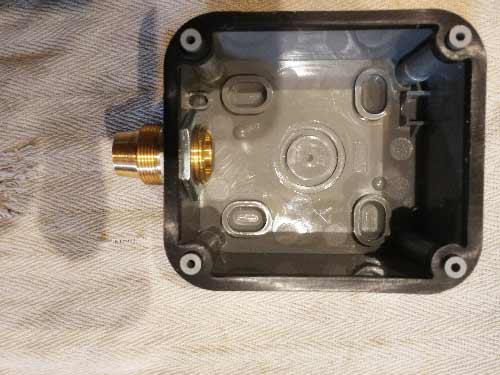
Threaded sleeve secured on base of waterproof enclosure
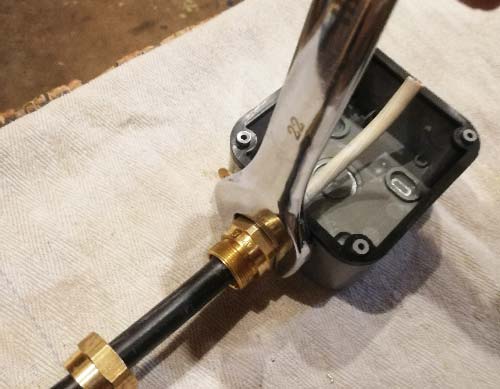
Once the gland sleeve is fixed in place, secure the enclosure to the install location (in this case inside the porch) by screwing through the rear of the enclosure using 8 x 32mm wood screws. Ensure the enclosure is fixed straight and level by using a spirit level.
Run Armoured Cable From Source to Install
The next task is to run the armoured cable from the location it’s going to connect into the consumer unit up to where the enclosure is. For this the electrician chose to use 10mm SWA cable.
Note: As this is a new circuit and will also be running externally is needs to be on its very own circuit and MCB, which as the socket was to be used for the occasions strimmer or power drill etc. a 20A MCB would be fitted in the consumer unit. As with the rest of the job, this should only be done by a Part P registered, fully qualified electrician!
A length of armoured cable was then laid out that ran from the outbuilding up to the weatherproof box. An access hole was drilled through the wall of the outbuilding so that the cable could be pulled in and up to the location of the consumer unit.
Armoured cable running into outbuilding
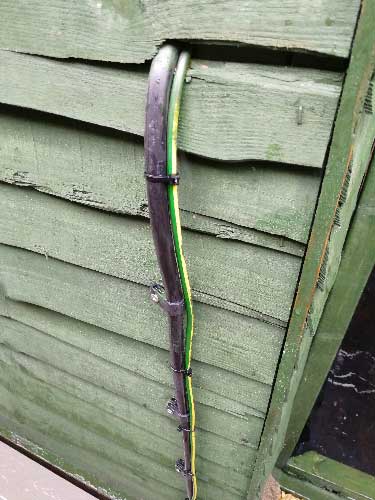
The cable was then run along an existing fence that bordered the property that ran from the rear entrance and porch area all the way down to the out building.
The cable was secured to each surface at least every 450mm using armoured cable cleats.
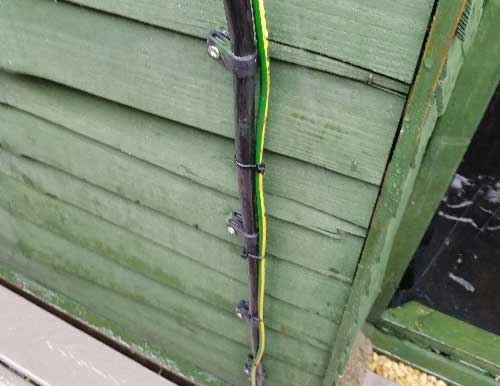
Armoured cable cleats fixing armoured cable to a wall
Run Armoured Cable into Weatherproof Enclosure
With the cable fully secured in place the next job is to run the armoured cable up through the threaded sleeve and into the enclosure.
If you have a lot of excess cable left over, first use a decent pair of wire snips, side cutters or a hacksaw to cut the end of the cable off to a suitable length so that there roughly 10 – 12 inches of cable left once pulled in to the enclosure.
So that it’s easier to get on the cable before it’s stripped, as once prepared the cores or armoured steel sheath can catch the next job is to slide the rest of the glad on to the end of the cable.
First, use a utility knife to trim the bottom 10mm or so off of the PVC sleeve and then slip it over the end of the cable and pull it down.
PVC sleeve slipped over end of armoured cable
In the exact following order, the sealed nut is slipped on and then the collar retaining nut and then the cable retaining collar ensuring that they are all facing the correct way around. Pull everything back down the cable to leave a good 6 – 8 inches of cable free.
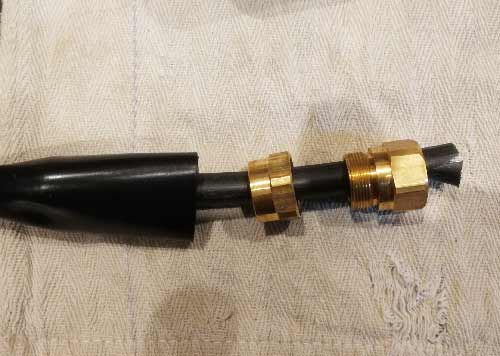
Remaining glad parts slipped on to armoured cable
Using a utility knife, cut down the centre of the PVC cover at about 6 – 8 inches from the end and then also cut around it and pull the cover off. Don’t push too hard you just want to cut through the cover.
Armoured cable PVC cover trimmed up
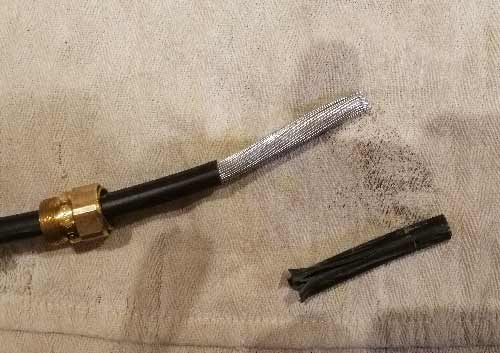
The next job is to now to trim down the steel wires that make up the armoured part of the cable so that they fit nicely around the threaded sleeve and then once the collar retaining nut is screwed up it helps hold the cable firmly in place.
Using a decent pair of side cutters, trim down each strand of wire so that there is roughly around 10mm left and then splay them all out slightly so that they fit around the sleeve nicely.
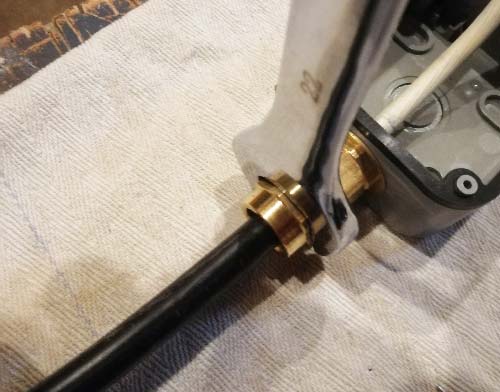
Now, push the bedding section of the cable up through the sleeve to the point that the PVC cover hits the bottom of the sleeve, ensuring that all of the wire strands are outside the sleeve.
Armoured cable pushed into sleeve up to PVC covering
Now, pull the collar up over the wire strands and then pull up the collar nut and tighten it fully. For this you will need 2 spanners, one to hold the sleeve and the other to tighten the collar nut.
Tightening collar nut using spanner
The penultimate job now is to screw up the sealed nut up to the sleeve. Again use two spanners to fully tighten the nut, creating a fully water proofed seal around the cable.
Tightening sealed nut
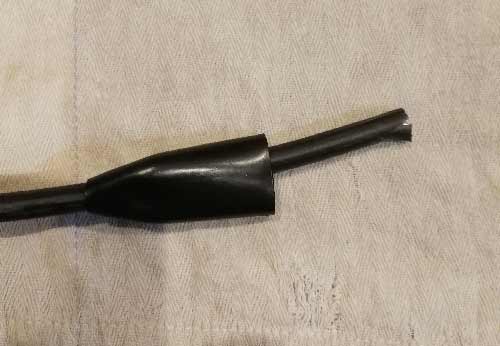
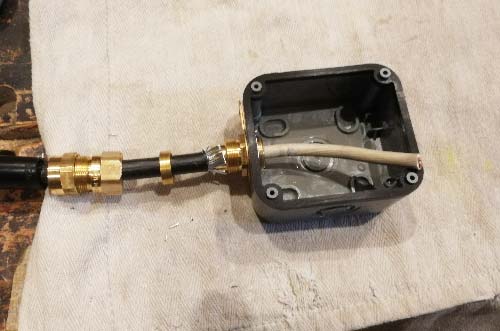
One of the final jobs now is to pull up the PVC cover all the way as far as it will go to the base of the weather proof box.
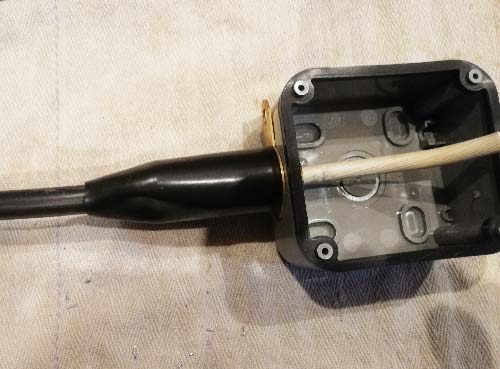
PVC cover pulled up over gland
Connect to Consumer Unit
The very last job for our electrician now is to connect the other end of the armoured cable into the consumer unit on its own MCB.
As we have stated, the initial connection to the consumer unit and corresponding MCB would be done using 10mm cable and this would then run to the weather proof enclosure where it would connect to the armoured cable.
Before any work was carried out the entire consumer unit was isolated before the new MCB was added. Once in place the 10mm cable was then connected up to the MCB and run out to the enclosure and then connected to the SWA cable. Once connected up the electrician then fully tested everything to ensure it was safe and then turned the power back on to run a live test.
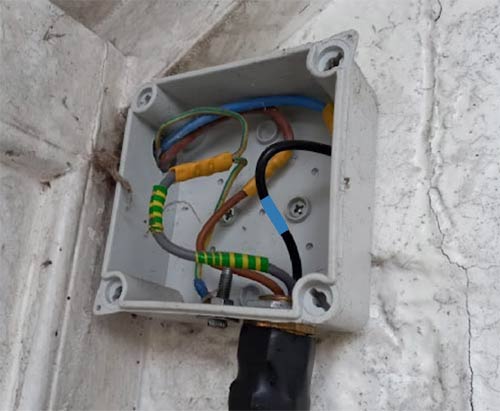
10mm cable from consumer unit connected to armoured cable
Installing and connecting up SWA cable is notifiable work and should only be carried out by a qualified Part P registered electrician. If you plan on installing outside sockets or running power supplies to sheds or outbuildings then using SWA cable is certainly the way to go.