If you have ever needed to join 2 sections of cable or wire together or create an additional spur for a new piece of cable then you should be well aware of the existence of the junction box and if not, this is the product you want if you are needing to do either of these jobs.
In this guide we take a look at junction boxes and how they are wired up and used, read on to find out more.
Working With Electricity and Junction Boxes
Electricity is dangerous, that’s a fact! We are all taught this from a very young age. When it comes to the electrics in your home, unless you know what you are doing or are a “competant person” then you should leave it well alone!
In respect to this other than changing the odd light switch or socket faceplate, this is about all you are legally allowed to do in your home (plus a few other things) and anything more substantial should only be done by a Part P registered electrician.
As part of the Part P regulations, if you want to sell your home then it could involve a check on any additional circuitry by qualified electricians. If you do not have a certificate to cover the work then this can affect your sale, you could be breaking the law and your house insurance may not be valid. Please be absolutely sure you know what you are doing and get all of your work checked by a qualified electrician.
When it comes to wiring up junction boxes, as you would expect, there are some quite strict rules on how they are wired, where they can be placed and how any cables should be secured. All of this is covered below.
For further tips on staying safe when working on and around electricity, check out our electrical safety project here.
What are Junction Boxes and What are They Used for?
A junction box is a type of electrical enclosure that allows you to safely and easily join 2 or more pieces of cable together and ensure that any connections and terminals are well hidden and protected from causing injury or fire.
Junction boxes can be used to connect additional sockets to circuits, add lighting points, extend circuits, and in general they are a way of getting power from an existing source and taking it somewhere else. They can also be used for repairs.
If a wire has become damaged, the damaged section can be cut out and the two sections joined back together again using a junction box.
In short they are used for joining wires or running a spur from an electrical circuit safely. Whenever you need to join two or more electrical wires, then you should use a junction box. As a result they are commonly used and very useful for anyone involved in wiring and electrics.
You might be thinking that block connectors do the same job and you would be right, but they do leave quite large sections of wiring exposed and if you have removed long lengths of the protective sleeve from wires, bare live wires can be easily accessible and cause an obvious danger.
Junction boxes have an advantage here in that all wiring and joins are housed within the junction box itself, leaving no exposed bare wires that can be touched or knocked.
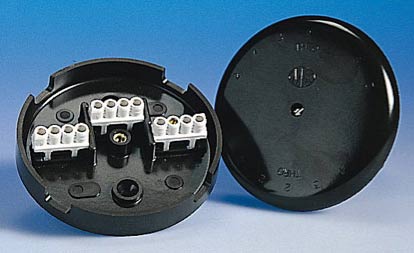
Junction boxes can also be used to add lights and switches. For more information please see our lights and switches project. A typical junction box
Types of Electrical Junction Box Explained
Electrical junction boxes come in a range of different types. There are two key differences that you will need to look out for when purchasing your junction box:
- Rating – the amount of current it is capable of dealing with
- Terminals – The number of terminals inside for connecting up to
There are also different styles of junction boxes that you can use. Each will differ slightly depending manufacturer (terminal layout, slightly different mouldings etc….), but the essentials should all be the same:
- Standard Junction Box
- Maintenance Free or Wagobox Junction Box
We will explain the differences between these types of junction box and their various benefits shortly, however it is important that you have the right rating whichever type that you choose.
Junction Box Amp Rating
Junction boxes are rated in amps to protect them, you and the circuit. Make sure you have the right box for the right job. A ring main (more about ring mains can be found in our project here) and also a radial circuit (more about radial circuits in our project here) will need a 30 amp junction box, whereas a lighting circuit (although you can buy 5amp junction boxes) will need a 20amp junction box.
The rating that you use must reflect the current of the circuit that it will be used on. It is possible to use a higher amp rated junction box on a lower rated circuit, but never the other way around – To summarise:
- Ring mains and radial circuits = 30 amp
- Lighting circuits = 20 amp
Junction Box Terminals and Wiring
Junction boxes come with either 3, 4, 5 or 6 terminals so work our which you will need to complete your project. The terminals are where the connections will be made by inserting the wire core from either side or the wiring run and then screwing the terminal close to create a safe electrical junction and join. A 3 terminal junction box being used to join two sections of wiring together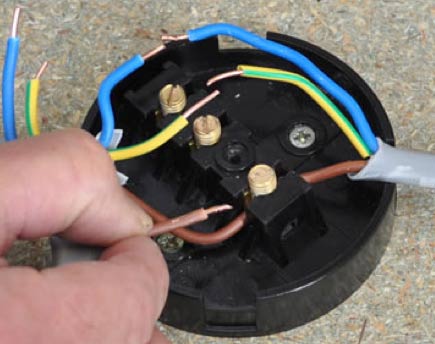
Essentially there are three types of terminal that are used in a junction box – these are:
- Single screw terminal – The terminal has one screw which is screwed closed on to the cable cores being joined together to secure them all in one single connection point. These are typically found in the Standard junction box, and allow the connection of a larger number or sizes of cable cores that the other terminal types

Single Screw type terminals inside a junction box
- Bussbar screw terminals – The cable cores are inserted into their own holes and then secured by screwing down on them to trap them securely. It is important to ensure that the terminal hole is sufficiently large for the cable core to fit. These terminals are relatively quick and easy to work with
Bussbar type terminals in a junction box
- Easy connect/maintenance free terminals – the cable cores are each inserted into their own hole in the terminal. The cables are either secured by levers, or are push fit. The number of cores that can be connected at each terminal is limited by the number of holes in each terminal – Generally 2 to 8. They are extremely quick to connect and easy to use.
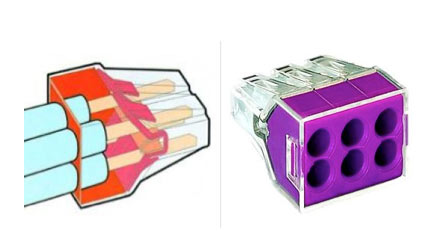
Easy connect maintenance free type terminal connector
Round or Square Junction Boxes
There is no requirement for a junction box to be either round or square, and they are commonly both. As a rule of thumb the more common round junction boxes are typically used for lower current cables. High current junction box – Image courtesy of Bartec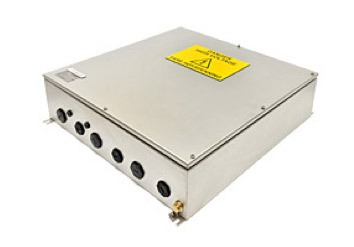
Increasingly common are the “Maintenance Free” Junction boxes. These are designed to replace the standard round junction boxes commonly use in household wiring. The reason that they have become so popular is that they can save nearly 75% of the time required to wire a traditional junction box. Maintenance free type junction box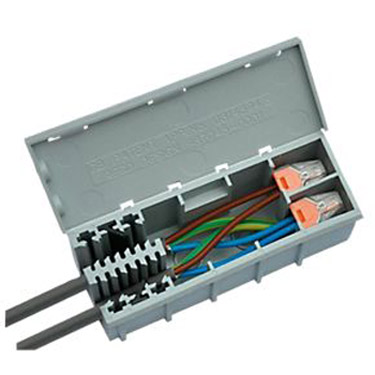
How to Wire a Junction Box
This section explains how to wire a traditional or standard style junction box. It doesn’t matter about the rating or number of terminals, the process is the same in each case.
Joining Two Sections of Wire Together
- Step 1 – Isolate Power: Before you do anything at all, first isolate the power to the circuit you are working on!
- Step 2 – Cut and Strip Cables: The next task is to cut any cables where you will be installing the junction box (if this needs doing, you may just have 2 ends that just need joining). Once cut, strip the main outer protective sheath and then strip 12mm or so from the end of each core wire
- Step 3 – Connect Wires: Once all stripped, connect the same core wire from each length of cable to the same terminal in the junction box e.g. brown live to live, blue neutral to neutral and earths to earth (remember to add some earth sheath to the earth wires – this is a legal requirement!). Make sure you screw each terminal screw down nice and tight
- Step 4 – Fix and Screw Cap on: Once all connected up, screw the junction box to a nearby joist or rafter or similar and then screw the cap back on
- Step 5 – Test: Once all secured, turn the power back on and then test the installation
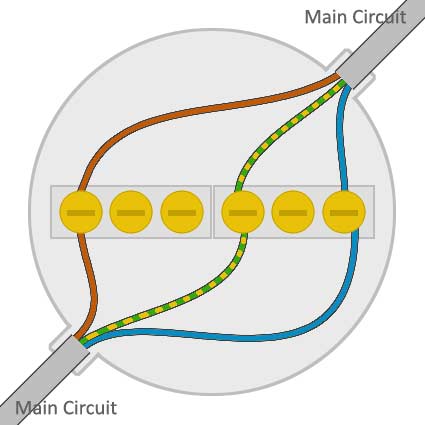
How to connect 2 sets of cables using a junction box
Creating a Spur Using a Junction Box
To use a junction box to create a spur, follow the steps below:
- Step 1 – Isolate Power: Before doing anything at all, the very first job is to isolate the power to the circuit you are going to be working on!
- Step 2 – Cut and Strip Cable: If you need to, cut the cable that you are joining into. You may not need to do this as you might already have 2 cut ends. Strip the protective outer sheath back from each of the 3 cables and then strip 12mm or so from the end of each core wire to expose the copper core
- Step 3 – Connect to Terminals: Once all stripped, connect each core wire to an individual terminal ensuring that each type of core is connected to the same from the other cable, e.g. a 3 brown lives in one terminal, all 3 blue neutrals in another terminal and all 3 earths in another terminal. Also ensure that you add earth sheath to each bare earth wire – This has to be done by law!
- Step 4 – Fix and Close Junction Box: Once you have ensured that each terminal screw is screwed down nice and tight, screw the junction box to a nearby joist or timber and then screw the cap down on
- Step 5 – Test: Once all wired up and secured, turn the power back on test the new spur socket to make sure all is working as it should be
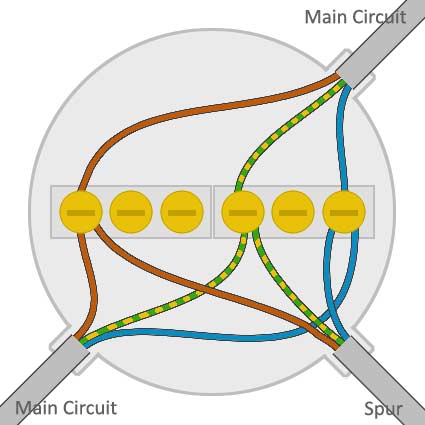
Junction Box with spur wiring diagram – Adding a Spur using a Junction box
Fixing cables into the Junction Box
When it comes to fixing the cables, each should be stripped to reveal the cable cores, but ensure that you do not do this back beyond the junction box itself. The cable leaving the junction box should be complete and intact.
The cable cores will need to be stripped before being inserted into the terminals. Try to expose the minimum amount of the conductor as necessary. 10 – 12mm will be typically sufficient for this, unless you are doubling them over then around 15mm is required.
Use green and yellow earth sheathing to cover the earth which will most likely be bare at present. As commented, this is a legal requirement stated in the Wiring Regulations.
Which Colour Wires are Which?
UK wiring colours went through a change in March 2004. The traditional red live and black neutral were changed to brown live and blue neutral. The earth wire remains as yellow and green if sheathed but it can also come bare. As stated above, if bare, you should cover with some sleeve just to indicate that it is the earth.
The main reason for this change was to ensure that any cabling used from that point onwards would harmonise (be the same) as those used in Europe.
For more information, please also see our project on the New Wiring and Cable Colours for a full explanation about the cable colours in use.
| Before March 2004 | After March 2004 | |
| Live | Red | Brown |
| Neutral | Black | Blue |
| Earth | Green and Yellow or Bare Core | Green and Yellow or Bare Core |
Securing a Junction Box Once Installed – The Rules
As we have stated in the how to wire section above, junction boxes must be fixed solidly to a firm, suitable surface and must be accessible! These rules are stipulated in the latest 18th edition regulations and must be adhered to. Screw the base of the junction box to a joist or rafter through the securing holes indicated in the image below. Parts of a junction box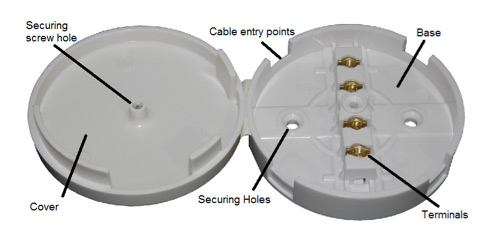
This does not necessarily mean they have to be visible, they can be fixed in floor or roof voids.
In terms of accessibility, this means that a builder or electrician can easily remove part of the floor or ceiling etc. and access the junction box when required. Junction boxes may not be buried in plaster or other similar materials.
Likewise, the cables running into and out of the junction box should also be secured to a suitable, stable surface. If not, then “mechanical strain” could take place and over time, wires may become loose causing loose connections.
Any cables running to and from a junction box should be clamped using cable clips or clamps!
Please also check the rules very carefully for ring mains and radial circuits. You are limited in the length of cable you are allowed to use in both circuits and long spurs could make you exceed the limit and over load the circuit!
If this is the case you are asking the circuit to use much more energy than the circuit is designed for. More energy = more heat and cables can catch fire!
For detailed information on the rules and for more specialist advice please download the latest Approved Document P available from the Planning Portal website.
You can also read a brief synopsis on the electrical guidelines and what they mean by visiting our Approved Document P project here.
Once the junction box has been fixed to a secure surface, and the wiring has been connected to the terminals and tested you can close the junction box, they must never be left open and exposed. The cover is screwed closed using the provided securing screw (or possibly screws) through the cover and fixing it to the base. It is often necessary to adjust the wiring inside the junction box to allow the cover to close. Avoid simply forcing the cover closed with the screw as this can risk causing damage to cables. Stuck or confused with wiring and electrics?! Get professional help – Image courtesy of Active Rain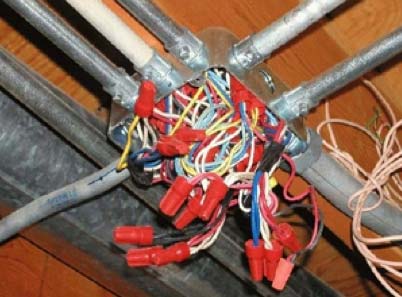
Junction boxes are very handy objects and can be used to quickly and safely join 2 sections of cable together or allow you to add an additional cable to create a spur. Despite their ease of use, it must be ensured that all wires are connected to the right terminals and that the junction box itself is fixed securely.