Why do we use Lintels?
Many walls in your house will be what are called supporting walls. This clearly means they support something! This could be the walls for the rooms upstairs, the ceiling or all the way up to the roof.
Whatever it is that is supported must, under UK building regulations, be supported all the way down to the foundations.
This means that when we have an opening in a wall, the structure above that opening must be supported in a way that allows it’s weight to be transferred either side of that opening and then all the way down to the foundations.
You can find out more about forming openings through walls in our project here.
Any wall which is supporting another part of the structure is called a load bearing wall and if any part of it is to be removed it has to be done in accordance with the relevant Building Regulations.
The Building Regulations will also tell you how the lintel must be supported and built in. This is a very important part of forming an opening through a load bearing wall because, by forming the opening, you will have dislodged many parts of the wall or joints which may not necessarily be visible.
Putting this wall back together, including building in the lintel in the most solid way, is therefore covered by the regulations. You are in fact, altering the very structure of the property and it must be kept safe.
DIY Doctor does not consider structural alterations to property to be DIY tasks and recommends that you find a suitable tradesman to complete a project of this type.
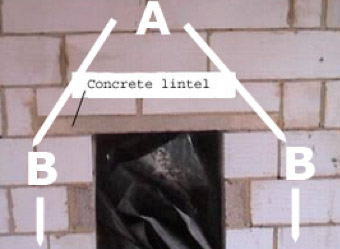
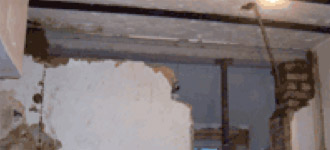
Lintels take the load of the wall above down to the foundations
You can see from the image above that a lintel has been inserted into a load bearing wall where an opening has been formed below it.
The weight of the wall A, is now bearing down onto the concrete lintel. The concrete lintel spans the opening transferring that weight onto the wall either side of the opening so the weight of A has now been transferred to the B walls.
In this case, these walls travel down to the ground floor slab which, in turn, is supported by the foundations of the house.
Types of Lintel
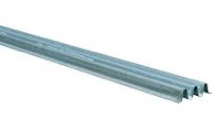
Steel Cavity Lintel
Anything that is capable of transferring the weight of the load above it, to the support on either side of it, is called a lintel.
Lintels can be wood, steel, stone, metal or a mixture of materials. The important thing about the type of lintel you use is that you must “prove” it can carry the load it is being placed in the wall to support.
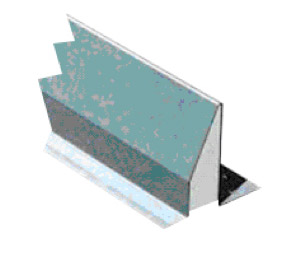
Insulation inside a cavity lintel to stop cold bridging
The proof (shown to the Building Inspector of your local councils Building Control Department) can be provided by you, your architect or even the company supplying the lintel but this is why the Building Regulations are in place, to keep you safe against using an insubstantial product in your home.
Concrete Lintel
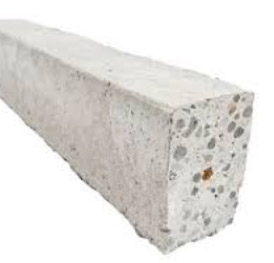
Concrete lintels are strengthened with reinforcing bars
Concrete lintels usually have some reinforcing steel inside them. This steel maintains the integrity of the lintel when it tries to bend under the compressive force of the weight above it. The steel allows the concrete to flex a little without cracking.
Stone Lintel
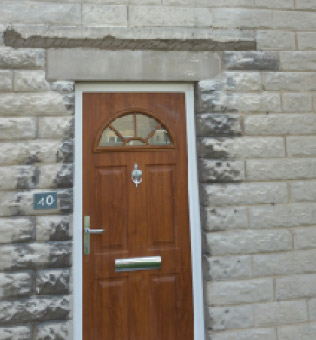
Improperly supported lintels lead to failure and wall cracks
If a lintel is not built in properly, e.g. the mortar joints are too wide, or the support is too weak in terms of it’s ability to deal with the weight placed on it, the likely outcome is that it will drop.
If it drops, the wall is no longer fully supported throughout its full length and it too will drop.
As the wall is fully supported by the foundations at either end, it will only drop over the faulty lintel and this causes a crack in the wall as you can see from the image of the stone lintel.
The remedy here was to add reinforcing “stitching bars” to the joints above the lintel.
Steel Single Skin Internal Lintels

Internal masonry walls need lintels over openings
Internal lintels over doorways and other openings can be steel and concrete. They can be box section as shown over an internal doorway, of corrugated where the strength comes from the bends in the steel.
Either way, you need to show a building Inspector that your chosen lintel can do the job you want it to do.
Internal wall lintels can be corrugated steel
Supporting the Ends of the Lintel
Lintel ends must be solidly built in
Just putting a little sand and cement mortar under the ends of your lintels is not enough. In most cases, the lintels are carrying and transferring huge loads. Even the lightest Fletton bricks weigh about 3 lbs each (or just over a Kg) so 1 square metre of brickwork weighs a massive 25 stones, without the sand and cement joints. That two people!!
To support and build in the lintel properly it is therefore necessary to stop the weight of the wall crushing the joints under the ends of the lintels.
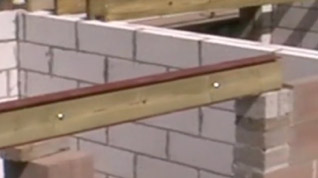
It is also vital to have enough of the lintel ends on top of the support to ensure a good bearing. The standard bearing length for each end of a lintel is 6 inches or 150mm but on all occasions this must be checked with the building inspector.

Lintels must have a minimum 150mm bearing
Once this bearing is established the lintel can be built in with bricks or blocks, paying normal regard to the procedure for laying them.
If there are gaps which mortar can not be forced into, further support can be obtained by jamming layers of slate into these cracks. Slate has a very high compressive strength and will not crush.
Sometimes slate, or slate substitutes, are used together with a mortar joint to ensure the weight of the lintel and the wall do not crush the joint.
For jobs where there is a real danger of the ends of the lintels crushing the fabric underneath the Inspector may ask you to insert concrete padstones.
Attaching timber to RSJ lintels makes it easy to box in
What is a Concrete Padstone?
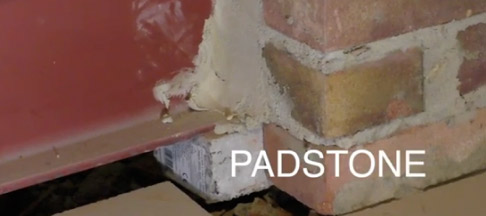
Concrete padstone under an RSJ lintel supporting a chimney stack
Defined by the Planning Portals section on common projects such as extensions, a padstone is an area of dense concrete, cast in situ or pre-cast, made of a size to suit the case in hand. A minimum padstone will therefore be 6 inches (150mm) long and the same width as the wall.
Building the Lintel in
When the lintel has been sited on the padstones, the masonry should be continued keeping as close to the original bond as possible.
Straight joints should be avoided and each brick or block should be tied into the main wall wherever possible. The lintel should become part of the wall, not be separate from it.
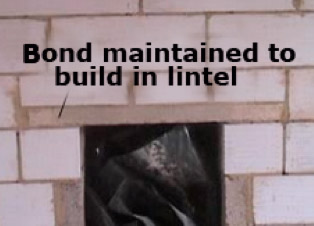
New lintels should be built in with the masonry bond maintained
Using the Lintel as an Arch
Sometimes lintels, especially cavity lintels, can be used to create a feature over an opening. This can be done by using different bricks over the lintel or by using them on end, known as brick-on-end or a “soldier course”.
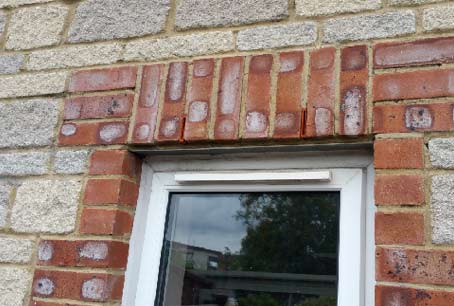
Cavity lintels can be used for feature brickwork by creativly placing soldier course
Using an Archway as a Lintel
The Romans realised that an arch was the strongest shape you could use to support heavy loads. The more weight you put on it, the tighter the joints became. It was, and is, capable of supporting massive structures.
An arch is built over a framework called a “turning piece”. The turning piece is cut to size and made to the thickness of the wall. The arch is simply laid over the top of it, with fully packed mortar joints. When the turning piece is removed, the arch stays exactly where it should.
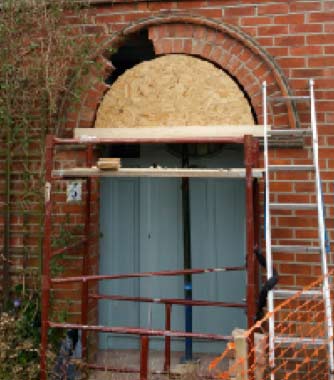
A turning piece is made and used to form brickwork arches
Building an Arch in a Square Opening
If you want to make more of a feature of a square opening its possible to make a mini turning piece and sit it on top of a square lintel.
The lintel used in the image below is a cavity lintel and the lip of the front edge has been used to sit a turning piece on. This turning piece supports the soldier course which, in turn, forms an arch over the window.
Rather than removing the turning piece as you would do with a normal arch, it is left in to become part of the feature window.
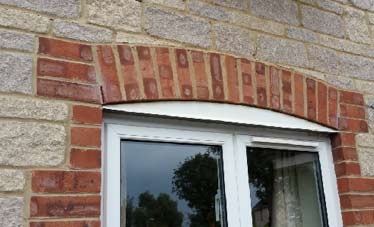
Archway created above window reveal with turning piece supporting soldier course
Building Regulation Approval
Finally, please check to see if you need building regulation approval for the project you are about to undertake. If your project involves a load bearing wall, you most definitely will need permission to continue. Please stay safe and enjoy your DIY.