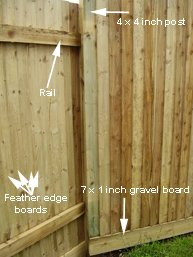
Closeboard fencing using feather edge boards and 4 inch posts
Fencing is a great DIY task but will be a lot easier if there are two of you as you will have someone to help hold the ‘other end’. Before you start your fencing project, you will need to plan where the fence will be positioned. This will often require clearing a path through any vegetation; any plants that you don’t want to trample should be dug up and potted, to be replanted once the fence has been built. (Find out more about re-potting plants here).
The best time to work on fences is in the early spring and late autumn, when the ground is not frozen, but the plants are not growing and have died back.
What is Close Board or Feather Edge Fencing?
Close board fencing is fencing which is made up of posts and rails, with feather edge boards fixed vertically to the rails. Here is a little more information on the parts of a feather board or close board fence:
- Posts: The fence posts are typically made of treated timber (as we will describe in this project), however they can also be made of concrete which will be much harder wearing. The posts can either be concreted into the ground (see here for how to concrete in fence posts), or they can be fixed with using metal supports, which are less sturdy, but much easier and quicker. We would prefer using concrete for a close board fence
- Rails: These are the cross member that are fixed between the fence post that you will fix into the ground. These can be fixed directly on to the post or you can use an arris rail, which fits into a triangular notch in the fence post. Post can be bought with the notches already cut, or you can cut these yourself. The arris rail will be triangular in cross section which means that it will fit into the notch and still leave a flat surface to fix the feather board on to
- Gravel Boards: The gravel board is fixed at the base of the fence along the ground horizontally from post to post. They help to allow the fence line to follow and traverse a slope on uneven ground, as they fill any gaps and can be dug into teh ground also. They will need to be treated as they are the most at risk area for rotting. If using gravel boards you should try and leave a 150mm gap below the fence boards that the gravel board will cover. This will also mean that the fence boards are less likely to get damp
- Fence Boards: For close board or feather board fencing, feather boards should be used. These are the boards that are secured vertically to the rails which provide the protection that the fence affords
- Capping Strip: Once all the feather boards have been attached and cut to the appropriate slope if necessary (see below for close board fencing on a slope), the exposed top or end grain should be treated with a wood preservative to make it last. Over the top of this and running the length of the top of the fence, you should fix a strip of wood called a capping strip to further protect the feather boards from the weather
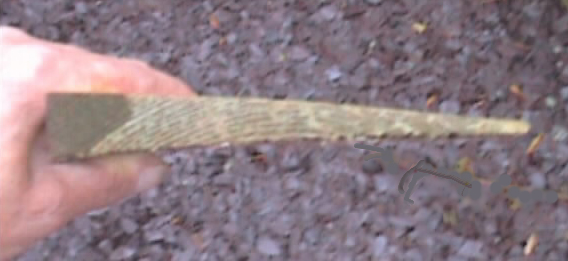
Feathered edge board used for closeboard fencing
How to Erect Close Board Fencing
The posts should ideally be 4 x 4 inch treated timber, set into the ground in a hole 2 ft (600mm) deep and concreted with a concrete mix as shown in our concreting fence posts project. The picture at teh top of the page shows both the inside of the fence (left) and the outside (right) to demonstrate how the fence is assembled.
Fencing Etiquette
It is an accepted rule that the outside (good side) of the fence is shown to neighbours. We suggest that you discuss this with them and this is the side that you will be doing much of the work (fitting the feather boards) so you may trample plants etc.
First the posts are concreted into the ground, then the gravel boards are fixed to the outside of the posts. Try and get the gravel boards as level as possible and if your garden slopes you may need to "step" the gravel board.
Close Board Fencing on a Slope
Stepping sometimes involves digging out the ground a little to set the board down into it; another reason why all timber should be treated as if it is in contact with the ground constantly then it won’t take long for it to start rotting.
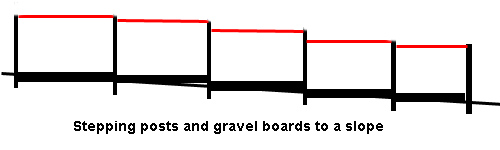
Stepping of fence boards and gravel boards on a slope
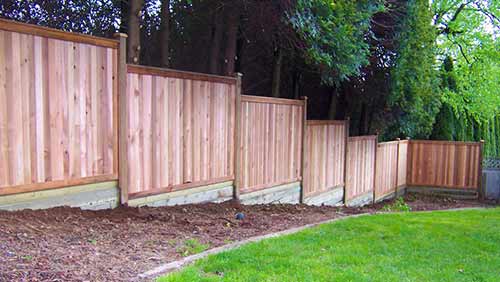
Stepped close board fencing on a slope
One of the features of using feather boards is that it is not necessary to step the fence if this is prefered, as you would have to with any panelled fence (Find out more about fencing with fence panels here). It is possible to fix the rails parallel to the slope of the ground, keeping the post and the feather boards vertical. If this is the approach that you have opted for you should fix the gravel board parallel to the ground also, rather than stepping it.
Once the feather board panels have been fitted then they can be cut at the top and bottom parallel with the rails and the ground. A handy tool for this is a reciprocating saw.

Closeboard fencing following a slope – Image courtesy of pridefencing.co.uk
Fixing the Fence Rails
Once the posts are secure, the rails need to be positioned.
The rails can be flush with the front of the posts, which will allow the feather edged timbers to sit on the gravel board and be fixed easily for the length of the fence. Some people like to set the gravel board and rails back so the feather edged timbers sit a little inside the posts – the choice is yours.
Fence supports in place and being fixed
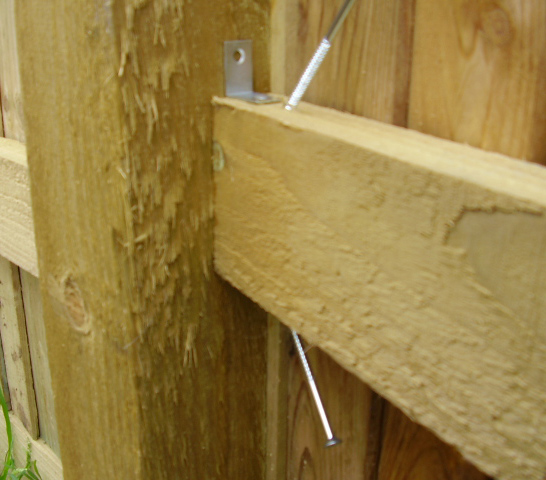
The rails can be screwed into the posts through the sides and supporting brackets can be used to give extra strength. Three inch number 8 screws are usually needed for this.
Again all timber should be treated to ensure it lasts! For extra strength galvanised brackets can be used to secure the rails further. There are a wide range of designs, even ones that will support arris rails. They should be used whenever possible as they will provide considerable extra stability and strength.

Fence rail bracket to fix rail to the fence post
Close board fencing can also be done using proprietary concrete posts. These posts have slots in them in which the rails can be easily inserted into.
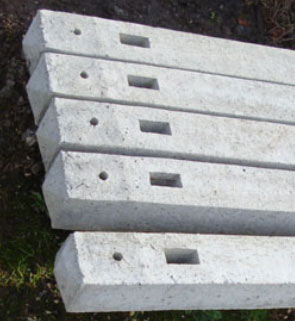
Notches in concrete fence posts for inserting rails into
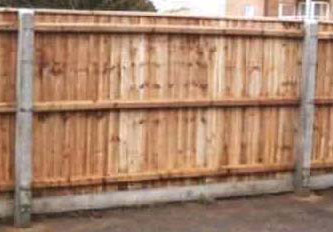
Closeboard fencing installed using concrete posts
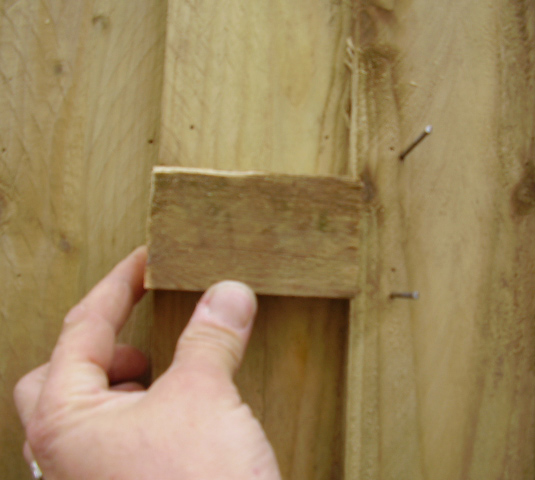
Fixing Feather Board to the Rails
The first feather edge board can then be fixed on the outside of your fence. Use a spirit level to make sure this is absolutely upright. They should be approximately 25 mm higher than the fense posts.
Nailing and screwing positions for feather boards on support rail
Each subsequent board can then be fixed to the one below it as shown above and to get the spacing right a small block can be used to ensure an even overlap. The overlap should be at least 25mm. Nails should be 50mm lost head nails or 50mm ovals.
Wooden block used as spacer
As you get towards the last post (between 6 to 10 boards distance) measure the distance and then adjust the spacing so that you finish at the outside edge of the post. This will mean that you have a nice neat finish.
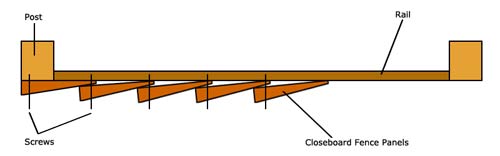
Options for attaching Feather Boards to Fence Rails
There is a school of thought that the nails that are used with fencing projects should be galvanised and round and should only go through the one board and not the thin edge of the previous board as we have shown.
Using galvanised nails is certainly the right way to go as they are much more resistant to corrosion so will last longer. The main reason for not nailing through the thinner section of the board is that it is likely to split. If using these nails then you should drill pilot holes to prevent this, particularly if they are used to fix the thin edge of the board as we have shown.

Closeboard fencing fixed using galvanised nails
Using galvanised nails is great as they do not rust but they leave the head of the nail proud of the timber and unless they are all perfectly aligned, this looks horrible, especially in sunshine. In reality, it takes 7 years for a lost head or oval nail to rust and routine maintenance will identify any weak points during and at that time.
In light of this, if you are a proactive DIY enthusiast you will save time and get a neater looking job not using galvanised nails. The trade off is that you will have to do more maintenance to the fence over the years, but if you are prepared for this it is no hardship.
Also because galvanised roundheads have a larger (circular in section) diameter shank than lost heads or ovals they have a tendency to split the timber.
Given that lost head or oval nails have a lesser diameter and are generally sharper, they are able to pierce both the thicker section of the feather edge, and the thinner edge of the board behind it, without splitting the timber. This (double fixing) to each lap stops the timber "curling" as it dries out. Curled timber creates wind and drag which can very quickly wreck a fence.
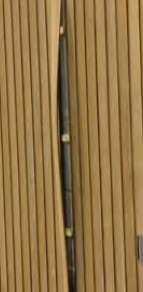
Damaged or curled feather boarding on a close board fence can result in further wind damage
There are no rules really and so long as you understand the trade off between the two approaches you can make the decision about which way you prefer to fix your feather boards to make your ideal close board fence.