Unfortunately, condensation is pretty much inevitable when you live in the UK. Due to our humidity levels and wet winters, as soon as we hit Autumn and the temperature starts to drop we start to see water and moisture forming in the corners of windows or across entire glazed units.
Despite the inconvenience of having to wipe windows down and unattractiveness this brings, it can also cause other issues, mainly in the form of black mould growth. This not only adds to the unattractive nature of this problem through the growth of mould spores all over the place, but can also contribute to and cause numerous health and breathing issues.
The issue of condensation forming on the inside of a window is more normally associated with older single pane glazing where there is only one pane of glass between the inside and outside. The colder outside air cools the glass and when the warm air on the inside hits it, it condenses and condensation forms.
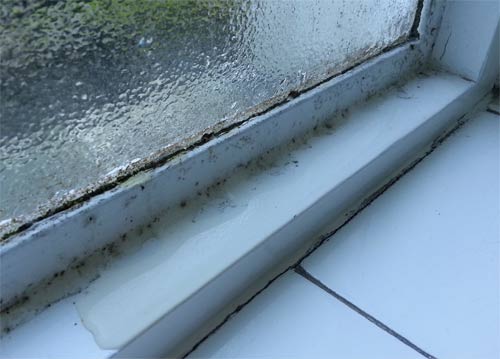
Extreme condensation running off of single pane glazing and on to window ledge
Towards the end of the 1980’s, uPVC windows started to become readily available, replacing their earlier aluminium flamed counterparts. Not only was plastic cheaper to use as a material, it also helped to retain heat within a room.
Aluminium and other metals are quite decent conductors of heat and cold and can easily transfer cold from outside into a room and the heat from inside out through the frame of the window itself. Using plastic helped to reduce this issue.
The plastic frames were complimented with a sealed unit (See our double glazing project for more about these) that comprised of two single panes, separated by a spacer bar. All edges around the panes are then sealed to prevent any moisture or air from getting in. To deal with any moisture trapped during sealing, tiny silica balls made from silica gel or in some cases calcium chloride (or desiccant as it is also known) is included in the spacer bars to absorb it.
These silica balls not only absorb any moisture that gets trapped during sealing, they are also there to deal with any future moisture that finds its way in. In reality, this should not really happen for a long time if the unit itself has been manufactured correctly using decent materials but some lesser quality units do start to leak, sometimes within five years of installation.

Desiccant balls
Today, most decent and reputable double glazing suppliers will offer at least a 10 year (sometimes 15 or 20 year) guarantee against their products, meaning that if a unit fails then you should be able to get it repaired or replaced.
As I’m sure you are well aware, anything will degrade over time and this also goes for double glazing in that eventually the seals will degrade and crack, the uPVC frames themselves can also crack and sealed glazing units will begin to leak. As mentioned, how quickly this happens will depend on the build quality of the windows themselves.
Note: If you are looking at getting your double glazing replaced, ensure any guarantees are insurance backed. Historically, smaller glazing companies have a history or going out of business, taking with them any guarantees that they may have covered your windows at the time of installation. An insurance backed guarantee should, in most cases, mean that your glazing and frames are covered even if the company goes out of business.
What Causes Condensation in and on Double Glazed Units
To help explain this, we will first start with a little explanation of what condensation actually is.
Condensation is the process by which a vapour or gas changes into a liquid. If a surface such as a glazed pane or wall falls below its “dew point” (the dew point is the temperature at which air needs to be cooled to achieve saturation) any water vapour present will condense and form water droplets. The dew point of any given atmosphere will depend on how much water it contains. The amount of water in a given atmosphere is also known as humidity.
When it comes to temperatures, in very humid conditions, condensation will start at a higher temperature, whereas in colder conditions, condensation will happen even if there is relatively low levels of moisture in the air.
When it comes to condensation, it can appear on a double glazed unit in several different locations:
- On the internal glazed faces of window
- On the external glazed faces of window
- On the surface of glazing in the air gap between the glazed units
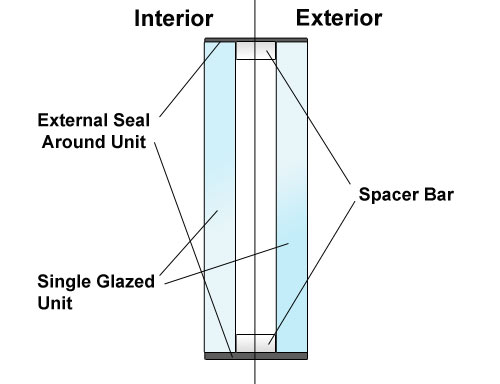
Cross section of a double glazed unit and parts that make up the unit
In terms of fixing and preventing condensation, how easy or inexpensive this is will very much depend on where it is. It might be as simple as not drying clothes on radiators or the worst case being the whole sealed unit will need replacing.
Condensation on Internal Glazed Faces of a Window
If you are suffering from condensation on the inside faces of your windows then this is down to either:
- Too much humidity in the room itself or the property as a whole
- Little to no air circulation within the room to clear the moisture in the air
- Low temperatures in the room or property creating cold surfaces that warm air can easily condense onto
In rooms of high humidity such as kitchens or bathrooms where there is a large amount of moisture and generally higher temperatures, it is pretty much inevitable that condensation will form on any colder surrounding surfaces.
If you keep the temperature within your property at a reasonable and constant warm temperature then it becomes harder for any moisture to condense as surfaces will be warmer. The temperature of internal surfaces can be affected by those outside. If it is cold outside then the cooling effect can be transferred through to internal surfaces, lowering their temperature and increasing the chances of condensation.
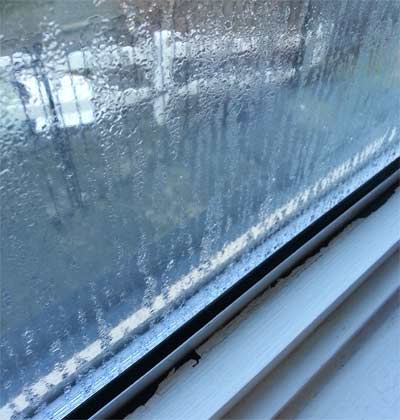
Condensation on internal areas of double glazing
Condensation on External Glazed Faces of Window
Although this is not seen too often but does occasionally happen. When condensation forms on the external face of a glazed surface it is normally an indication as to how well thermally insulated the units themselves are and not an indication that there is anything wrong with them.
In most situations this occurs during night when temperatures are low, with a clear sky and no wind. I’m sure you have come out to your car early on a crisp Autumn morning to find it covered in water droplets, well, this is the same thing.
With poor quality units where the air gap between each glazed pane allows thermal transfer there will be some heat-transference.
This is where the warm air inside warms the internal glazing pane and the heat is transferred to the external glazed pane, not only allowing the heat to escape to the outside but warming the pane itself, thus preventing this type of condensation.
In higher quality units the above does not happen as heat is prevented from travelling from the warmer inside glass across the air gap to the external pane, meaning that it remains at a much lower temperature. When the external air is warmer and the dew point of the air is higher than the temperature of the glazed surface, condensation will occur.
As mentioned, this will normally only happen where the sealed units are of high quality or are constructed using low-emissive or highly energy efficient glass and although it may be a slight pain in the fact that your visibility is limited until it clears, it is a good sign in terms of how good and efficient your windows are.
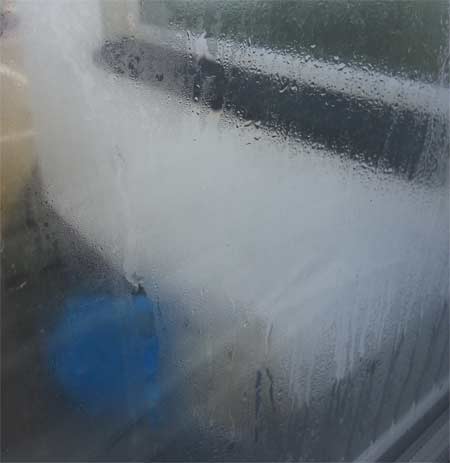
Condensation on external areas of double glazing
Condensation in the Air Gap Between Glazing Panes
The two issues above are relatively easy to deal with, but this is where it now gets tricky as there could be numerous reasons for this happening:
- It could be a temporary issue caused by abnormally cold weather or high humidity
- Presence of high levels of surrounding moisture due to wet concrete, plaster, paint etc…. drying out after major construction work
- The seal that creates the “sealed unit” starts to fail allowing moist air into the air gap
- On poorer quality units where the sealant used to create the seal is low-grade, the seal and bead that holds the glass in position in the frame can help to form the overall seal. If this external seal deteriorates then water and moisture can seep into the frame and into the sealed unit
- If the external seal deteriorates to the point that it is allowing large amounts of water into the frame and the sealed unit is allowed to sit in this pool of water for long amounts of time, it can eventually seep into the air gap
- The units themselves are old and have deteriorated to the point that they are no longer any good and need replacing
As you can see, there are quite a few different potential causes for condensation forming within sealed units, this can be just a temporary thing or it could be the fact that the unit has totally failed and needs replacing.
An important point to mention here and one that you should be aware of is the fact that the aluminium spacer frame that helps to make up the sealed unit is full of desiccant. This is a material that is highly absorptive by nature and will suck up any moisture present in void between the two panes.
If there is a very slight imperfection in the seal, any moist air entering will be absorbed up to the point that the desiccant becomes saturated and cannot retain any more, at which point, any further moisture will then start to appear as condensation.
With this in mind the problems you are experiencing may have been there for quite a while but they have now only become apparent due to the desiccant failing.
Despite the annoyance and undesired appearance of condensation within the window itself, if the seal has failed then this can also mean that you are wasting huge amounts of energy heating your home as it is just escaping through the gaps to the outside.
When it comes to fixing these issues, the cause will very much determine the fix and also the expense involved, but as stated, if your sealed units have failed then the money you are wasting through heating your property could fully justify the expense of repairing or replacing the failed windows or sealed units.
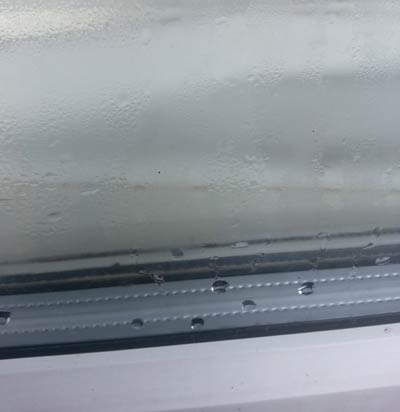
Condensation between double glazing panes
Fixing Condensation on Internal Glazed Faces
In the majority of cases, this is one of the easier fixes. As we have stated above, internal condensation issues are often caused through high humidity and temperature. The best way to deal with this is at the source.
- When cooking, ensure that you cover all pots or pans with a lid. Also, open windows or use extractor fans to move moist air from inside to the outside
- Avoid drying any wet washing inside when possible
- When showering, close doors and open a window or use an extractor fan to remove moisture-rich air
- If you have a tumble dryer, ensure the vent pipe is routed out of a window or other external vent
- If possible maintain a reasonable and stable temperature inside your property. This will help prevent surfaces from cooling to their dew point and allowing moisture to form water droplets
- If condensation does form, wipe it off as soon as possible with a cloth or tea towel. If it is allowed to sit on surfaces, especially timber, then it will eventually cause rot and other damage
- Ensure that you open as many windows in the property as you can for at least a few hours a day as this will allow fresh air to circulate and replace the humid, stale and moist air
By following the above steps you should be able to minimise the potential causes of condensation on your double glazing and other surfaces but if after following these guidelines for a period you still find that you are suffering, it might be worth calling in an expert for their opinion.
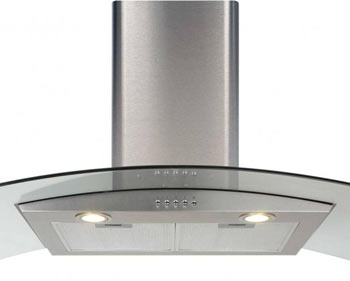
Modern cooker hood extractor fan
Fixing Condensation on External Glazed Faces
As we have explained above, this is not really an issue other than it can be a little annoying as it restricts outside views and can be a little unsightly, but a good sign in the fact that you have very thermally efficient windows.
If, however, you do want to cure it there are few things that you can do:
- Try to allow air and wind to circulate past your windows. If they are blocked by gates or other items, consider moving/repositioning them to allow air to flow past
- Shading from vegetation, nearby buildings or other objects can help to retain warmth and prevent surfaces cooling to the point that condensation forms so you could position tall shrubs, potted trees or even some form of shelter nearby

Vegetation around window – Image courtesy of dwell.com
Fixing Condensation In Double Glazing
This is the big one and one that will in almost all cases, causes the most expense or hassle to fix. If you are experiencing large amounts of water and moisture in your glazing then it is likely that the seal has totally failed.
If you are lucky enough to have a guarantee for your glazing and it is still valid then you will need to get hold of the company that installed your windows and if found to be a defect in the seal, then any units should be replaced free of charge under the guarantee.
Do not attempt to tamper with or repair the units yourself as in most cases this will invalidate any guarantees.
If you do not have cover for your windows then you are really left with only a few choices
- Replace all faulty units with new ones
- Have a specialist repair company recondition each faulty unit
- Attempt a DIY fix yourself
Replace Faulty Units with New
The first choice obviously comes at a substantial expense if you need to replace all or most of your units, but if you can afford it them this is the best route to take.
A professional and reputable window installation company will manufacture your new units to a high standard, install them professionally and should also cover their work with a guarantee (ensure this is insurance backed).
You will also have the added bonus of being able to upgrade the units to those that are highly energy efficient. This will also help you to save on your heating costs.
If the actual uPVC units themselves are in good condition, in most situations you will not need to replace these, just the sealed units. If you are savvy with your DIY then it is possible to replace just the sealed unit yourself. Once you have measured up and sourced your new unit from a glazing company, check out our video here on removing and refitting the sealed unit.
If you are considering replacing all your units and you currently have old and outdated double glazed then updating to new triple glazing is a good idea. Although they are expensive, the decrease in U value (the measurement of how efficient a window is) that they give can be fairly large and could go a long way to helping reducing your heating costs. As well as this they also have several other benefits:
- Can help to reduce cold spots in areas around the windows
- Great for reducing external noise
- Can help to keep your home warmer if you live in colder areas
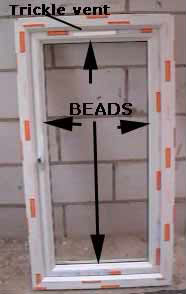
Brand new double glazed unit
Have Faulty Sealed Units Repaired or Reconditioned
Over the past few years, quite a few companies have emerged that can now repair failed sealed units at quite a reasonable cost. Many housing associations across the country now use companies such as these to repair units rather than throw them away and go for the extra cost of replacing them with brand new ones.
There are a few different methods of achieving the repair but most involve drilling one or two holes in one of the glass panes or in the side spacer bars.
The unit is then either pumped or injected with a special drying agent that either dries out the air within the unit or expels the moist air that’s found its way in. At this point, some companies also clean the inside of the unit, removing and smears or marks and will also coat the inside with an anti-fogging agent that then prevents any further moisture build-up.
One important fact to remember here is the root cause of the issue – the fact that the seal has most likely failed! If you are thinking of repair as opposed to replacement, look for a company that reseals the unit as part of the repair process.
Resealing will normally be done through injecting a sealant material into the unit along the base to prevent any moisture from entering through the base. Again, the sealing technique that is used will depend on the company and their particular technique.
The final process again will depend on what company you use. They will either completely seal the unit again, sealing up any holes that have been made or they will insert special vents into each hole that will allow airflow. Fitting vents will most commonly be used when an anti-fog coating has been applied.
The success of the repair will very much depend on the company or individual you use. There are many success stories online concerning repairs to double glazing units but on the other hand there are also many stories of failure, so do some decent research first.
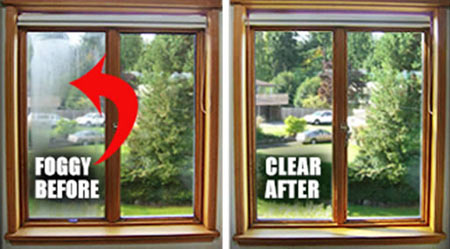
Comparison of before and after the repair of a misted double glazed unit – Image courtesy of infinityglassandmirror.net
Repair Failed Double Glazing Units Yourself
We have included this section mainly because, technically this can be done, but the end result will very much depend on practical abilities and experience.
The repair process pretty much involves removing the sealed unit from the frame, splitting the panes away from the spacer bars, cleaning each pane thoroughly, replacing the desiccant and then putting it all back together again, sealing each section and then sealing the unit as a whole.
Although this may seem like a simple and cost effective way to solve any issues, you really have to know what you are doing as you can easily make things worse.
Glazed units are also bulky, heavy, sharp and hard to handle and can easily be dropped or cracked while you are removing or working on them and if this does happen, then you will be left with a gaping hole and nothing to fill it with.
This is not a job for the faint hearted and should really only be attempted by someone with experience of glazing or a good, practical knowledge of building and construction, however if you are feeling brave we have a project here on repairing a sealed double glazed unit if you want to have a go.
Damaged External Window Seals, Beads and Gaskets
The condition of the external seal or gasket as it is also know can also help to contribute to condensation in double glazed units. Although they will not directly allow water or moisture into the sealed unit itself, if broken, cracked or perished, they will allow water to seep into the window frame.
If a sealed unit is allowed to sit in a substantial amount of water for long periods of time, eventually water can find its way through the seal and into the base of the unit causing condensation to form. If your seals or gaskets are damaged, then you will need to replace them.
How to Replace the Seal in a Double Glazed Unit
Replacing double glazing gasket or seal is a pretty simple DIY job and as long as you take your time, one that can be done by most. Work through the following steps:
- First, you will need to purchase some replacement gasket. This can be found in pretty much all DIY stores. Before you do so, using a slender flat knife, prise out a section of your existing gasket and take a picture of how it looks using a phone or camera. This is just so that you know exactly what type of seal the unit currently uses so that you can get a direct replacement, there are quite a few different types and sizes. If you are unable to find an exact copy of your existing, there are universal products that will fit most modern units
- Once you have your replacement seal, you will also need a thin, flat knife to help prise out the existing seal. You could also use a pair of needle nosed pliers. You will also need a sharp pair of scissors
- Starting at the base, prise out and remove the old seal along its full length. We will be working on one side at a time. Once removed, use some window cleaner and a cloth or sponge to give the edge a good clean down, removing any marks or algae growth if it is present
- Take your new seal and measure it along the width of the section you’ve just removed and allow an additional 10-15mm for movement. Take your scissors and cut off a section and then at one end, cut the end at a 45° angle, working inwards to about 8mm. This will be used to form a mitre joint in the corner and ensure there are no overlaps that could allow water to penetrate into the frame
- starting at the end with the 45° cut, push this section into the corner and then using your thumb, push the seal downwards and it should clip into place
- Using your thumb, work your way along the length of your chosen edge, pushing the seal down into place as you go and making sure it is sitting correctly with no creases or gaps
- When you get to the opposite edge you will now have to cut off the excess. Push the gasket into place as far as you can and then mark on the gasket seal, the point that it reaches the corner. Pull it out slightly and cut it off on the mark. As before, cut a 45° mitre and then push it back into place
- Check the edge over and make sure that the seal is in its correct position in the frame and also against the glass, creating a good seal. If all is ok, you have now completed one edge
- Replacing the remaining seals uses exactly the same process described above. Once the seal is in place, make sure there are no creases, it is firmly against both the frame and glass and that there are no gaps. Also ensure each corner is nice and neat and that both joining edges meet nice and neatly
- If you do find there are some gaps in the corners, you can fill these with a small amount of silicone
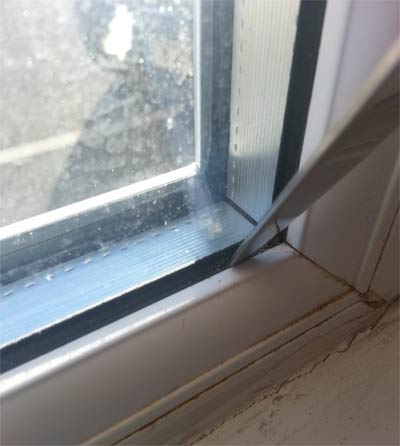
Prising out existing gasket with a flat knife
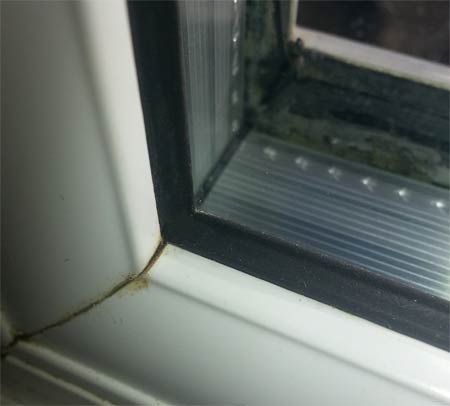
Two corners joining at 45 degrees creating mitre joint
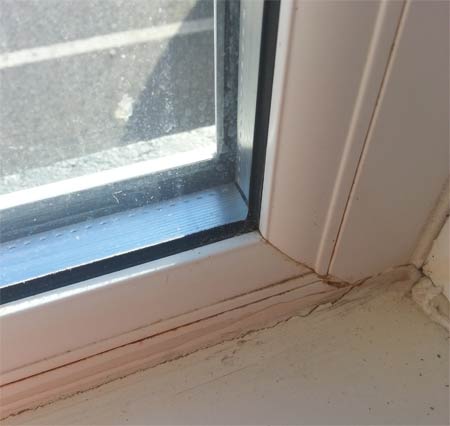
Two edges completed with new gasket seal
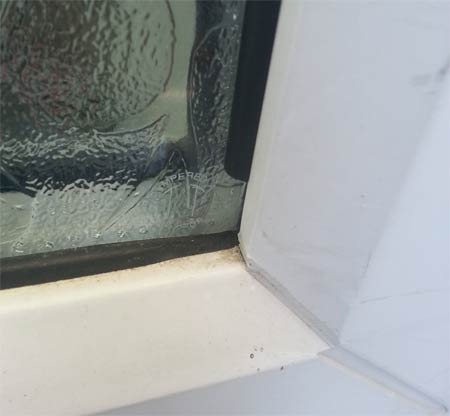
Gap that needs filling with sealant
you should also be aware that some window manufacturers make their beads (the plastic sections that hold the glass in the frame) and seals as a one-piece unit. If this is the case, these can be really tricky to remove and even trickier to refit.
The fixing methods do in some cases differ between manufacturers so unfortunately we cannot provide definitive instructions on their removal and refitting. If you do have these types of single piece unit and fancy having a go yourself, go ahead, but be aware, they are tricky to get out and often, even trickier to clip back into place.
One other thing to be aware of is that fact that the beads hold the glass in the frame. By removing the beads the glass will in most cases be free to move so be careful it doesn’t drop out of the frame!
A word or warning though is that in case all goes horribly wrong, you should have a backup method of covering the window e.g. a sheet of ply or spare window frame and glass. There are specialist tools that allow you to remove such beads and they can be purchased from most DIY stores or builders merchants but if the frames are old then the required tools may no longer be available.
If the beading and seals are separate units, the seal should come out fairly easily with a little prying but if after some levering they are stiff and do not budge, changes are they are part of the bead.
Tips for Preventing Condensation
Most of these tips are mentioned at the top of this project but if you read past and missed them, they can be summarised as follows:
- When you are cooking, make sure all pots etc…. are covered with lids. If you have a hood extractor over your cooker, use it. Failing this, open a window
- When showering or bathing, always use an extractor fan, leave a window open slightly or both and close the door!
- Don’t be tempted to dry clothes indoors on radiators if you can help it
- If you have a tumble dryer make sure you stick the vent pipe out of a window
- Use your heating wisely to maintain a decent and constant temperature
- When condensation does form, wipe it off with a cloth or suck it up with a window vacuum
- Ventilation is good! Open windows during the day time and allow fresh air to circulate and replace stale and moist air
A damaged double glazed sealed unit can not only cause condensation and misting but it can also contribute to a great deal of heat loss from your home and cost you a great deal in wasted energy, therefore it is important to get them repaired or replaced.
In terms of repair, we have outlined several methods above. Their success will very much depend on your DIY skill level and knowledge if you intend to give it a go, but when dealing with windows, it’s always best to get a professional repair company in or get your sealed units replaced with new.

