We often get questions about plastic and UPVC conservatories, especially when people plan to build one themselves, but for a successful DIY conservatory project, accurate measuring and assembly is absolutely critical.
Any changes or eve small mistakes you make during installation can also affect and even invalidate your guarantee, so with this in mind, in this guide we look at all aspects of DIY conservatories.
Popular DIY Conservatory Designs
Once you have measured your available space, the next step in your DIY project is choosing the right conservatory design. Below are some of the most popular and practical styles to consider:
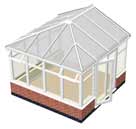
Edwardian Style Conservatory
An Edwardian style conservatory is one of the most popular conservatory designs in the UK, mainly because it offers a simple, practical shape that maximises usable floor space. Unlike more ornate styles, the Edwardian conservatory has a clean, square or rectangular footprint with a symmetrical roof.
This makes it ideal for homeowners who want a bright, functional room that works well as a dining area, home office, playroom or extra living space.
From a DIY and installation point of view, Edwardian conservatories are also among the easiest to fit. The straight walls and right angles mean measuring is more straightforward, frames align easily, and standard glazing panels can be used throughout.
Edwardian Style Conservatory
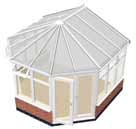
Victorian Style Conservatory
A Victorian style conservatory is one of the most traditional and visually striking conservatory designs in the UK. It is best known for its distinctive curved or multi-faceted front, usually made up of three or five angled sides, and a steeply pitched roof.
This classic shape gives the conservatory a period look that suits both older properties and modern homes wanting a more decorative extension.
Although the shape is more complex than square designs, modern DIY conservatory kits are manufactured with pre-cut frames and panels, making installation far more manageable than many people expect.
From a practical point of view, a Victorian conservatory provides excellent levels of natural light thanks to its angled glazing panels, making the space feel bright and open.
Victorian Style Conservatory
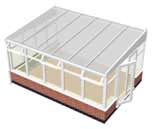
Lean-to Style Conservatory
A Lean-to style conservatory is one of the simplest and most versatile conservatory designs, especially popular in the UK for modern homes. Characterised by a single-sloped roof that leans against the back wall of the house, this style offers a clean, minimalist look and is ideal for properties with limited garden space.
Its straightforward design makes it easier to install and often more cost-effective than more complex conservatories like Victorian or Edwardian styles.
One of the main advantages of a Lean-to conservatory is its adaptability. It can be built in a range of sizes and finishes, using modern UPVC, aluminium or timber frames and can accommodate a variety of glazing options for insulation and energy efficiency.
For DIY enthusiasts, many Lean-to conservatory kits come pre-fabricated, making installation straightforward while still delivering a professional and stylish finish.
Lean-to Style Conservatory
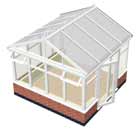
Gable Style Conservatory
A Gable style conservatory is another popular choice for UK homeowners seeking a bright and spacious addition to their home. Its signature feature is a high, pitched roof with a triangular gable at the front, which not only enhances the visual appeal but also creates a sense of height and openness inside.
This design maximises natural light, making it ideal for sunrooms, dining areas or garden-facing lounges.
These conservatories can be constructed using UPVC, aluminium or timber frames, depending on your preference and budget. Many homeowners choose double or triple glazing options to improve insulation and energy efficiency.
For DIY enthusiasts, gable-style conservatory kits are available, offering pre-measured, modular components that simplify installation, however depending on how hight the gable is, can be a little tricky to assemble, but with the correct scaffold can be easily overcome.
Gable Style Conservatory
Most DIY conservatories use a modular design, made from standard-sized components that slot together to form a set structure. In many kits, parts such as French doors can also be repositioned within the frame but this will depend on the manufacturer and the design.
What Different Types of Conservatory Roof are There?
When choosing a conservatory, the roof type is just as important as the style of the building. The roof affects the amount of light, heat retention and overall comfort that your conservatory will supply, so selecting the right option is absolutely key.
In the UK, there are several popular types of conservatory roofs to suit different homes and preferences, these are as follows:
Polycarbonate/Glass Roof
The polycarbonate roof is lightweight, cost-effective and ideal for smaller conservatories. It lets in natural light while providing some insulation, though it may not retain heat as well as other options.
Glass roofs, on the other hand, maximise daylight and create a bright, airy feel. Modern double or triple-glazed glass panels also help reduce heat loss and noise, making them a popular choice for year-round use.
Some more expensive panels can also reflect heat in the summer, while trapping it in the colder months and some also have integrated solar panels that can then be used to generate power for your home.
Solid and Hybrid Roofs
Another option is the solid roof, which offers excellent insulation and allows for more control over temperature, making your conservatory feel more like a traditional room.
Hybrid designs, combining glass panels with solid roofing sections, provide the best of both worlds—plenty of natural light while much improving comfort and energy efficiency.
Choosing the right conservatory roof comes down to what matters most to you, such as natural light, insulation or overall appearance. Understanding the options available helps you make an informed choice that suits your home, boosts energy efficiency and keeps your conservatory comfortable all year round.
Key Features for Your DIY Conservatory
Choosing the right features for your DIY conservatory depends on how you intend to use it. If it will be a regular living space, such as a home office or lounge, you will need to prioritise energy-efficient glazing and roofing to keep heat in and running costs down.
However, for occasional use, comfort is still important, but high-level insulation may be less critical in this case .
For best results, every DIY conservatory should include the following core features:
- 28mm Toughened Low-E Glazing – Helps retain heat, improves comfort and lowers energy bills by reflecting warmth back into the room as opposed to letting it escape.
- 25–35mm Polycarbonate Roof Panels – A cost-effective option that offers good insulation and also light transmission.
- High-Performance Glass Roofing – A premium alternative for your roof with much better thermal control and optional self-cleaning coatings.
- Opening Fanlights with Secure Locks – Essential for airflow, helping prevent overheating in the summer and condensation in colder months.
- 70mm Double Glazed Frames – Provide stronger insulation, better security and improved long-term durability.
- Full DIY Fitting Kit and Guide – Absolutely essential if installing yourself, ensures you have all fixings and clear instructions for a smooth, successful installation.
DIY Conservatories and Planning Permission
In most cases, building a DIY conservatory in the UK does not require planning permission, as long as it falls under permitted development rights.
This means the conservatory must meet certain size and height limits and must not take up more than half of the land around the original house. It also needs to be built at ground level and use materials that match the existing property.
Despite this however, there are situations where planning permission is needed. These include homes in conservation areas, listed buildings, flats or properties where previous extensions have already used up permitted development allowances.
If your conservatory is particularly large, close to a boundary or changes the front of your home, it’s also likely you’ll need approval.
Even if planning permission isn’t required, your DIY conservatory must still comply with UK building regulations, this is the law! This covers areas such as structural safety, glazing standards, ventilation and electrical work.
Checking with your local authority building control office before you start is always recommended, as it ensures your project is fully compliant and avoids costly mistakes later on.
To summarise, these are the main points:
- Any extensions, including a conservatory, must not cover more than 50% of the total land around your home.
- If your property fronts a road or public highway, the conservatory cannot project beyond the main or side walls.
- Maximum extension limits are 3 metres for semi-detached houses and 4 metres for detached houses.
- For the most up-to-date and official guidance, visit the Conservatories Planning Permission section on the Planning Portal.
Is a Conservatory the Same as an Extension?
Many homeowners wonder whether a conservatory is the same as a standard home extension. While both add extra space to your property, there are key differences that affect planning permission, building regulations and overall use.
A conservatory is typically a lightweight structure with a predominantly glass or polycarbonate roof and large glazed walls. Its design focuses on bringing in natural light and connecting indoor and outdoor spaces, making it ideal for leisure, dining or sunrooms. In contrast, a standard extension usually has brick walls, a solid roof and full insulation, designed to be used year-round as a living area.
Legally, a conservatory can sometimes fall under “permitted development,” meaning you may not need planning permission if it meets certain size and design criteria.
Traditional extensions, however, often require formal planning permission and must comply with stricter building regulations for structure, insulation and heating.
Understanding the distinction helps you plan your project correctly, ensuring your new space is safe, comfortable and compliant with UK regulations. It also allows you to choose the style that best fits your lifestyle, whether it’s a bright, airy conservatory or a fully insulated extension.
Does a Conservatory Need a Foundation?
In short, yes absolutely, any and every conservatory requires a solid foundation. Even though conservatories are lighter than traditional extensions, they still need a stable base to support the structure, prevent settling and ensure safety over time.
Foundations are usually made from concrete and must be level, strong and deep enough to handle the load of the conservatory’s walls, roof and glazing. In the UK, the depth and size of the foundation will depend on the soil type, the size of the conservatory and local building regulations.
Skimping on foundations can lead to uneven floors, cracks in walls or structural instability and worse case, eventual collapse, especially in regions with heavy rainfall or frost.
For DIY builds, always follow the manufacturer’s guidance and local building regulations, and consider consulting a professional if you’re unsure about ground conditions or load-bearing requirements.
Choosing the Right Base for Your DIY Conservatory
For most DIY conservatories, a concrete slab is the preferred choice. It should be at least 150mm thick, reinforced with steel mesh and laid on well-compacted hardcore to provide a level and durable foundation. The slab must extend slightly beyond the walls of the conservatory to protect against moisture and settling.
Another option is a block and beam foundation, which uses concrete blocks and infill beams to create a raised base. This method can be useful if you need to run underfloor heating or want a cavity for insulation. However, it requires careful planning to ensure stability and level surfaces.
Before building, assess the soil type, ground drainage and local regulations. Clay or soft soil may require deeper foundations, while rocky ground may need less preparation.As stated above, always consult with your local authority building control office as they will be able to offer advise and specifications.
Concrete Base for a Conservatory
After setting the base, you can choose between two options:
- Build a dwarf wall and then place the conservatory on top of it.
- Directly install the conservatory frames onto the base for a full-height conservatory.
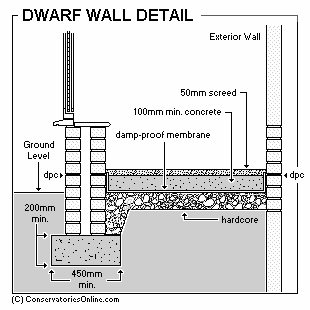
Dwarf Wall Detail
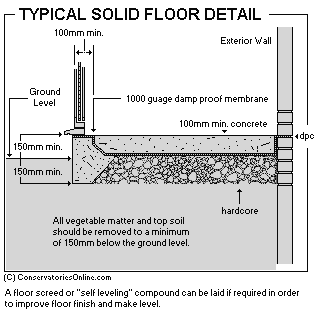
Solid Floor Detail
Each option has its pros and cons:
- Advantages: Pouring concrete and building a wall are manageable DIY tasks, or you can hire a builder. Using matching bricks or blocks for the dwarf wall enhances aesthetics and insulation.
- Disadvantages: The quality and cost of builders can vary, and the process can be disruptive with the need for skips, concrete lorries, and building materials.
Pre-Fabricated Base
Also called "Steel Bases," pre-fabricated bases are a modern, DIY-friendly option that often eliminates the need for a builder.
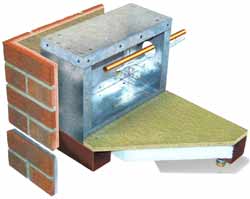
Pre-Fabricated Conservatory Base
These bases are made from galvanised steel sections covered with brick-effect tiles, preventing rust and corrosion while providing a neat finish.
- Pros: Fast, easy installation with minimal disruption, ideal for tight spaces. Many designs include built-in channels for wiring and utilities.
- Cons: Limited to standard brick styles, which may not suit every home. They generally provide less insulation than traditional brick bases.
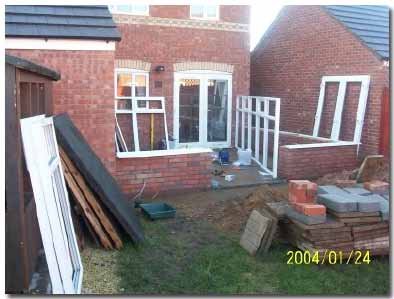
How to Build a DIY Conservatory
Constructing your conservatory yourself is arguably the most affordable option. With a DIY kit and clear instructions, the process is straightforward if you have a good basic DIY knowledge.
Many suppliers allow you to customise your conservatory and build it to your exact specifications. Keep a copy of the design drawings for reference throughout the project.
Every DIY conservatory build will be slightly different depending on specs, size, location and who manufactured it, however regardless of this all will share the same basic construction steps.
Step 1 – Check Area Fully
The very first job to do is ensure the area for your conservatory is free of any debris such as rubbish, stones/rocks and tree roots, which if laid over could later crack the floor slab or damage your base causing structural issues and other things like damp and the likes.
If you’re hiring a builder, having them clear the site and lay the base or dwarf wall will save you both time and also possibly money in the long run.
You must ensure that the area in which you are laying your base of foundation is absolutely flat, smooth and level to ensure that it’s structurally sound and lasts.
Step 2 – Lay Base
After choosing your base type (concrete or pre-fabricated), the next step is to do any preparation work and then lay it.
The size and design of your conservatory will determine the exact base requirements, so always follow the guidance provided by your DIY conservatory kit manufacturer, all info should be stated in your instructions.
It is critical to ensure that all corners are square and level to make sure the construction goes correctly.
As you lay the base, fit a damp proof course (DPC) where required to protect against any moisture that may rise up from the floor and cause damp issues.
For concrete bases, lay a damp proof membrane (DPM) beneath the slab. If building dwarf walls, install the DPC above ground level.
With pre-fabricated bases, use the manufacturer’s instructions for positioning the DPC and membrane correctly.
Also ensure that you install insulation within the floor to retain heat and maintain energy efficiency. How this is done will depend on the type of base you are laying. Again all specifications should be stated in the manufacturers instructions, but in most cases you will be laying hard insulation boards such as Celotex or Kindspan.
Step 3 – Building Dwarf Walls (if needed)
After your base has cured, you can start constructing the dwarf walls, if indeed they are part of your plan and you are not installing straight off the base.
To build your dwarf wall you will need lay your bricks or blocks around the perimeter base of your conservatory frame, so the frame can sit on top, whether you build a single skin or cavity is up to you, but a cavity will provide better insulation etc.
If you can lay bricks, all well and good you can simply crack on, if not, refer to our DIY guide on laying bricks for detailed instructions.
If you need to install electrical sockets, ceiling fans, or phone lines, consider these during the construction of your dwarf walls.
Consult a qualified electrician to get advice on when and how to install these elements. They can guide you on the best stage for installation and some will also allow you to lay cables etc. ready for installing.
Once your walls are built, allow them to fully cure. You can also then install any insulation in the cavity.
Base layed, dwarf walls constructed and side panel modules joined together
Step 4 – Check the Kit Over
With your base and dwarf walls (if any) all ready, you are now pretty much set to begin installing your conservatory frame, but before you do, it’s essential that you lay the whole kit out and run through the instructions to check everything is present, even down to nuts, bolts and screws.
Next, layout all the frames in the positions in which they are to be fixed and installed, so you know the layout and exactly what goes where. This will also give you an idea of how everything will fit together.
If you do find anything missing or indeed any damage to any items, the manufacturer should get these replaced for you, however you will need to contact them. Tis is also the case for any missing items.
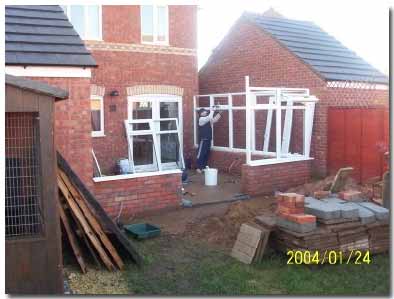
Step 5 – Start Construction
Once you have ensured that everything fits together as it should, all the components are there and that there is no damage, you can now begin construction.
Construction should be undertaken following the exact steps outlined in your manufacturers instructions. Whenever a new section is installed, ensure it’s firmly fixed in position and square and level.
Where there are any openings, ensure these are formed correctly and again are square and level. Also ensure any openings are the correct width so doors etc. open and close correctly.
Complete side panel placed on wall and fixed in place on to dwarf wall. Front module added and fixed to dwarf wall and side module to give it some ridgidity
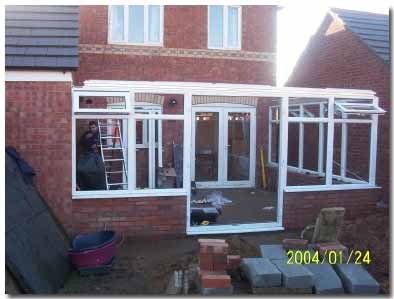
Front section modules added and fixed to dwarf wall and conjoining modules. Door opening frame added and fixed to base and conjoining modules

Roofing bars fixed into position
Step 6 – Fit Glass
Once you have successfully constructed all of the frame work of the conservatory, ensured everything is secured as it should be, all openings are square etc., you can then start to fit the window glass and beads as stated in the instructions.
If you have never fitted any glazing before, it can be quite tricky, especially getting the beads in place to hold it in. It is extremely advisable to get a second pair of hands to assist you with this, especially holding each pane in place whilst fitting beads.
For full details on fitting glazing and how it’s done correctly, see our double glazing how to project.
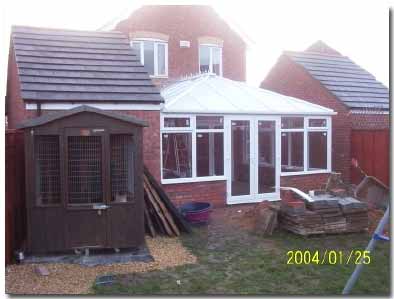
Glazing added to side modules and roofing fixed into roof area
Step 7 – Seal Joints
The penultimate job is to now to seal any and all joints as directed by the manufacturers instructions.
This is absolutely essential and integral, as it will prevent any water and moisture ingress into the conservatory interior and also importantly, stop any draughts and heat loss that can seriously effect energy efficiency..
For help with how to use a sealant gun see our using a sealant gun page.
Step 8 – Time to Finish
Now your DIY conservatory is fully built, it’s time to add the finishing touches and make it your own.
This usually includes plastering or painting dwarf walls (if fitted), decorating any exposed walls and choosing suitable flooring to complete the space.
You may also want to fit conservatory blinds to control light, improve comfort and add privacy.
As most conservatories use low-maintenance uPVC frames, there is typically very little structural decorating required.
One final job is to then lay any flooring required. What you lay is entirely up to you and your tastes and overall design brief.
Building your own DIY conservatory might sound daunting, but with basic DIY skills, clear instructions and a willingness to put the work in, it’s a realistic and rewarding project for almost all homeowners.