
Learning how to lay bricks and blocks is a valuable DIY skill that you’ll use time and again for walls, garden projects and home improvements.
This guide explains how to lay bricks and blocks correctly, with each section covering a key part of the process. Use the links below to jump straight to the topic you need:
- Cavity Walls – Step-by-step guidance on how to build strong, insulated cavity walls.
- Types of Brick – A quick overview of common brick types and how they affect your build.
- Types of Brick and Blockwork Bond – Learn about different bonding patterns and the benefits of each.
- Types of Block – Understand the main block varieties used in UK construction and tips for laying them correctly.
- How to Lay Bricks and Blocks – Follow our practical guide to start building your own wall safely and accurately.
The Importance of a Good Foundation
Every successful brick or block project starts with a strong, level foundation. The quality of this base determines how long your structure will stay upright and stable.
Different types of foundations suit different projects, so it’s vital to choose the right one for your build. For full guidance, see our Foundations Project for detailed advice and step-by-step instructions.
When preparing your foundation trench, make sure the base is smooth and even so the concrete sits at a uniform thickness throughout. Any uneven areas can create weak points that may crack or fail over time.
Once poured, check the foundation is completely level. A flat, level base makes bricklaying easier, keeps every course straight and ensures a durable, long-lasting build.
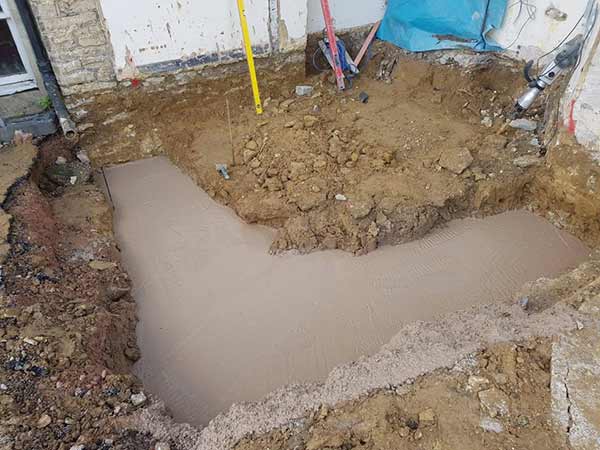
Foundation laid ready for block work to be laid
The Rules for Building Cavity Walls and What to Watch Out For
If you’re new to bricklaying, a cavity wall is made up of two separate walls, an inner leaf and an outer leaf, with a gap or cavity between them. This cavity varies in width depending on the design but plays a crucial role in insulation and moisture control.
Most modern UK homes use cavity wall construction because it prevents damp problems common with solid walls and allows space for insulation materials that improve energy efficiency.
- According to Building Regulations Approved Document A, each wall leaf must be at least 90mm thick with a minimum 50mm cavity between them.
- The two wall leaves are tied together with wall ties fixed into the mortar joints. For cavities 50–75mm wide, ties should be spaced no more than 900mm apart horizontally and 450mm vertically. For cavities 76–100mm wide, ties should be spaced a maximum of 750mm horizontally and 450mm vertically.
- Wall ties must slope slightly downwards towards the outer leaf to prevent moisture from travelling inward.
- Wall ties often secure insulation boards inside the cavity. The insulation type and thickness will be specified by your Building Control officer.
- The cavity’s main purpose is to stop moisture passing from the outer wall to the inner wall and to improve insulation against heat loss.
- Keep the cavity completely clear of debris. Even a small lump of mortar can bridge the gap, letting moisture and cold transfer through the wall.
For more detailed guidance, visit our Cavity Walls Project to learn more about correct construction and insulation techniques.
Cavity Walls and Common Damp Problems
If you’ve noticed cold or damp patches on internal walls, even in a warm room, it’s often caused by a bridged cavity. This happens when something inside the wall cavity allows moisture or cold air to pass from the outer wall to the inner wall.
Bridging is most common around window and door reveals, where the cavity is closed to secure the frame. These areas are naturally weaker and more prone to heat loss and condensation.
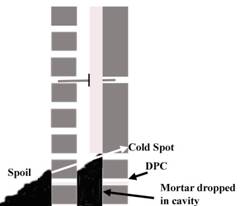
Cavity Wall Cross Section – Side View
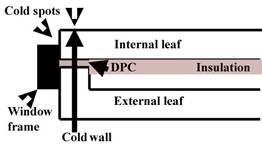
Cavity Wall Cross Section – Top View
The first diagram shows what can happen during construction when a lump of mortar accidentally falls into the cavity and goes unnoticed. This can cause several issues:
- Insulation can’t sit properly down to the damp proof course (DPC) level.
- The mortar creates a bridge across the cavity, allowing moisture and cold to pass through to the inside wall.
At the same time, if garden soil or rubble is piled against the wall above DPC height, it can also create a bridge for water. Moisture from the damp soil seeps into the wall, rises above the DPC, and moves across the cavity via the mortar bridge. This creates a cold, damp area inside the room.
Warm indoor air then condenses on this cold spot, leading to damp patches and black mould growth on the plaster, a common problem that often reappears even after cleaning.
The second diagram shows how cavity walls close around openings like windows and doors. These points often have minimal insulation, so they can easily become cold spots where condensation forms.
Fitting a vertical damp proof course (DPC) between the inner and outer walls can stop moisture from penetrating, although it won’t fully prevent condensation. For a full guide, see how to fit a vertical DPC and how it works.
General Rules for Building Strong, Level Walls
Before you start building, it’s important to follow a few basic rules to make sure your walls are strong, straight and built to last. The following guidelines apply to most brick and block walls and will help you achieve a professional finish every time:
- Check your plans carefully to ensure all openings for doors and windows are straight, even and correctly positioned both vertically and horizontally.
- Measure diagonals regularly to confirm your wall layout stays accurate and square to the plans.
- Keep checking that every section remains level and square as you build.
- When building a cavity wall, construct both leaves at the same time so they stay aligned and provide mutual support.
- Never build more than 1.5m (around 16 courses) in a single day. This prevents stress or movement before the mortar has cured properly.
- Use a standard brick bond with a consistent 10mm mortar bed for strength and accuracy.
- If your bricks have a “frog” (a hollow recess), always lay them with the frog facing upwards.
- Make sure all horizontal and vertical joints are fully filled with mortar to prevent weak points.
- Keep the cavity completely clear of dropped mortar or debris to avoid damp or cold bridging.
- Set wall ties at least 50mm deep into the mortar bed for a secure bond between the two walls.
Following these simple rules will help you build walls that are solid, level, and long-lasting, essential for any DIY or professional bricklaying project.
Types of Brick and How They Are Made
Understanding the types of bricks you use is just as important as knowing how to lay them correctly. The right brick ensures durability, aesthetics and compatibility with your build.
Most bricks are made from clay, often called “brick clay”. Clay bricks are highly durable, versatile, and have been used for centuries in construction. Traditional bricks were shaped and fired by hand, giving each batch unique colours and textures, which added visual interest as well as functionality.
Today, most bricks are produced in large automated factories to ensure uniform size and quality. These are known as “standard bricks.” However, handmade and specialty bricks are still available for projects that require unique textures, colours or designs, though they tend to be more expensive.
Architects and planners often choose special bricks to maintain the look of historic or locally styled buildings, ensuring new construction fits in with existing architecture.
Over recent decades, UK clay brick production has declined due to the rise of concrete blocks, timber and plasterboard wall construction. Between 1974 and 2004, production dropped from 5,000 million to 2,750 million bricks. A further dip occurred during the 2008 recession, leading to factory closures.
As demand increased, the UK became one of the largest importers of bricks by 2019. To reduce reliance on imports, in 2023 two new brick factories opened, one in Leicestershire and the other in Avonmouth in Bristol, with the Leicestershire factory being the largest in Europe.
Common Bricks
Common bricks are hard-fired and strong enough for most general brickwork, but they are lower in quality than facing or engineering bricks. Their colour is not controlled and they are not suitable for use below ground.
These bricks are mainly used for internal walls, partitions or hidden parts of a structure. They are lighter than facing or engineering bricks and are increasingly being replaced by concrete or lightweight blocks for indoor partitions.
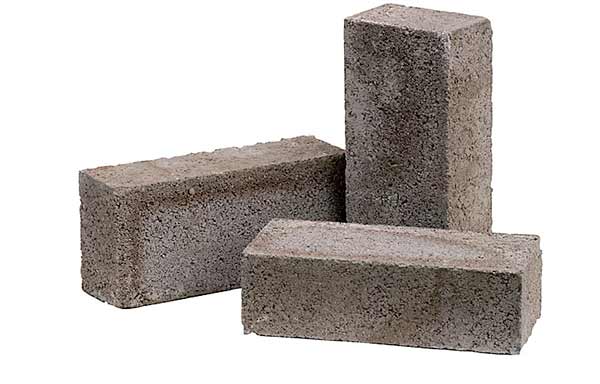
Common bricks
Engineering Bricks
Engineering bricks are made from carefully selected clay and undergo precise crushing, moulding and firing. This process produces a very hard brick with high compressive strength and low water absorption.
These bricks are suitable for underground use and are often installed as a damp proof course (DPC). They are classified as Class A or B, with Class A being the strongest and least absorbent, making them ideal for structural or high-strength applications.
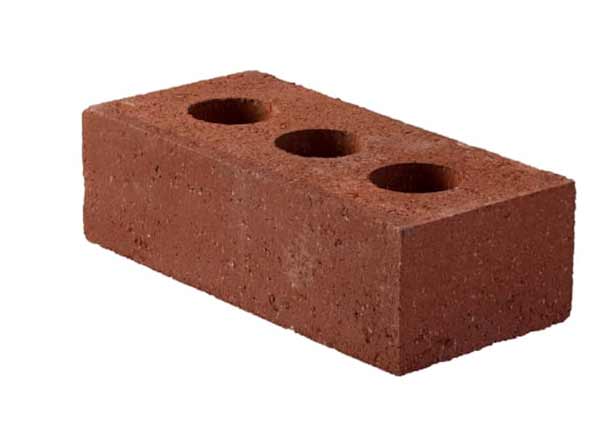
Engineering brick
Facing Bricks
Facing bricks are used as the visible exterior of a building, providing both durability and aesthetic appeal.
They are hard-fired to withstand the UK’s changing weather, temperature fluctuations and exposure to pollutants such as smoke or soot, ensuring long-lasting strength and a clean finish.
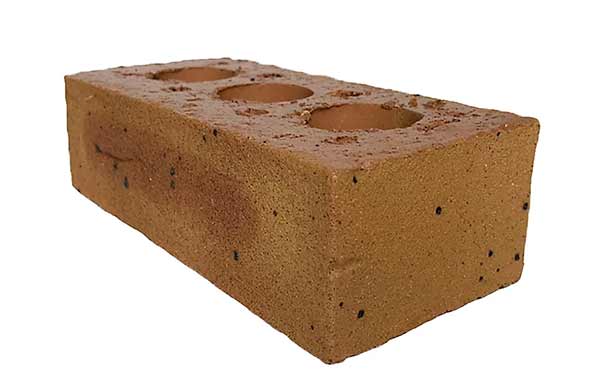
Facing brick
Stock Facing Bricks
Stock facing bricks, often called “stocks” are soft, slightly irregular bricks made by pressing wet clay into sanded moulds. The sand helps release the brick and gives it its characteristic texture and unique, uneven appearance.
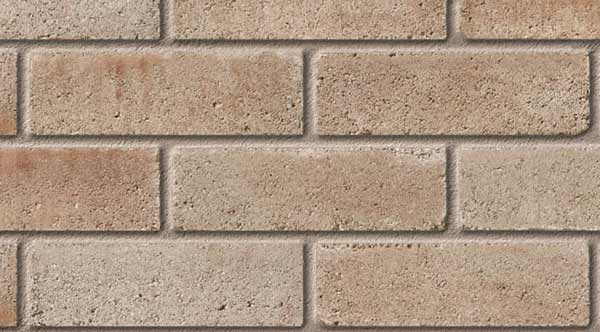
Stock facing brick
Wirecut Bricks
Wirecut bricks are the most common type of facing brick in the UK. Wet clay is pressed into a block, shaped through a die for a perfect rectangle and given its finished face. The block is then wire-cut into individual bricks and fired in a kiln for strength and durability.
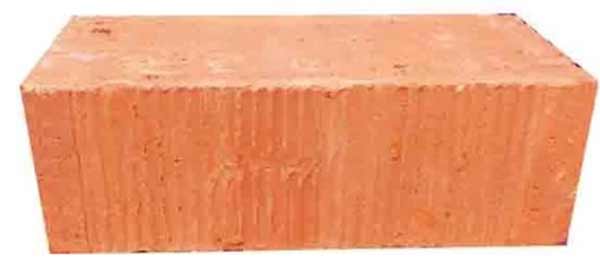
Wire cut brick
Waterstruck Bricks
Waterstruck bricks are removed from their moulds using water. They have smooth edges, a solid structure and contain no holes or frogs, making them ideal for clean, precise brickwork finishes.
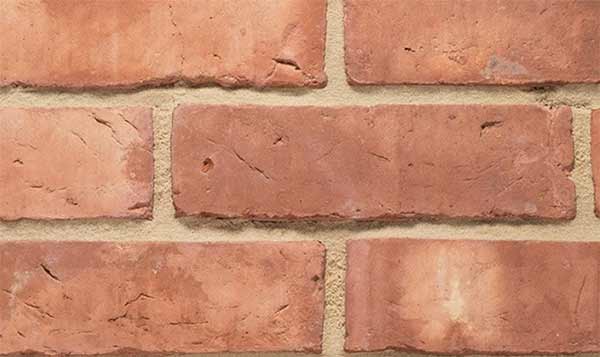
Water struck bricks
Handmade Bricks
Handmade bricks are crafted individually, producing unique textures and natural creases, often called “smiles”. This labour-intensive process makes them more expensive, but ideal for high-end or heritage buildings where character and aesthetics are important.
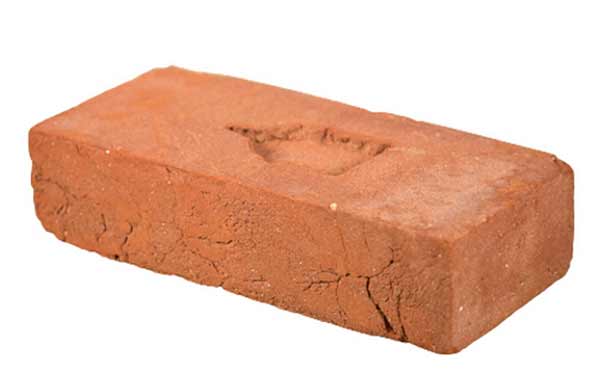
Hand made brick
Reclaimed Bricks
Reclaimed bricks are salvaged from older buildings and can include a mix of different brick types. Their worn edges, creases and marks add character and a unique look to new constructions.
Many reclaimed bricks are in older imperial sizes, which can make integrating them into modern walls tricky. To solve this, special reclaimed brick panels are often used.
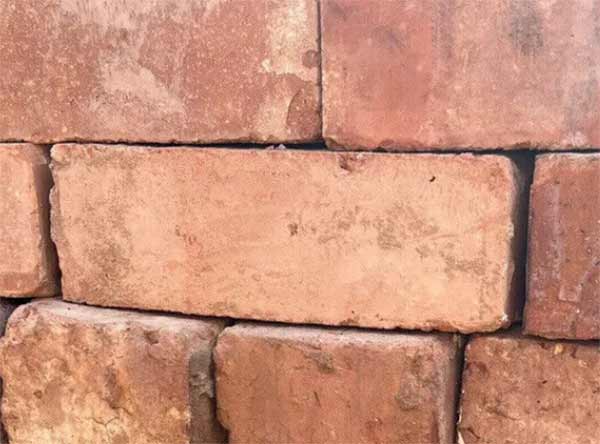
Reclaimed bricks
Special Bricks
Special bricks are designed for specific tasks, such as finishing the top of a wall or creating a window sill. A common example is the bull-nosed brick. Other specials include plinth bricks, copings, arch keystones and custom shapes, which brick manufacturers can produce for bespoke projects.
All bricks must withstand wear and tear. Their strength is measured by crush testing, which tests twelve bricks of the same type and calculates an average crushing strength in Newtons per mm². Softer facing bricks typically have a strength of 3–4 N/mm², while engineering bricks can withstand around 145 N/mm², making them suitable for high-strength applications.
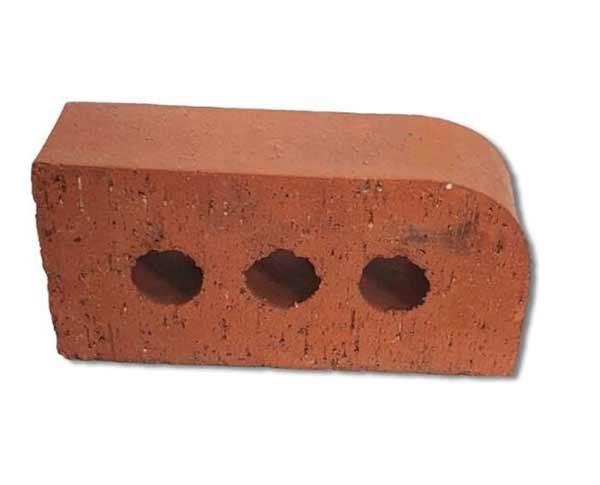
Bull nosed special brick
Understanding the Faces of a Brick
Before learning brick bonds, it’s important to know the different faces of a brick. This helps you identify terms like the stretcher face or header end.
The long, visible side of a brick in a wall is called the stretcher face, while the shorter ends are called headers.
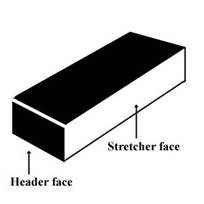
The Different Faces of a Brick
What is a Frog?
Many UK bricks have an indent on the top called a frog. When laying bricks to British Standards, the frog should face upwards and be filled with mortar for maximum strength.
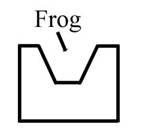
Frog indent on top of a brick
According to BS 5628-3:
Lay single frog bricks with the frog uppermost and double-frogged bricks with the deeper frog on top. Fill all frogs with mortar to maximise stability and performance.
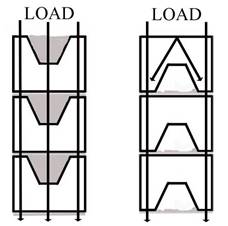
Frog correctly laid upwards and filled with mortar
When the frog faces up, the load spreads evenly across the brick to the foundations. If laid downwards, the load is concentrated on the edges, reducing stability.
The Stretcher Bond is the most common bond used today, especially for garden walls. While easy to use, single-skin stretcher bonds are weak under lateral pressure and can fail if used for retaining soil.
For guidance on building a strong retaining wall, see our Garden Wall Retaining Project.
Types of Brickwork and Blockwork Bonds
Bricks and blocks are laid in different patterns, called bonds, depending on the wall type and purpose. Some bonds show only the ends of the bricks, while others display the sides. Choosing the right bond ensures maximum strength and stability.
Popular bonds include stretcher bond, half bond, and quarter bond. In a half bond, each brick overlaps the one below by half its length; in a quarter bond, the overlap is a quarter of the brick’s width.
Before you start, dry-lay your bricks or blocks to check the pattern works. A simple tip: practicing bonds with a pack of dominoes can save time and mistakes when building walls, especially garden retaining walls or other DIY brickwork projects.
The most common types of UK brick bond are as follows:
Stretcher Bond
Stretcher bond is the most common brick pattern in UK house construction. It is economical, fast to lay and uses a single-brick (half-brick) skin. Two stretcher walls can be built back-to-back and tied with collar ties to form a double-brick cavity wall, providing an attractive face on both sides.
In a single-skin wall, stretcher bond uses about 60 bricks per square metre. Each brick overlaps the one below by half its length, creating a strong, uniform pattern. Corners are formed by placing one brick at a right angle to another, automatically continuing the half bond. To finish wall ends, bricks are cut in half (half batt) to maintain vertical alignment.
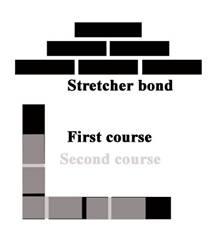
Stretcher Bond, First Course and Second Course
English Bond
English bond, also called Ancient Bond, alternates courses of stretchers and headers. This creates one of the strongest brickwork patterns, ideal for load-bearing walls.
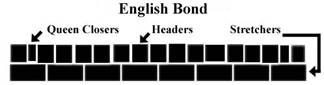
English Bond showing alternating stretcher and header courses
English bond is labour-intensive and uses more bricks, making it costlier. The English Garden Wall Bond, used by Victorians in gardens, modifies this by inserting a header course every five stretcher courses. It keeps strength, improves aesthetics and reduces cost and time.
Each course requires closures, often a Queen Closer, a brick cut lengthwise in half—to maintain the bond pattern and alignment.
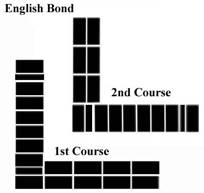
First and second brick course of an English bond brick wall
Flemish Bond
Flemish bond alternates stretchers and headers in every course, creating a visually appealing quarter-bond pattern. While not as strong as English bond, it is widely used for decorative walls and façades.
There is also a Flemish Garden Wall Bond, where more stretchers are inserted between headers. This maintains the attractive pattern while reducing the number of headers needed, making construction quicker and more economical.
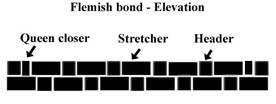
Flemish Bond – Elevation
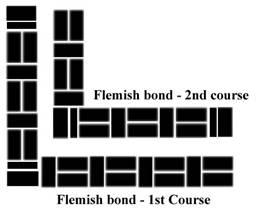
Flemish Bond first and second course
Quetta Bond
Quetta Bond is a strong, industrial-style brickwork pattern, ideal for retaining walls and heavy load-bearing applications. It can also be adapted for garden walls that need both strength and visual appeal.
The wall is built using alternating stretchers and headers, with the voids filled with concrete. The first course is laid directly onto the wet concrete foundation, ensuring a solid base.
Steel reinforcing rods (12mm high-tensile recommended) are inserted through the voids and additional courses built around them. Once the voids are filled, the result is a sturdy, durable wall capable of withstanding significant pressure.
Steel rods are widely available from builders’ merchants and can be easily cut with a hacksaw or angle grinder.
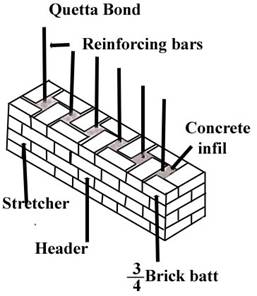
Quetta Bond
Honeycomb Bond
Honeycomb Bond is a decorative brick pattern commonly used in garden walls. Its open design allows light and air to pass through while reducing wind resistance, making it both functional and attractive.
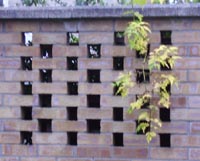
Honeycomb Bond
The top of a wall is often finished with a Brick On Edge course, where bricks are laid on their stretcher edges to create a neat, strong edge.

Finishing layer on Honeycomb bond wall
Strengthening Long Walls
Stretcher bond is economical but not the strongest. For long walls, piers should be added at intervals to maintain stability and prevent sagging or bowing.

First course of bricks laid

Second course of bricks laid

Alternative first and second course
Two common methods are used to finish a stretcher wall with piers:
- Half-batt bricks in alternate courses
- Three-quarter batt bricks
These techniques add strength while keeping the wall visually uniform.
Dealing With Gaps – Using Closers
When a gap appears in brickwork that doesn’t match a full or half brick, a closer is used. Closers are cut bricks designed to fill these gaps and maintain the bond pattern.
Some brick bonds rely on closers to work correctly and the same type is often used in every course or every other course.
Closers have specific names based on their use, such as King or Queen closers. Half and three-quarter batts are also commonly used to finish courses neatly.
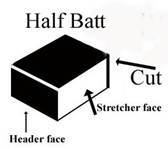
Half Butt
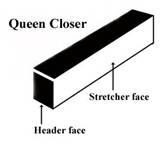
Queen Closer
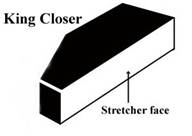
King Closer
Additional Finishing Techniques
One of the best ways to finish a garden wall is with coping stones. These stones have a slightly angled top to help rainwater run off, preventing moisture damage. They also overhang the brickwork to stop water from staining the wall below, much like a window sill.
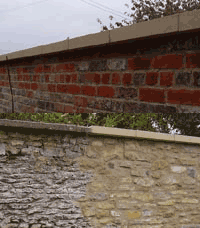
Coping Stones used to cap-off and finish a garden wall
Additional Strengthening Techniques
To boost the strength of any wall, you can add galvanised steel mesh, known as Expanded Metal Lathing, into the mortar joints. This mesh, similar to chicken wire, is sold in rolls or sheets at most builders’ merchants.
For DIY projects, rolls are easiest to use and come in widths from 50mm to 450mm. Simply cut the mesh to size with tin snips or a hacksaw—it can almost double your wall’s strength and stability.
Different Types of Blocks and Blockwork
Concrete and lightweight blocks are popular in both construction and DIY because they’re quick to lay and easy to work with. Blocks with a fair face finish are ideal for areas where the surface will remain visible.
Each standard block (440mm x 215mm) covers the same area as six bricks, meaning around ten blocks are needed per square metre. Their size matches the width of two bricks and the height of three, including mortar joints, allowing bricks and blocks to bond neatly together in one structure.
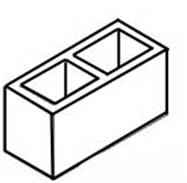
Standard concrete pillar block or hollow block
Concrete Blocks
Concrete blocks come in various thicknesses, with most UK standard blocks around 100mm. Both solid and lightweight types, such as Thermalite, are widely used for strength and insulation.
Blocks can be laid flat in a Stretcher Bond pattern, creating exceptionally strong walls. Hollow blocks are also common, their internal voids can be left open for insulation or filled with concrete for extra strength and stability.
Because they’re faster to lay, concrete blocks are often used for foundation walls, saving both time and labour costs. However, they require precision, laying blocks level on mortar is more challenging than it looks. Their size and weight make them harder to adjust once placed, and even a small knock can cause movement in nearby blocks.
For best results, apply a gentle touch and avoid building more than five courses at once to keep the structure stable and level.
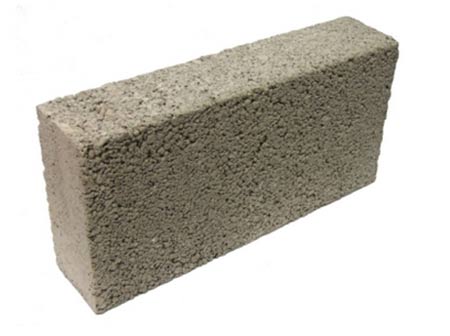
Standard solid concrete block
Lightweight Blocks (Thermalite Blocks)
Lightweight or Thermalite blocks are versatile, high-performance building materials used in both load-bearing and non-load-bearing walls. Despite their light weight, they offer excellent compressive strength, easily meeting Building Regulations for both internal and external use.
Their low weight makes them easy to handle with one hand, reducing fatigue and speeding up construction. They also provide excellent thermal insulation and sound resistance, helping to cut heating costs and improve comfort in modern homes.
Lightweight blocks are simple to cut and shape using a standard saw, and can be drilled just as easily as wood. For secure fixings, use specialist lightweight block plugs available from most builders’ merchants.
They are non-combustible, highly resistant to frost and sulphate attack, and perform exceptionally well under freeze-thaw conditions. Their millions of sealed air pockets prevent moisture absorption, making them ideal for damp or exposed environments.
Lightweight blocks combine strength, insulation, and durability, making them one of the most practical and energy-efficient choices for modern construction projects.
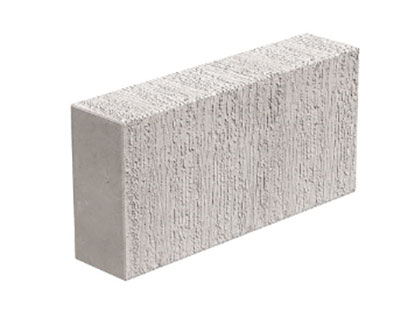
Standard Thermalite light weight block
Glass Blocks
Glass blocks are a stylish and functional way to bring light into a space while maintaining privacy. They can be installed like standard blocks using sand and cement joints, or with special frames and spacers often supplied in kit form for easier assembly.
When using mortar, remember that glass is non-porous, so excess wet mix can easily spill onto the block surfaces. Careful application ensures a clean, professional finish.
Glass blocks are suitable for both indoor and outdoor use. They come in clear or frosted finishes and a variety of sizes, allowing natural light to pass through while keeping spaces separate.
Modern glass blocks are tested for fire resistance and thermal insulation. Choosing the right block ensures compliance with UK Building Regulations.
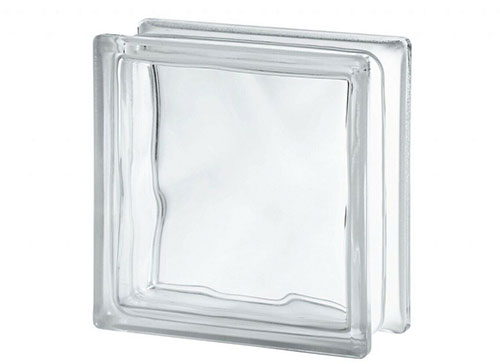
Glass building block
Tools and Products Needed for Laying Bricks and Blocks
In order to lay your bricks and blocks correctly, you will need the following tools and products to hand:
- Bucket trowel
- Pointing trowel
- Brick laying trowel
- Sand
- Cement
- Cement mixer, spot board or wheel barrow for mixing cement/mortar
- Spirit level
- Boat level
- Enough bricks or blocks for the job
- Ballast (for making foundations, if needed)
- Brick line
- Pen/pencil
- Timber batten for marking height
- Scaffold if working at heights
How to Lay Bricks and Blocks
Now that you understand the different types of bricks and blocks, as well as the common bonds and their uses, it’s time to learn how to lay them properly.
The bond you choose depends on your project and any Building Control requirements. It’s wise to practice your brickwork on a small scale before starting a major build.
The basic techniques for laying bricks or blocks are the same regardless of the bond. Key points to remember:
- Always check that each brick or block is level before moving on.
- Never force a brick or block into place with a hammer or trowel; this can misalign surrounding units.
- While mortar is still wet, even a sturdy wall can shift, especially when using heavy blocks.
Practicing proper handling and alignment ensures a strong, level wall and reduces mistakes that can be costly later.
Step 1 – Laying a Foundation
A strong, level foundation is essential for a durable wall. The type and depth of foundation will depend on the wall you’re building, for example, a house wall requires a deeper, stronger foundation than a conservatory wall.
For detailed guidance on choosing and building the right foundation, see our foundations project here.
Step 2 – Choosing and Mixing Mortar
The right mortar mix depends on the type of wall you’re building. Getting it right is essential for strength and durability. For full guidance on mixing mortar correctly, including using a spot board or wheelbarrow, see our mortar mixing project here.
Step 3 – Preparing to Lay Bricks or Blocks
After your foundation has fully cured and the mortar is mixed, spread a uniform 10mm bed of mortar on the foundation for your first course.
Place each brick gently, using a slight twisting motion to level it. Apply mortar to each end so it joins the previous brick securely.
Occasionally tap bricks lightly with the trowel handle, then step back to check alignment. Also confirm levels using your spirit level to make sure it’s 100% spot on.
Taking care with the first few courses makes the rest of the wall easier to build and ensures a straight, level finish.
Getting the Right Wall Height
To ensure your wall reaches the correct height, use a timber batten the same length as the planned wall. Mark each course of bricks or blocks in pencil, starting from the bottom and working up. Remove these marks before making your final adjustments.
Check the gap between the last mark and the top of the batten. If the gap is small, slightly increase the mortar thickness in each bed joint (maximum 15mm). Alternatively, add another full course and slightly reduce joint thickness. Avoid joints thinner than 6mm for stability.
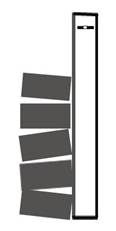
Check the level of your blocks
Check Levels Regularly as You Build
While building, always check that your wall is straight, upright and level across its width, not just along the bricks. A brick can look level on the front or side but tilt across the width, making the wall uneven.
Use a spirit level in all directions to ensure accuracy. It may feel excessive at first, but precise leveling prevents future issues. Over time, you’ll develop a sense for it, but for beginners, the level is essential.
In the images below, a small “boat” level is used across the wall to confirm perfect horizontal alignment.
Step 4 – Start Laying Your Bricks or Blocks
Begin by placing some mortar on a spotboard near the wall. Use your trowel to roll it into a “sausage” and slide it onto the foundation for your first course.
Form a small “V” in the mortar bed with the trowel. This allows excess mortar to move as you press the brick down, ensuring an even 10mm bed under the brick.
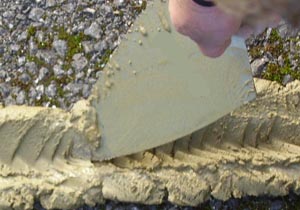
Form a “V” in the mortar bed using your trowel
Carefully place each brick or block, pressing down with a slight twist. Add mortar to the ends before laying to fully fill the joints.
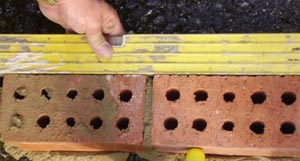
Place bricks carefully on the mortar bed
If using stretcher bond, check for plumb on the ends after every 2–3 courses. Use a spirit level or small boat level to verify both vertical and horizontal alignment as you work laying each course. Starting right ensures the wall finishes right.
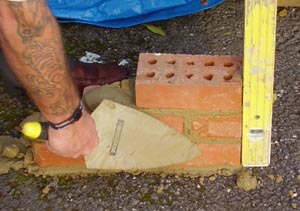
Bricks laid in stretcher bond
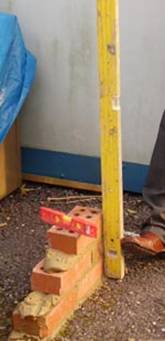
Check the bricks or blocks for their level every course
Step 5 – Build Up Corners
After laying the first course along the wall, build up the ends first to about 5 courses. These are your corners, which act as guides for the rest of the wall.
Insert bricklayer pins into the mortar at the corners and stretch a string line between them. Lay the bricks so their top edges just touch the string. Properly built corners make the rest of the wall easy to align.
For walls longer than 6m, don’t rely on a single line as it will sag. Build an additional “corner” in the middle to maintain straightness.
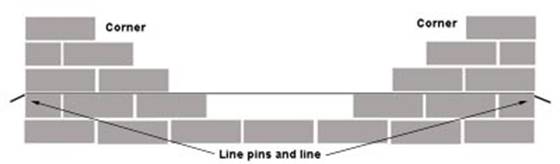
For walls over 6m long, build another Corner
Step 6 – Use Scaffold for Taller Walls
When your wall reaches a height that’s difficult to reach safely, use a scaffold or scaffold tower. Always follow safety rules, as most construction accidents happen at height. Learn how to work safely on scaffolds here.
Following these steps gives you a solid foundation for laying bricks and blocks efficiently and safely, whether for walls, garden projects or even larger builds.
Building a brick or block wall is a rewarding DIY project that anyone can master with a little practice. By choosing the right bricks or blocks, using the proper mortar and following the correct brick bond, you can create a strong, attractive wall that looks professional.

 DIY Doctor Ltd,
  0845 6342 179


