Although you may think that door knockers are a little “old hat” and that doors bells are the way to go when it comes to some one notifying you that they are stood on your door step, they do still certainly have a place, especially when it comes to period properties and doors.
Aside form the typical traditional style door knocker, today they come is a massive range of sizes, colours, shapes and styles to suit any design considerations you may have.
Additionally, if your property is in a conservation area then any features of that property may be regarded as of special interest.
This can include such items as doors, door furniture, windows, architectural mouldings and a great many other objects.
If this is the case then you may need to consult with your local planning authority before making any changes.
What Different Types of Door Knocker are There?
When it comes to choosing a door knocker for your door, there are essentially two different types:
- Through the door
- Surface mount
Through the Door Type Door Knockers
Fitting a through the door type door knocker is slightly more involved than fitting its surface mounted counterpart.
In order to secure this type of knocker to a door you have to drill holes through the door and then, normally using the dome head type security bolts sometimes known as carriage bolts or stove bolts (so they cannot be un screwed from the outside), then the nuts are screwed on the inside (inside the property) that then secure the knocker to the door.
Although these are a little more tricky to fit they are generally a bit more secure and more pleasing to the eye. Although it’s unlikely that some one would want to steal a door knocker, prevention is better than cure and as you need to fix it one way or another, you my as well use the best fixing method possible.
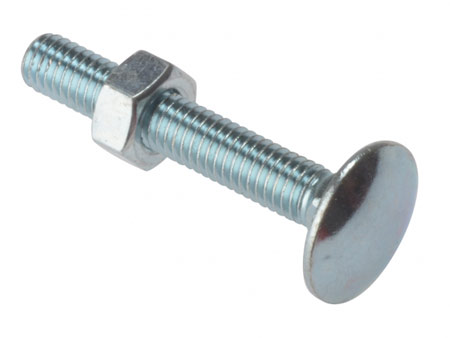
Dome head type bolt or carriage bolt
Another benefit of this type of knocker is that it can be fitted to a variety of different types of door including composite, PVC, aluminium, steel etc…. Why is this significant I hear you ask?
A standard hardwood front door is normally somewhere between 1½ and 2¼ inches thick which provides a suitable amount to screw in to. Alot of the afore mentioned doors are no where near this thick so screwing isn’t an option. In this situation the through teh door fixing provides the best and most secure fix.
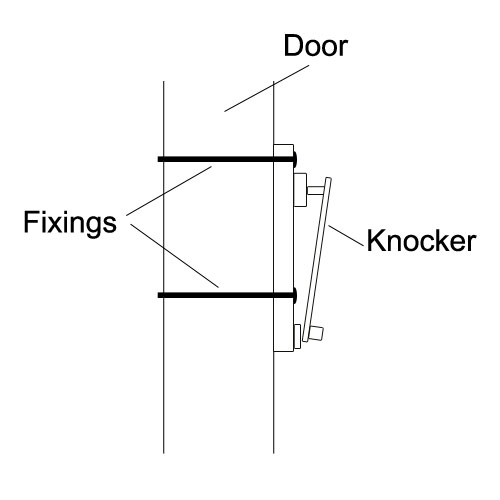
Door knocker fixed to door using through the door fixings
Surface Mount Door Knockers
As you may have guessed if you have read through the info on the through he door type knocker, as opposed to running bolts through your door, this type of knocker is screwed to the door from the outside using standard screws.
In the above info we also touched on how the through the door type fixing can be used with a variety of different types of door.
As this type has to be screwed then you are going to need something substantial to screw in to so the surface mount knocker is really only suitable for use with solid wooden doors.
In terms of actually fixing, this is quite a straight forward task. Once you have marked the position that you want your knocker to reside in, you simply screw it to the door. We will cover this in more detail below.
As we have already mentioned, this type of knocker can only be used on solid doors and although we are repeating ourselves, it’s worth confirming this once again.
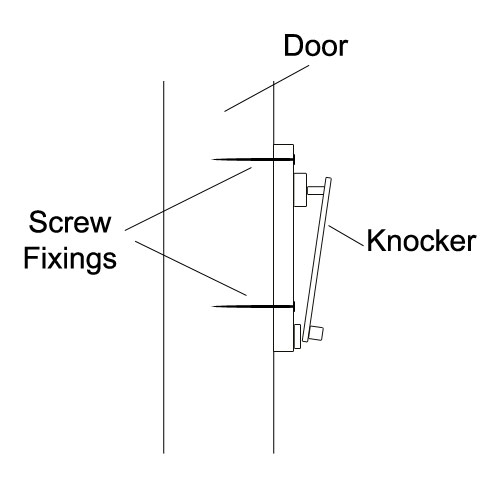
Surface mounted door knocker screwed to door
It is also possible to get knockers with in-built eye viwers. We would advise against one of these as in most cases the viewer can be obscured by the knocker itself and also this can dictate where the knocker is placed on the door as it needs to be around eye level for it to work correctly, meaning the knocker itself is then placed too high up the door.
Where Should I Position my Door Knocker?
Once you have chosen your ideal door knocker it’s now time to decide where on your door it’s going to go.
To some degree this may be dictated to you by the style of door that you have e.g. some doors have glass top sections, some have thin panels, doors can be made of PVC, thin aluminium etc… and in each of these cases, this will affect where the knocker can be placed.
In terms of an ideal position it should placed centrally on the door, at somewhere between eye and shoulder level of an average person. In real terms this is roughly about 1.5 metres from ground level.
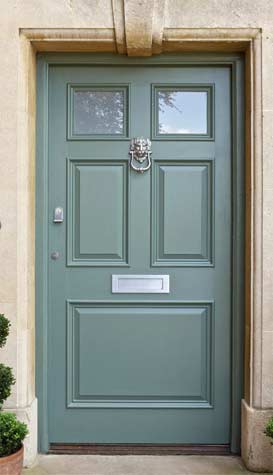
Door knocker fixed centrally to front door
If you are unable to place it centrally, then the upright on the opening side of the door should be fine.
How to Install a Door Knocker
For the purposes of this project we are going to assume that you are fixing your knocker in a central location on the door, with the fixing holes loctaed vertically. However, if you are not fixing centrally or fixing holes are horizontal and not vertical then the principals outlined below (which ever method you use) should remain the same.
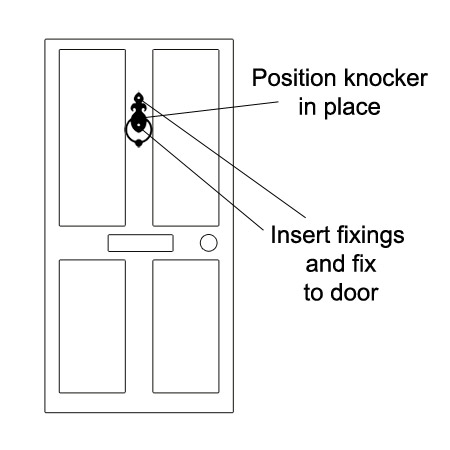
1. Place Knocker on Door in Desired Location
The first job is to place the knocker on the door in the vertical area that you want it to go, using the “between eye and shoulder level” area as a guide.
Whilst it is in place, put a pencil mark on the door through the top most fixing hole of the knocker and then remove it.
Measure down from the top of the door to this mark. You now have your rough fixing position and the exact height of your top fixing point.
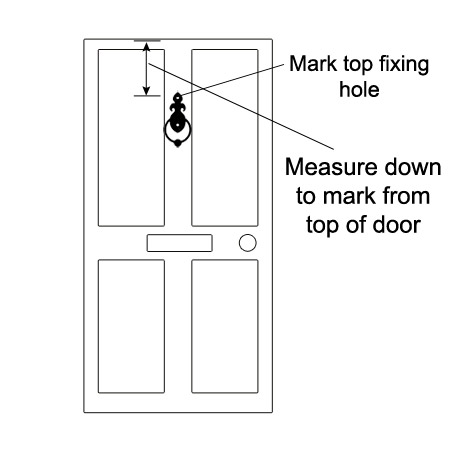
Position the knocker on the door and mark the top fixing hole
2. Accurately Measure and Mark the Centre of the Door
With your rough position marked it’s now time to get a bit more accurate. Using a tape measure, measure the total width of your door and divide that number by 2, this will give you a measurement of the exact centre of your door.
Using the tape, measure in from the left the number that you arrived at in the step above at the area in which you made your rough fixing mark and then put another mark to pin-point the centre of the door.
For example, if your door is 813mm wide (standard widths of UK doors are generally 686, 762, 813 or 838mm wide) then half of this will be 406.5mm.
Once the centre point is marked, measure down from the top of the door in-line with your centre point mark and make another mark using the measurement you arrived at in step one for your top fixing point.
This will now give you the exact point for your top fixing at the centre of the door and at your desired height.
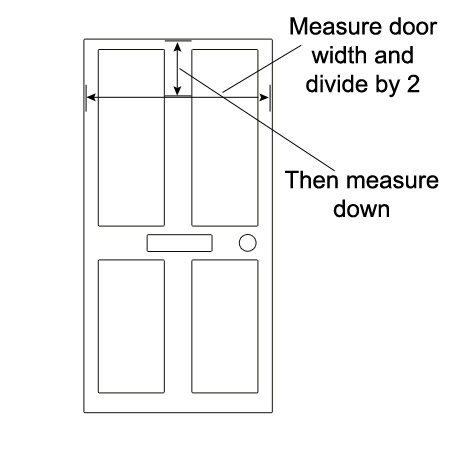
Measure width of door and divide by 2 to find the centre and then measure down
3. Drill Pilot Holes and Final Fixing Holes
Whether you are through fixing or surface mount fixing you will need to drill some pilot holes.
When surface fixing, the pilot holes will allow your screws (or similar fixings) to screw down into your door much easier and cleaner than trying to force them in.
If you are through fixing, a pilot hole is a must! Many PVC, aluminium, composite etc… doors are filled with an insulating materials and then clad on the outside.
This cladding is quite thin and trying to force an 8mm drill bit through in one go can cause the exit hole to crack, deform or split. The pilot hole forms a guide and easy exit point for the full size bit, decreasing the chances of causing any damage.
In terms of the size of pilot drill to use, a 2 – 2.5mm diameter bit should be suitable. This will provide a good start for any screws and also a good width to prevent damage from larger bits to accomodate through-fixing bolts etc….
When it comes to the size of bit for the through fixings, this will very much depend on the type of fixings supplied with your door knocker. In this case, the manufacturer should state the size of drill bit you should use.
Before you start drilling, one thing to be aware of is that any holes will need to be totally square. This means holding your drill horizontally and vertically level while you make them.
This is expecially important when it comes to through fixings as if not level, nuts and bolts heads will be wonky and look unsightly and make tightening everyting up tricky. For tips on how to drill in a perfectly line see this article here.
With the pilot drill bit inserted in the drill, position the tip of the bit on your final top fixing point and start drilling.
If you are only drilling a pilot hole for a screw you don’t want to go all the way through the door so only drill in around ⅔’s of the length of the screw you will be using.
So that you know the depth to drill to, measure along your drill bit to the desired depth and then wrap a piece of masking tape around teh bit. This will signify the depth you need to drill to.
For through fixings, don’t rush. Drill at a steady pace and don’t apply too much pressure, let the drill do the work for you.
Once you have formed the pilot hole for your first fixing, if through fixing, pop in your final size drill bit and repeat the previous step. Again, don’t rush or apply too much pressure. Once done, you have now completed your first fixing point.
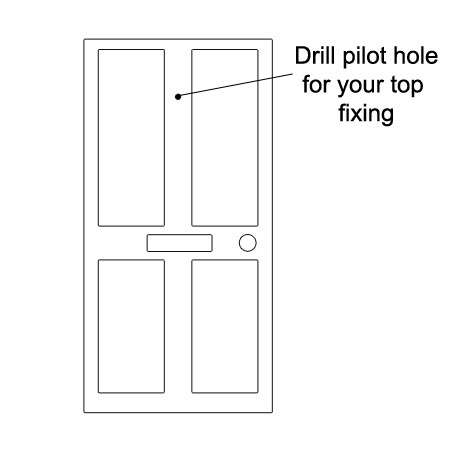
Drill out the pilot hole for the top fixing
4. Mark and Drill Your Final Fixing Point
Marking the bottom fixing hole of your knocker on the door can be a tricky job. If there are any dead flat sides to the knocker then you can loosly fix it in place on the door, place a level on one of these flat sides and then you can position the knocker until vertically level and then mark the bottom fixing hole, but in many cases the knocker itself won’t have a flat side to do this with.
In these instances the best thing to do is to place the knocker on a piece of paper and draw around its perimeter and also mark the two fixing holes.
When you take the knocker off of the paper you will be left with an outline of the knocker and the two fixing holes. Using a straight edge, draw a straight line between the two fixing holes and then position the template back on the door with the top hole of the template over your fixing point on the door.
Place a spirit level vertically inline with the line between the two holes and using the top fixing as a pivot point, swing the bottom (keeping the spirit level level with the line on the template) until it’s in an ded horizontal line.
When you are sure that all is totally level, mark through the bottom fixing hole in the template on to the door and you now have your final fixing marked out.
This can be quite tricky so it’s a good idea to get a second pair of hands to help you out.
With the final point marked, work through the points outline in step 3 to drill out a pilot hole and/or fixing hole and you are now ready to actually get your door knocker on the door.
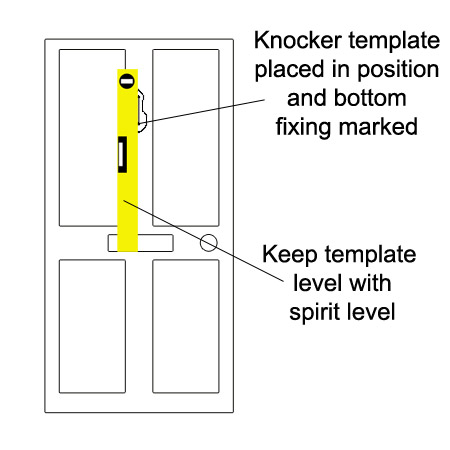
Position the template on the door and mark the bottom fixing point, keeping the template level in the process
5. Fix the Door Knocker to the Door
The final task is to fit the knocker to the door. Pick it up and position it with the top hole over the upper most fixing hole. If surface mounting, insert a screw and screw it up pinch tight (not fully tight – allows a little movement to the get the bottom screw or bolt in).
If through fixing, push a bolt through your top hole and on through the door. If a washer has been supplied put this on and then screw on a nut, again tightening up to pinch tight.
Repeat this for the bottom fixing and when all is in place and ready, fully tighten both fixings, checking any levels as you go.
Once done you have now fixed your door knocker to your door and you can now stand back and admire your handy work. Well done!
Door knockers come in many shapes, sizes and styles and on many of these, fixing holes and positions will vary, but as we have stated, the principals of this tutorial can be applied to any of these variations.
Bottom fixing pilot hole drilled and knocker fixed top the door