There are a number of mixer valves, They all do the same job but in different ways. A bath mixer tap, as with all other taps, is a valve. A shower mixer is the same thing. The differences between them all is how they deal with the water and at which pressure they deal with it.
First we can deal with the bath mixer tap. From the dark ages some of us can remember a rubber hose we pushed onto the end of the bath taps to wash our hair. These days the hose has taps on the end !
Contemprary looking manual mixer valve tap fitted to bath
There are two types of bath mixer tap one simply mixes and lets you play with the tap controls until the water is at the right temperature for you then you switch over to shower and it sends the same water out through the shower head.
For this type of mixer valve, called a manual mixer, to work properly, the hot and the cold need to be at the same, or almost the same, pressure. This is usually ok in an upstairs bathroom because the cold water normally comes from a cold tank in the loft and the hot from an immersion, or hot tank in the airing cupboard.
Problems will only arise when one or the other of the supplies is of a different pressure. The other problem with a manual bath mixer tap or valve, is that the water it uses is shared by others in the house. As soon as someone uses a tap elsewhere it will affect the supply to the mixer. A contemporary mixer valve is shown in teh image above.
If different water pressures are encountered, special valves can be installed into the pipe. These are called pressure reducing valves and they are dealt with in a separate project called pressure reducing valves or PRVs. Either the hot or cold pressure can be reduced to equalise pressure going into the valve.
The next step up from a manual tap mixer valve is a thermostatic tap mixer valve. These valves are more expensive than manual mixers but they contain a device which measures the temperature of the water leaving the valve.
Thermostatic mixer valve bath tap set featuring shower hose and head attachment
If, as in the case above, someone else in the house flushes a loo the valve will sense that the cold water flow and pressure has dropped within its body. It will regulate the flow of the hot water immediately to stop the water scalding the person in the shower.
Thermostatic mixer valves come in varying ranges also and it really is no wonder the layman gets confused. The valves are made in 3 ways. Low pressure, High pressure and both.
The manufactures label on the valve you buy will tell you which it is but if you want to be specific:- Low pressure valves can be used where the water pressure at the valve or tap can be measured from 0.2 – 1 bar. This is the usual situation in a bathroom where both hot and cold water are fed by a tank.
A high pressure valve can be used with pressures ranging from 1 – 5 bars. This is the valve you would use for a pumped mixer or power shower . A valve which can cater for both will deal with pressures ranging from 0.2 bar to 5 bars. This is the ideal valve to put in if you know you will be upgrading to a better shower in the future.
From bath mixer valves we move up to shower mixer valves. These valves, as well as coming in the ranges described above, offer two further choices. Surface mounted or hidden. The important thing to remember with shower mixer valves is that if they are low pressure and you are relying on the existing pressure you have at you bathroom taps, a shower valve will certainly not make it any better, in fact more often than not it will make it worse.
Large style contemporary shower head

Wall face mounted mixer tap
In a normal bathroom, with water supplied by tanks, the water pressure is entirely dependant on the height from the tap to the tank. This height is called the head and by placing a mixer valve halfway up the wall you are in fact reducing the head. This will reduce the pressure.
A major problem we have encountered with showers is that people who have low pressure but do not want to go to the expense of installing a Power Shower to pump the water to the shower, still sometimes want the huge contemporary shower heads which look so great.
The big problem is, they fit the shower and the head and the water trickles out of the head like a dripping tap. Its a heart breaking sight but you cannot get a good shower without both water pressure and water flow. To read more about both of these, and how to achieve them, see our project on power showers.
Hidden thermostatic mixer valve
The surface shower mixer valves, above, do exactly what it says on the tin. You can see all of it. The valve itself, whether manual or thermostatic, is quite a big affair and although, usually, attractive, can take up quite a bit of room. The pipework can very often be surface mounted also making installation much easier especially if you are putting a pump in the system.
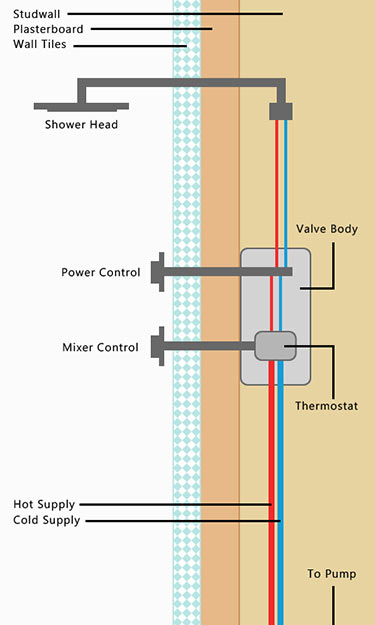
Cross section diagram of pumped mixer valve installation
Hidden valves require a bathroom refit basically. They are really attractive and give a really modern feel to the bathroom but the installation is tricky and not for the faint hearted.
The pipework needs to be hidden behind the tiles as does the shower valve. All that is exposed are the controls and the shower head. In the image titled “Hidden thermostatic mixer valve” above the shower hose can be seen as well as the shower rail, shower head and controls but many hidden valve sets come with a head which is fixed to the wall and is fed from the supply which is hidden inside the wall. This can be seen in the diagram directly above.
If you plan to install a hidden shower valve make absolutely sure you tighten every single compression fitting and gland. If the system leaks you may not know anything about it until your lounge ceiling caves in.
The diagram above shows the installation of a hidden dual control thermostatic mixer valve. In this diagram it is pumped but it does not have to be. The water enters the valve and is mixed as with every other type of mixer valve. The power control then decides how much water to send to the head.
All of the parts shown here, including the hidden pump, can be bought separately, as can pressure reducing valves should you need them. Be aware of the pressure problem, read the manufacturers instruction and, if you have children, make sure your shower valve, be it a tap mixer or a wall mixer, is thermostatically controlled.