What is a PRV and How Does it Work?
Another question we get asked all of the time at DIY Doctor. In its simplest terms a pressure reducing valve, or PRV, allows water to flow into it and, controlled by a spring loaded internal diaphragm, reduces the pressure to one pre-set by the owner.
The mains pressure coming into a property is usually between 1 and 4 bars. If this water is to be mixed with water from a hot water tank which only has a pressure of 0.2 bars then the chances of any of the hot water being felt is minimal.
Installing a mixer shower or mixer tap under these circumstances is a waste of time and so in this instance a PRV is ideal to regulate and reduce the incoming mains pressure.

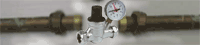
Pressure reducing valve with water pressure gauge
Most PRV’s come preset to 3 bars but this can be altered to suit the pressure you need to get down to.
It is important that the direction of water flow is followed with the valve and this is usually marked with an arrow on the valve itself.
Nowadays the spring loaded diaphragm operates a ceramic disc which is raised or lowered according to the pressure required. PRV’s can also be used on all sizes of pipe.
How to Install a Water Pressure Reducing Valve
To reduce the pressure of the cold water, a PRV can be installed into a horizontal cold water pipe as easily as fitting an isolation valve – see our project on repairing a burst pipe to get a better idea of cutting pipes and the principles of copper compression joints.
A PRV is inserted into the pipe and the fittings tightened to both keep it in place and stop it leaking. Some pressure reducing valves, Comap in particular, come with a stainless steel filter and a water pressure gauge (as can be seen in the image above).
A water pressure gauge is a very good idea to have as it will allow you to accurately measure the exact pressure that is going through the valve and also adjust the pressure if required.
Fitting the PRV is simple enough. As mentioned before, do this in conjunction with our projects on copper compression joints and isolation valves.
Select Location for PRV
Find a suitable length of pipe to cut into. Make sure that the length you choose is easily accessible and is a feed supply to the item or appliance you need to reduce the pressure to. Additionally, please make sure you have turned the water off and drained down first.
Cutting Pipework for a PRV
We have shown two methods of cutting into the pipe in the image below. The first pipe cutter on the left is a wheeled pipe cutter and the one on the right is commonly called a pipe slice.
Both of these, although slightly more expensive than a hack saw are far more advanced, quicker, neater and easier to use. There are no burrs left on the end of the pipe and olives and other fittings can be used immediately without having to file down the end of the pipe.
The image below that shows the pipe with the section cut out. As you will see from the projects mentioned above, the distance between the cuts depends on the item being inserted but.
With compression fittings, unless they are slip couplings, there is always a lip which the inserted, cut pipe sits up against. Measuring between these lips gives you the size of the section you need to cut out of the pipe.
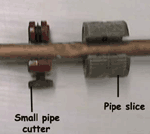
Cutting a copper pipe using a small pipe cutter and pipe slice
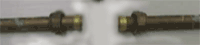
Pipe section cut out and olives added
Add Compression Nuts and Olives
Apologies for the quality of the first image below but it does give the idea! When the pipe is cut, remove the compression nuts from either side of the PRV. Slide them onto the pipe and then slide the olives on.
An olive is a circular brass fitting thicker in the centre of its width than at the edges. As the compression nut is tightened the olive is squeezed between the body of the nut and the fitting itself. This makes the joint watertight. The second image below shows how the olive fits into the inlet and outlet on the PRV valve itself.
Pressure reducing valve ready to be inserted into pipe

Olives added to copper pipe and compression nuts ready to be tightened
Tighten Compression Nuts
Double check the direction of flow arrow on the PRV is pointing in the direction that the water will be flowing and tighten everything up. You can grip the body of the valve with some mole grips or pipe grips as you tighten the compression nut to avoid twisting or bending anything.
Set Your Required Pressure
You can now set the pressure to that required and enjoy your shower. Pressure reducing valves can be inserted after the house stop cock to reduce the water pressure throughout the home if it is too great. Reducing water pressure can actually reduce wastage and therefore save you money.