Connecting taps and valves to the various water sources is a big question for DIY Doctor regulars. Choosing between the various types of tap connectors can cause problems and this project will help you identify the connectors and where they are best used.
Different Types of Tap Connector
The image below shows a sample of tap connectors and the instructions underneath will run through connection to taps and valves. Click on the image to find out more about tap connectors and to get to the plumbing section of the tool store.
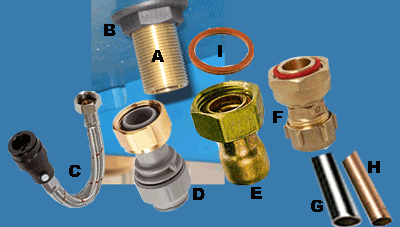
Types of tap connectors
- A = the thread at the bottom of a tap – That which is hidden under the bath/basin
- B = Backnut to tighten tap to bath/basin
- C = Flexible push-fit tap connector
- D = Push fit tap connector
- E = Yorkshire (end feed) tap connector
- F = Compression joint tap connector
- G = 12mm chrome (called silver) pipe
- H = 12mm copper pipe
- I = O-ring, washer or seal
The threaded end of C, D, E, F screw onto A and the unthreaded end of them fits onto G and H
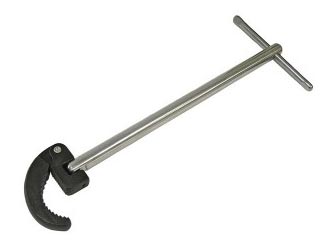
Adjustable basin wrench or spanner
A – Thread at the Bottom of the Tap
This is how a tap is fixed to the unit it serves. The thread, either 22mm or 15mm, goes through a hole in the basin, bath or sink and the body of the tap is tightened up to the unit by means of the nut underneath.
Reaching this nut is made considerably easier using basin spanner or basin wrench shown in the image above. You can click on this image to find out more.
Sometimes it is made easier to get to the nut by allowing it to tighten a little further down the thread. This is done by placing a special washer on the thread, before the nut goes on. This washer is called a top hat washer.
The thread is also the same as the thread which sticks out of a toilet cistern inlet valve. Top hat washers are not used on these as they are easy to get to but the tap connectors are used in exactly the same way. This also applies to valves in the roof tanks.
B – Tap Back Nuts
This is the back nut which is tightened up against the underside of the basin, sink or bath. The same method is used when taps are placed into worktops and overhang the unit.
C – Push Fit Flexible Tap Connectors
This is a push fit, flexible tap connector with a built in isolation valve. Absolutely excellent for units where access is difficult.
The chrome nut at the top connects to the tap thread after inserting a fibre washer (I) and the black end is simply pushed over either a chrome pipe (G) or a copper pipe (H).
The small silver circle you can see in the black push fit end is a valve which is easily turned on and off with a screwdriver allowing you to isolate water to this tap at any time. See our projects on Speed Fit fittings and also our Isolation valves project. Flexible tap connectors can also be bought with compression fittings on the end (see below) with or without isolation valves and in different lengths.
D – Speed Fit Tap Connector
This is a Speed Fit tap connector where the brass nut tightens onto the thread of the tap and the pipe is pushed directly up into it. See the project link above to Speed Fit plumbing.
E – Yorkshire Tap Connector Fitting
This is a Yorkshire fitting tap connector. The nut is tightened to the tap thread and the copper pipe is fed into the end of the fitting. This is then soldered into place. See our project on soldered pipe joints.
F – Compression Joint Tap Connector
This is a compression fitting tap connector. The nut is tightened to the thread on the tap and there is a nut on the other end which contains an Olive.
The Olive is fed over the end of the copper pipe and the nut tightened down onto it. See our project on compression joints to see how this works. The fibre washer (I) can be seen sitting at the top of this connector.
G – Chrome Pipe
A length of chrome pipe. This pipe can be used instead of copper in areas where it is likely to be seen. A feature can then be made of the pipe rather than trying to hide it. For DIY purposes only compression joints should be used to join chrome pipe.
H – Copper Pipe
I’m pretty sure everyone is familiar with copper pipe. Even if you are not a plumber or have no interest in plumbing your sure to have come across it in a kitchen or bathroom at some point.
I – Fibre Washer
Fibre washer – This seals the joint between the back of the nut on the tap connector and the rim of the thread on the tap thread.
Sometimes, after being compressed in a used fitting for a while it is not easily seen, and even less easily removed but do not try to place a new one on top of an old one as it will reduce the thread available to tighten onto the tap. This can make it difficult and lead to cross-threading which can lead to leaks all too easily.