• Skip to primary navigation
  • Skip to main content
  • Skip to primary sidebar
  • Skip to footer
DIY Doctor

Main navigation

      • All Projects
      • Brick, Block, Masonry and Concrete
      • Damp, Condensation, Rot and Woodworm
      • Doors, Windows and Conservatories
      • Electrical
      • Fencing, Decking, Paving and Patios
      • Floors, Walls, Ceilings and Lofts
      • Garages, Sheds and Outbuildings
      • Gardening and Landscaping
      • General Building, Self Build and Renovation
      • General Repairs and Cleaning
      • Green Living and Eco DIY
      • Ground, Foundations and Drainage
      • Heating, Central Heating and Boilers
      • Joinery and Carpentry
      • Materials, Fixings and Fixing
      • Painting, Decorating and Finishing
      • Planning Regs, Project Management and Safety
      • Plastering, Plasterboard and Rendering
      • Plumbing
      • Roofing and Gutters
      • Tiling and Tiles
      • Tools, Appliances and Access
      • DIY Tips
      • Bathroom DIY Videos
      • Decorating Videos
      • Green and Eco Friendly Videos
      • Kitchen Videos
      • Building Foundation Videos
      • Electrical Videos
      • Hand and Power Tools Videos
      • Plumbing Videos
      • Building Videos
      • Fitting Blinds Videos
      • Heating and Central Heating Videos
      • Security Videos
      • Carpentry and Woodworking Videos
      • Flooring Videos
      • Kitchen Videos
      • Damp and Damp Proofing Videos
      • Gardening Videos
      • Plastering and Drylining Videos
      • Find a Tradesman
      • Contract Download
      • Working With Tradesmen - Ultimate Guide
      • Home Improver Protection
      • Price Doctor
      • Tool Store
      • Book Store
      • Tool Reviews and Product Reviews
      • Blog
      • DIY Competitions
      • About DIY Doctor
      • What we do
      • Trade Shows and Exhibitions
      • Master Classes
      • Contact Us

Home > DIY How To Projects and Tutorial Guides > How to Fit a Monoblock Mixer tap

How to Fit a Monoblock Mixer tap

How to fit a monoblock tap to a kitchen sink, basin or bath. Learn how to connect, fit or replace a mixer tap in your kitchen or bathroom. Also get some hints and ideas on which tools will make this project a little easier.

Don't want to do this job yourself? Let us help you find a tradesman local to you

TwitterFacebookPin ItBuffer
Project Page Menu
  • How to Tutorial
  • Video
  • Find Tradesmen
  • Help

It has to be said that fitting a monoblock mixer tap (or monobloc as it’s also spelt) is not the easiest operation in the world and can certainly be a bit fiddly. However, this project should go some way to making it a little easier.

If you do not have any isolation valves handy to cut off the water supply while you carry out your work then you will have to ensure that the water is turned off. Additionally, while the water is off it’s a good idea to fit isolation vales for any work you may need to carry out in the future.

How do Monoblock Taps Work?

Top and bottom of a monoblock

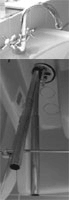
Top and bottom of a monoblock tap

The monoblock is a very clever piece of design technology which allows both the hot and cold feed to enter the base, or block of the tap. The temperature is then "mixed" by the operation of the tap valve or handles.

In order for both feeds to get through the same opening they are reduced to 10mm or 8mm and special tap connectors are used to screw into the block.

The image above shows the tap at the top with the connection tails at the bottom ready to receive the hot and cold feeds. The 10mm feed pipes screw into the underside of the tap and are then machined out to become 15mm copper tails ready for the connection of 15mm feeds.

This can be seen more easily in the image below.

Mounting plate for mixer tap

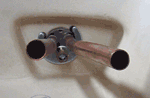
Mounting plate for mixer tap seen from underneath a sink

Fixing Your Monoblock Tap to a Sink or Bath

The opening for a monoblock mixer is usually 26mm. This will be, or be close to, the size of the hole in your sink, basin or bath.

Where do the Rubber Washers go?

There should be a large rubber O ring which sits underneath the block and is squashed between the top of the sink and the underside of the block as the monoblock is tightened into place.

A large, flat rubber washer is placed on the underside of the basin and this has holes in it which should line up with the holes in the monoblock.

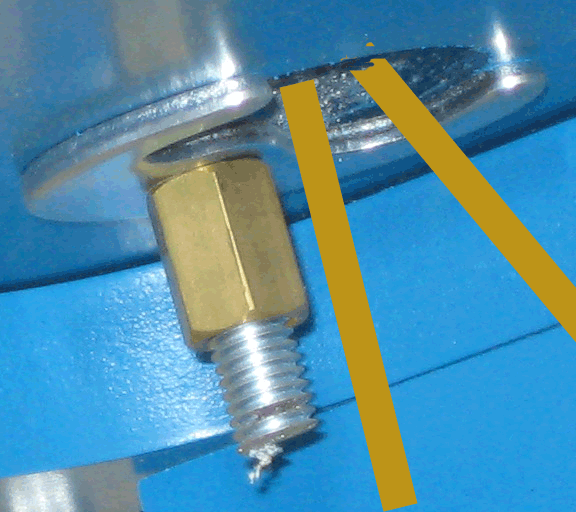
Where do the Feed Pipes go?

The larger two of these holes are for the feed pipes to be screwed in and the smaller two are where the threaded connection bars are screwed into.

Underside of mono block tap

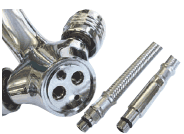
Underside of mono block tap showing feed pipe holes and holes for threaded connection bar

Fit the Threaded Bars First

These threaded bars should be fitted before dropping the tap through the hole in the basin. Only do them up as tight as you can by hand. If you use pliers or grips there is a danger you will damage the thread.

Monoblock with double fixing

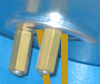
Monoblock tap with double fixing

Sliding on the Steel Washer

Once the tap is in the hole with the flat washer or mounting plate placed over the threaded bars, the steel washer can be slid into place also.

On some models of mixer tap there is only one threaded bar making the job a great deal easier.

Monoblock with single nut fixing

Monoblock tap with single nut fixing

Tighten the Nuts on the Threaded Bar

With the washer in place the nuts can now be tightened onto the threaded bar and this is where the DIY enthusiast struggles.

Use a Box Spanner

There is hardly any room under the basin, less under a bath and a kitchen sink is a nightmare! Plumbers on the other hand, carry a box spanner which is a long open tube with the correct size nut shaped hole at the end.

It is slid over the thread and the other end twisted tight by putting a nail or something similar into the hole and turning. Easy!
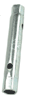
Box spanner

Box spanner

Connecting any Pipework

Once the tap is securly fixed into place you can now go ahead and connect up any pipework.

Speedfit fittings can be used on monoblock feed pipes so click into the speedfit project to see more or you can use standard fittings but make sure they are the correct size of course.

Ensure that any compression fittings are tightened up sufficiently and you can then turn back on the water or open any isolation valves.

Once pressurised, check your work for any leaks.

All project content written and produced by Mike Edwards, founder of DIY Doctor and industry expert in building technology.

TwitterFacebookPin ItBuffer

Video

Back to the Top

Find a Reliable Local Tradesman

Back to the Top
Don't fancy doing this project yourself? We work with the industries best to ensure that we recommend only reliable and trustworthy tradesmen.
Let DIY Doctor help you find a tradesman

Find a tradesman now!


More Help

Back to the Top
Related Projects That May Help You:
  • Advice on Connecting Taps to Basins and Sinks – How to Fit Flexible Tap Connectors
  • Water Filter Taps – How do Water Filter Taps Work to Filter Water and When can They be Used
  • Fitting an Outside Tap – How to Install a Garden Tap Yourself Easily
  • Changing Taps – How to Change a Tap on a Kitchen Sink, Basin or Bath Including the Different Types of Tap and how Each Type Works
  • Ceramic Disc Taps – Ceramic Disc Tap Fitting or Servicing with Washer and Valves Repair or Replacement Tutorial
Give us Some Feedback!

We love feedback on our DIY tutorials it helps us to make them the best they possibly can be so if you have any comments you would like to share with us, click the button below and let us know.

Primary Sidebar

DIY Doctor deal of the week

Blue Groove Set:

Auger and flat bit 8 piece set

RRP Price: £68.04

Special Price: £29.15

Get it here now

See our other deals now!

Master Basic DIY - By DIY Doctor

Our Book - Master Basic DIY

Grab your copy now for all the DIY help you need right at your finger tips!

Buy it Here!

Signup for our Newsletter

Keep up to date with our DIY projects, tips and latest deals

Sign Me Up!

Our Sponsors

Find out about advertising on DIY Doctor

Advertisments

Other Similar Projects
  • How To Connect A Mono Block Tap
  • Do Ceramic Disc Taps Come As A Mono Block Tap?
  • How To Change And Connect Taps
  • How To Install An Outside Tap
  • How To Install A Water Filter Tap

Footer

DIY Doctor

Site Menu

  • About Us
  • Contact Us
  • Blog
  • Media/Press
  • Community Work
  • DIY Projects
  • DIY Videos
  • Superstore
  • DIY Tips
  • DIY Suppliers
  • UK DIY Forum
  • DIY Webinars

Other Stuff

  • Advertise
  • Competitions
  • T and Cs
  • Privacy Policy
  • Cookies
  • NHIC
  • Sitemap

DIY Doctor Social Channels

Follow us on Facebook
Follow us on Twitter
Follow us on YouTube
Follow us on Pinterest
Follow us on Tumblr

DIY Doctor are members of:

© DIY Doctor Ltd 2022 All Rights Reserved