Ceramic disc taps are designed to last a lifetime. Unfortunately, in hard water areas they do not and it is as well to know how they operate and how to service them.
It is very rare for the ceramic discs to wear out and the need to replace them is even rarer. It is, most often, just a case of dismantling the moving parts and servicing them. Should you be unlucky enough to have a tap wherein the parts do actually "wear out" then it is unlikely you will be able to replace the discs and will probably need to replace the whole cartridge within the unit.
The disc tap should be virtually indestructible because a) the ceramics do not wear out, and b) The distance moved by any part of the tap in any one go, is only a quarter of a turn.
Ceramic Tap Components
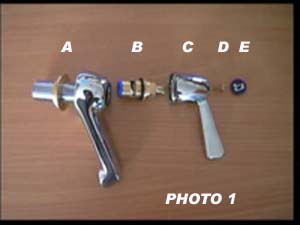
At this point little difference can be seen between this tap and a conventional tap (see repairing a dripping tap). A = Spout, B= Tap cartridge O ring etc, C= Handle, D= Retaining screw, E= Screw cover/Hot-Cold indicator.
Ceramic Tap Inner Components
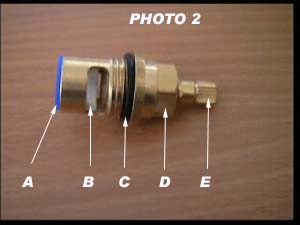
In photo 2 we can see the parts we are concerned with. A = Disc retaining washer, B = Ceramic discs, C = O ring which stops any water seepage up to the head of the tap, D = Valve retaining nut, E = Spindle on which the handle sits. The handle, when turned, moves one disc over the other to open the two triangular holes seen in the photo. This allows the water to pass through.
Labeled retaining washer components
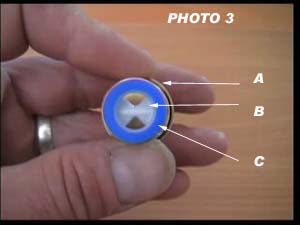
Photo 3 shows A = Valve body, B = Ceramic discs, C = Retaining washer. It must be said at this point that the retaining washer acts almost like a normal tap washer. It provides a seal between the metal of the tap and the ceramic disc. while the tap is in use. It is the water pressure against the underside of the discs which keeps them in place. There is always the possibility of the water being turned off and the tap being dismantled which makes it necessary. The disc is open in this photo as you can see by the two triangular holes. This obviously means the tap would be on.
Ceramic Tap Valve with disc closed
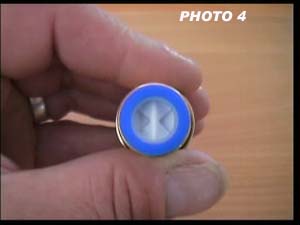
Photo 4 shows the same tap valve with the discs closed, meaning the tap would be off. The ceramic discs are in two parts and it is the top part which moves over the bottom part. Two locating lugs fit into the top part of the top disc and turn with the spindle.
Ceramic Tap with locating lugs in place
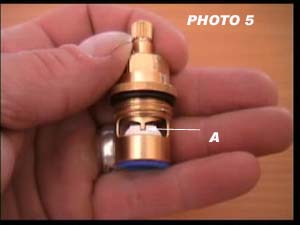
Photo 5 shows how the locating lugs fit into the top disc. The handle sits on the spindle which is between finger and thumb in the photo. When the handle/spindle is turned, the top disc rotates, opening the apertures through which the water flows. These apertures are shown clearly in photos 3 & 4. The bottom disc is held in place and will not move because is sits in between two different locating lugs.
Ceramic Tap – Removing the circlip
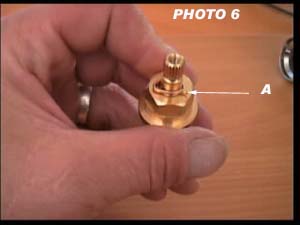
To service the tap fully, we recommend that the circlip is pulled (A) and the spindle is pushed down. This will release all the valve mechanism from its housing and allow all parts to be cleaned with descaler. Do not place the rubber washer or any O rings in the descaler, just wash them with warm soapy water to remove any limescale. The rest of the mechanism can be immersed as you would a shower head.
Ceramic Tap – Retaining Washer
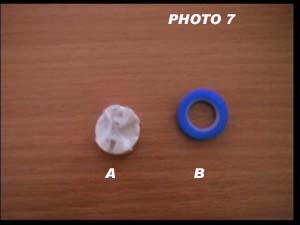
With the retaining washer (B) simply pulled out from the valve, a tap on a hard surface will see the ceramic discs (A) slip out of the valve body, These are the parts that matter and if you are lucky enough to live near a good plumbers merchants and you know the make and model of your taps, you may get a replacement disc. In reality few of us know the make of our taps etc, so it would be necessary, if cleaning does not work, to change the entire cartridge or valve body. These are pretty much universal and not too expensive either.
Ceramic Tap – Retaining Washer
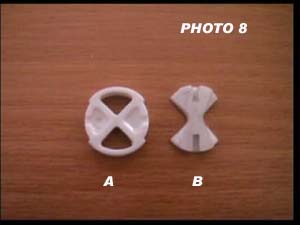
Disc section B sits on top of disc section A. A very thin film of Vaseline can be smeared between them. The shape of B obviously covers the openings in A and closes down the water. Two lugs at the end of the spindle fit into the slots at the top and bottom of B, opening and closing the tap.
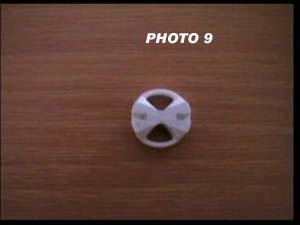
Ceramic Tap – Discs placed together in open position
In photo 9 the discs have been placed together in the open position. The slots into which the spindle lugs fit can be clearly seen. The bottom section of the disc is held in place and the top section rotates across it. The thin film of Vaseline, while not essential, does make the operation a little easier. Too much Vaseline however may keep both sections of the disc a little too far apart and allow water to seep through any gap
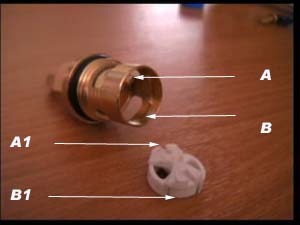
Ceramic Tap – Locating lugs in both valve body and ceramic discs
The last photo shows the locating lugs in both the valve body and on the ceramic discs. The slots (A1) can be seen more clearly in photo 8 and the area marked B1 has a tiny sliver of disc removed in order for it to slide over lug B in the valve body. This secures the bottom half of the disc ( A in photo 8) in the valve body and allows the top half (B in photo 8) to slide over it when turned by the lugs (A) attached to the spindle. It must be noted here that disc taps can be "handed" that is they can be bought to open by turning clockwise and to close by turning anticlockwise. You need to check which hand you are buying and the availability of the spares for your particular tap. The hands can be reversed by registering the lugs differently