Where do I Find my Mains Stop-Cock?
Most homes have the mains stop-cock in the kitchen. More often than not it is under the sink and usually only accessible after a mammoth clear out of a thousand different kinds of cleaning fluid and shoe brushes.
In older houses which have undergone many changes throughout the years, the stopcock may be found in the lounge or dining room which, once upon a time, was the kitchen.
This may be one reason for wanting to move the stop cock or you may decide to have a complete change round in the kitchen. This was the case with this job. The stop cock was under the sink, the sink was moved and the way the kitchen was redesigned, the stop cock had to be moved.
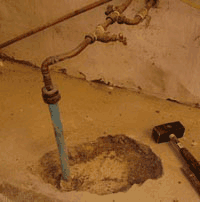
Existing stopcock in floor
How to Move a Mains Stop-Cock
Turn off the Mains Water and Drain Excess Water
The first thing to do before attempting to move a stopcock is to make sure you have turned off the mains in the road. But even before you do that you need to check that you do not share a mains connection with your neighbours.
If all is well, turn off the mains. Leave the stop cock open indoors for a while as you turn on all the downstairs taps and flush any downstairs loos. If no more water comes through then you can be sure that the main street stopcock works.
On the stopcock pipework indoors, there should be a drain plug. Put a hose over the end of this and run it into the garden. Undo the drain plug to drain all the water out of the pipes after first filling a couple of saucepans and the kettle. Plumbing without a cup of tea is no joke!
Decide Where Stop-Cock Should go
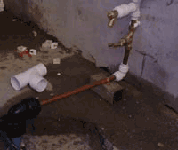
As you can see from the image below (all of the kitchen units had been taken out) the stop cock is quite a long way from the wall and we wanted to get it back out of the way.
Give Yourself Some Space to Work in
The first thing to do was to give ourselves as much room as possible to allow us to get the new pipework down nearer the floor. A hammer and chisel was used to break up the floor screed which gave us an extra 50mm to play with.
All modern water mains are poly pipe or MDPE as it is known. MDPE stands for Medium Density Polyethylene. If you still have lead pipes coming into your house, see our project on replacing lead water mains.
Cut Existing Water Main Poly Pipe To Correct Length
Poly pipe is best cut with correct cutters as you then get a square, unburred edge. Burrs on poly or plastic pipe can damage the rubber O rings of the fittings they are used with.
Cut the pipe off at the level you want but allow plenty for the fitting to grip on to. Clean the end of the pipe thoroughly with wire wool.
A pipe slice will enable the copper pipe to be cut close to the wall or floor and gives a clean cut to work with.
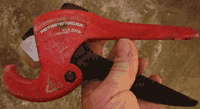
Cutters for cutting the poly pipe to level
As you can see below, we held the fitting against the pipe to get the right depth. The fitting we used was MDPE elbow with a MDPE to copper adapter kit.
Fit New MDPE Fittings
All MDPE and plastic pipes need to have inserts pushed in when they are used in conjunction with fittings. The inserts stop the fitting crushing the pipe in any way. You can read more about pipe inserts in our speedfit project.
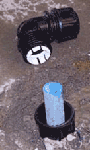
Fitting tried out for depth

Pushing insert into pipe
Relocate Stop-Cock to Desired New Location
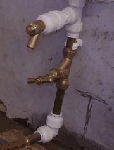
Once the insert is pressed home the fitting can be attached. The images below follow the rest of the installation through. The 15mm copper pipe was connected to the other end of the MDPE elbow and the pipe then taken towards the wall.
We had decided to use Speedfit for this installation as it will all be hidden and we like Speedfit for its speed and ease of use.
The copper was connected to a 15mm speedfit elbow to take it up the wall a little. A timber block was plugged and screwed to the floor as support for the pipe.
Copper in other end of MDPE fitting
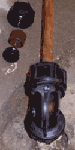
New stopcock nearly complete with all connections made
Fit New Stop-Cock
After the bend a short length of pipe was fitted and then a new 15mm stop cock. The stop cock was clipped to the wall top and bottom to keep it secure.
You can see the mark on the wall which denotes the bottom of the new units which were to be fitted so, when fitted, the new stop cock would be right at the back of the unit just above the bottom shelf.
Fit New Drain plug and Connect to Existing Water Feeds
A short section of pipe was connected to the stopcock and then a new drain plug. From the drain plug the pipework can then go on to feed the sink and so on.
Mission accomplished. Make sure you check all the joints and turn on the outside mains valve and then check again for any leaks when the system is under pressure.