If your wooden floorboards are in decent condition but not suitable for staining or varnishing, a coat of paint can refresh them. Painting them white or off-white can instantly brighten the room, making it feel cleaner and more spacious. For a bold transformation, try a brighter colour to create a unique, standout look.
In this DIY guide we look at the process of painting a wooden floor to give it a fresh new look.
Why Paint a Wooden Floor?
There are several reasons why you may want to paint a wooden floor, but the main reasons tend to be to give it a fresh new look and to extend its life.
Due to the nature of floors and the amount of foot traffic they have to support, they do tend to wear over time, especially is they are not covered with carpet or the similar, and if they are not properly maintained, they do start to look tired and unsightly pretty quickly.
If a floor is badly worn, other than the option of painting, if you want to revitalise it the only other choice is to rip it all up and replace it. As you may imagine, this is quite an expensive and hassle-laden job to take on, so if budgets are a big consideration then painting is often the best way to go.
Finally, if your floor has a fair bit of damage such as splits, cracks, knot holes and the likes, if you repair them, often the repairs themselves stand out like s sore thumb!
However, once a nice coat of paint has been applied, they are then hidden and all that you are left with is the nice, uniform finish of the paint.
What Paint to Use for Wooden Floors?
The first decision is choosing the right type of paint for your wooden floor. It’s best to opt for a dedicated floor paint, as it’s specifically designed to handle the heavy wear floors are subjected to.
Floor paints are formulated to resist foot traffic, as well as flaking, chipping, and peeling. They’re also spill and stain resistant, making them durable and easy to maintain.
Some floor paints require a primer or sealer, while others don’t, so always check the manufacturer’s instructions on the tin.
Priming your floor before painting creates a solid base for the top coat, ensuring strong adhesion and long-lasting results. To prevent knots in the wood from bleeding through the paint, use a good-quality primer. For tougher knots, Zinsser BIN is a good option.
Lastly, ensure the primer is compatible with the type of paint you’re using. Avoid mixing different compositions of paint together e.g. water-based and oil-based products, only ever use like-for-like. If you’re unsure, ask for help at your local DIY store.

Zinsser BIN
What to do About Damage?
Due to the volume of foot traffic even a fairly quiet room will receive over time, it’s inevitable that some damage will occur and before any paint is added, such areas need to be repaired.
To do this, the best thing to use is a good quality wood filler such as the one in the image below. If you can, also try to match shades and tones as this will reduce any chance of the repair bleeding through.
Fill over each area of damage and allow the filler to cure for the specified time, to ensure it’s completely solid.
Once cured, use a medium grit sand paper (around 140 grit) to sand it back flat with any surrounding areas.

Ronseal High Performance Wood Filler
Should I use a Brush or Roller?
You can paint using a brush, roller or even a paint pad, however you’ll need a brush to do the cutting in around the edges of the room and then you can use the roller to cover that large remaining area of the room.
In both cases, go for the best quality items you can afford as this will make a difference. Good quality brushes and roller sleeves generally give a better finish with fewer brush and roller marks left in the overall finish.
Good quality items also lose less bristles and roller pile so you won’t be constantly picking them out of your finished paint coat!
It’s also good to know that you can indeed also use a paint pad. These handy tools can cover large areas very quickly, producing a great, very smooth finish and minimising any stroke marks.
One final point to note is that if you’re using a brush or any short handled item that involves you working on the floor, get some knee pads, you will certainly be thankful by the end of the day.

Paint pad set
Tools and Products Needed for Painting Wooden Floors
In order to successfully paint a wooden floor, you will need the following tools and products:
- Roller, brush or paint pad
- Handle extension for roller or paint pad (if needed)
- Good quality wood filler
- Selection of sandpaper
- Vacuum
- Old rags
- Bucket and clean water
- Good quality paint
- Floor sanding machine (if required)
- PPE – Dust mask, goggles, old clothes etc.
How to Paint Wooden Floors
Now that you know exactly what type and quality of paint and painting tools to use, it’s now time to look at how to actually get the floor prepped and get some paint onto it.
Step 1 – Prepare the Floor
The very first job to do is to get the floor prepared, and the first task here is to move all unfixed furniture and items out of the room so you have a clear floor to work with.
You may be tempted to do a bit at a time, moving furniture as you go, however this is rarely a good idea. Inevitably, this will take much, much longer and everything will get coated in dust when you sand, meaning aa much bigger cleanup job.
If you have beading (edging) around the perimeter of the room, always remove this before starting, don’t be tempted to work with this in place as it will likely get damaged or covered in paint.
If you want to paint or varnish it, this is also best done while it’s off and you can then replace it once finished.
No matter what’s on the existing floor (paint, varnish etc.) or even if it’s bare, it will definitely need sanding before you paint it, but how you do this will really depend on the size of the room.
If a fairly small room then a hand held sheet, belt or orbital sander will do the job, however if it’s fairly large the best tool to use is a floor sander (see our sanding a floor project here).
These tools are best hired from your local hire shop.
Whatever tool you use, before you start, go over the entire surface first and knock any proud nail heads down so they don’t snag the sandpaper or damage the sanding belt of the machine.
In terms of the sanding itself, as with painting, start at the back of the room and work towards the door, working across the room as you go.
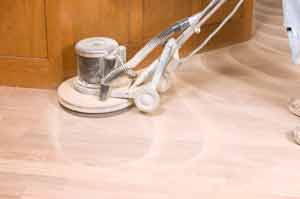
Sanding down a wooden floor
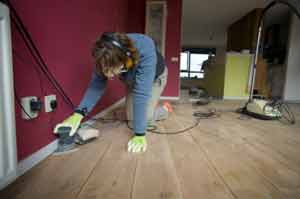
Detail sanding the wooden floor
After sanding the entire floor (be sure to reach the edges by hand or with a mouse sander), it’s time for a thorough cleaning. Use detergent and water to mop the floor. If you notice any mould or mildew, clean it off with a bleach and water solution.
Once the floor is clean, rinse it with fresh water and a mop. Let the floor dry completely before proceeding. This drying process may take a couple of days, so ensure no moisture remains before moving to the next step.
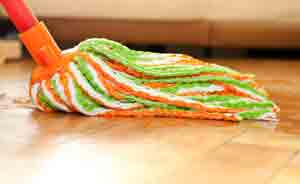
Mop wooden floor to clean excess dust and debris before painting
Note: Sanding is an extremely dusty job, so ensure that you always wear a decent, good quality face mask, googles and other PPE gear!
Step 2 – Fill and Repair Damage
Once the floor has been properly cleaned, the next job is to repair any damage that’s present.
For any holes, splits, large cracks and the likes, use a good quality wood filler to fill these holes. To prevent any bleed through, choose a filler as close a colour match to the existing floor as possible.
Once you have applied the filler, leave it to cure for the manufacturers specified time (generally about 24 hours) and then sand it off flat with the surrounding area.
Once sanded down, vacuum up any and all dust and then wipe over with a damp cloth to remove any final remnants and then leave to dry fully.
Step 3 – Prime the Floor
Ensure proper ventilation while priming, but if you’re concerned about security, close any accessible windows beforehand. Many windows have a vent or part-open lock setting for airflow. If leaving windows open isn’t an option, keep the door ajar and open windows elsewhere to maintain ventilation.
Not all floors need priming before applying the top coat, so check the paint manufacturer’s instructions on the can to confirm. If priming is required, start by cutting in around the edges with a brush, getting close to the skirting boards without splashing them.
After edging, use a paint roller or pad to cover the rest of the floor area. Start at the back of the room and work your way towards the door, working from side to side as you go. Be sure not to paint yourself into a corner (excuse the pun)!
For a smooth finish, complete the priming in one go to avoid lap marks (proud edges where teh paint has dried). Allow the primer to dry fully for at least 24 hours before applying the top coat.
Step 4 – Paint the Floor
Ensure good ventilation to help with fumes and drying time. Open windows or use fans to keep air flowing.
Start by cutting in around the edges of the room with a brush, painting a couple of inches out from the skirting, and avoiding any paint on the skirting boards.
Next, use your roller, paint pad, or brush for the remaining floor area. Begin in the farthest corner, working your way towards the exit to again avoid painting yourself into a corner.
Dip your roller or pad lightly into the paint, removing excess, and apply along the wood grain. Start at a comfortable reach and pull towards you, working on small sections at a time. Ensure smooth blending between sections to avoid visible overlaps. Complete the entire floor in one session to prevent lap marks.
Apply at least two coats. Refer to the tin for drying times between coats. Thin coats dry harder, making them more durable, so you might need additional coats if applied thinly.
Allow the paint to dry for at least 24 hours before walking on it. Ideally, wait a few extra days before moving furniture back, as the paint will continue curing to a tougher finish.
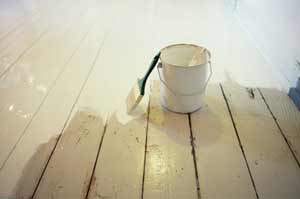
Painting your wooden floor – start at the opposite end of the room and work back towards the door
Painting a wooden floor is a quick, cheap and sure fire way of revitalising a tired room and giving it a new look without the hassle and expense of actually replacing the floor or indulging in other large-scale works.