Many questions we receive focus on painting kitchen units, worktops, and updating existing kitchens. This DIY project is popular because it’s a cost-effective way to personalise a new home without spending a fortune.
Revamping kitchen units and cupboards is affordable and can significantly transform your kitchen, especially if you invest in new worktops and unit doors.
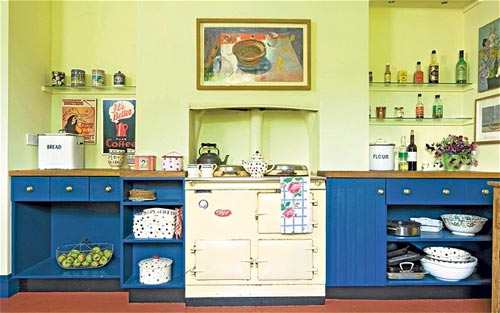
Painted kitchen units in a traditional style kitchen – Image courtesy of the telegraph.co.uk
Painting Kitchen Worktops
Before you go ahead and start your your worktops and units, take note of the important points stated below:
Can I Paint Any Type of Worktop?
Most worktops, except for hardwood timber ones, should not be painted. Non-timber surfaces, like laminate, are designed to repel moisture and food, preventing paint or varnish from bonding properly.
Paint or varnish on these surfaces will likely chip and crack quickly due to the constant use and wear. This damage can lead to germs and an unhygienic work surface.
For timber worktops, use oil for treatment. For details, see our guide on treating wooden worktops.
Considerations Before Painting Your Worktop
If you have to paint a worktop, only ever attempt to paint a timber or wooden worktop. If the worktop has been treated with oil, varnish, or stain, the success of painting depends on how long these treatments have been on the surface.
Oils and stains penetrate the wood, making it difficult for paint to adhere properly. If the surface is too sealed, paint may crack and peel.
Check if the worktop has been treated and with what. For example, Danish oil can often be painted over. If the surface is non-porous and well-aged, painting might be less successful.
Use semi-gloss or part-gloss paint to reduce visible brush marks. Matte finishes can be chalky and harder to clean.
How to Paint Wooden Worktops
This guide outlines how to paint a treated wooden worktop, although as we have stated, this ins’t necessarily a good idea. While we’ve had success with this method, results can vary. Proceed with caution, as mistakes might require a new worktop:
NOTE: For the best results, move the worktop to a garage or another area outside the kitchen if possible.
- Clean with White Spirit: Use a rag or soft brush to scrub the surface with white spirit, focusing on any crevices. Repeat this process twice, wiping away residue with a clean cloth. Wear gloves for protection.
- Sand the Surface: Once the white spirit has dried (wait at least 24 hours), sand the worktop with fine sandpaper (300–400 grit), following the grain to avoid scratches. Remove dust with a brush and vacuum.
- Wipe with White Spirit: After sanding, wipe the surface with white spirit to remove remaining dust and grease.
- Prime: Choose a durable primer suited for high-traffic surfaces. Apply one coat of primer using a brush or roller, and let it dry according to the manufacturer’s instructions. Dacrylate offers a range of suitable primers.
- Apply Undercoat: Apply two coats of undercoat that matches your primer and top coat, ensuring compatibility. Use a brush or roller, allowing each coat to dry thoroughly.
- Apply Top Coat: Select a top coat compatible with your primer. For a smooth finish, use a fine roller or brush. Apply the top coat in thin layers, allowing each coat to dry as per the manufacturer’s instructions. Add a second or third coat if needed.
Allow the worktop to cure for at least 24 hours, preferably 48 hours, before use.
Choosing Paint for Kitchen Cabinets and Cupboards
Gloss paint is traditional for kitchen cupboards, offering a shiny finish but revealing imperfections and brush strokes.
For a more forgiving finish, consider an eggshell paint. It provides a smooth look while hiding brush and roller marks effectively.
When selecting paint, check the manufacturer’s guidelines to ensure it’s suitable for use on kitchen units and surfaces. This goes regardless of what type of paint you use, whether you choose water-based or oil-based.
Paint Cupboards or Units In Situ or Remove Them?
For the best results, remove cupboards and units for painting in a separate space like a garage. This approach gives you a lot more space and allows you to paint the entire piece at once, avoiding obstacles like worktops and appliances.
While removing doors is straightforward, floor units may be more challenging due to attachments like screws, worktops, and appliances. If removing them isn’t feasible, you’ll need to paint in place. Use masking tape to protect areas you don’t want to paint, and do this after thorough cleaning and the correct prep.
Alternatively, you can remove and paint one unit at a time to keep your kitchen functional, though it will be partially disassembled during the process.
In either case, remove all handles and hinges before starting and store them in a safe container to avoid losing any parts.

Kitchen unit painted in situ without removing – Image courtesy of oak-free-standing-kitchens.com
Cleaning and Preparing Kitchen Units and Cupboards for Painting
Cooking releases grease and moisture that can settle on your kitchen units, even if it’s not visible. To ensure a smooth paint job, start by thoroughly cleaning all surfaces. Use a multi-purpose cleaner or degreaser, followed by sugar soap, to remove any residue. Allow the surfaces to dry completely before proceeding.
- Timber Surfaces: For wooden or previously painted surfaces, sand them lightly with high-grit sandpaper, around 100–120 grit (information on the different types of sandpaper can be found here) to smooth the surface and remove any imperfections. Pay special attention to decorative elements. After sanding, wipe the surface with a damp cloth to remove dust.
- Laminate Surfaces: For laminated or coated surfaces, sanding isn’t necessary. Simply clean thoroughly and apply a melamine primer before painting.
Priming, Undercoating and Finishing Kitchen Units and Cupboards
When painting kitchen units and cupboards, proper priming and undercoating are crucial for a smooth finish. Use a high-quality brush with fine bristles to minimise visible brush marks. Apply each coat in the same direction, whether up and down or side to side, for a consistent look.
Step 1 – Priming Surfaces
Priming is essential for a smooth paint job. Choose the right primer based on the surface you’re painting:
- Wooden and Timber Surfaces: Use a dedicated timber primer for best results. While all-in-one primers and undercoats are available, a specific primer usually offers a better finish.
- Laminate and Melamine Surfaces: Apply a melamine primer, which you can find at most DIY stores.
Generally, one coat is sufficient if the existing colours are light. For dark or glossy surfaces, apply two coats to prevent bleed-through. After the first coat, lightly sand the surface, remove the dust, and then apply the second coat.
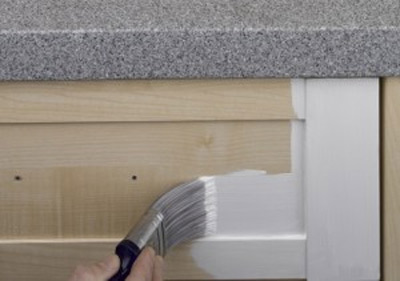
Priming a sanded kitchen unit using timber primer – Image courtesy of juliancassell.com
Step 2 – Undercoating Surfaces
After priming, apply an undercoat that is compatible with your primer. Always check the manufacturer’s instructions for compatibility.
One coat of undercoat is usually sufficient. If brush strokes are visible, apply a second coat. Lightly sand the first coat before the second application, and wipe away dust.
For the best finish, select an undercoat colour that closely matches your topcoat.
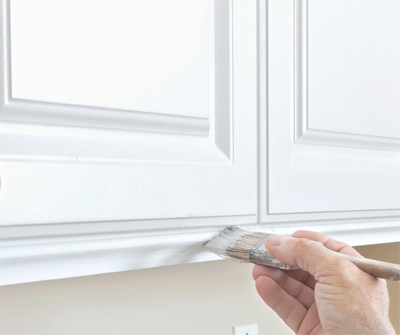
Applying undercoat to primed kitchen cupboard
Step 3 – Top Coating Surfaces
After the undercoat has fully dried, lightly sand it to smooth out any imperfections and then remove any and all dust.
Apply at least two thin layers of top coat. Allow each coat to dry, then lightly sand before applying the next layer.
Use a small amount of paint on the brush to avoid clumps and runs, ensuring a smooth, even finish.
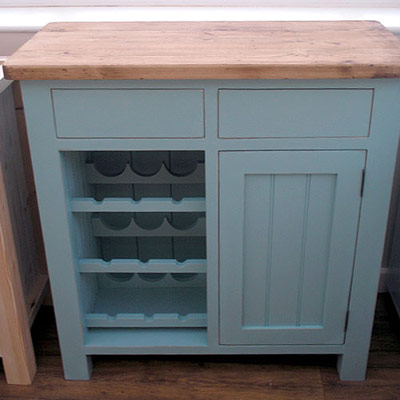
Completed painted kitchen unit – Image courtesy of black-barn-crafts.co.uk
Choosing Hardware for Your Kitchen Units and Cupboards
After updating your cupboards or units, the final step is to replace the handles and hinges. Choose fittings that match your new colour and style, whether modern or traditional, to complete the look.
When shopping for new hardware, bring a sample of your old fittings to match sizes and spacing accurately. Additionally, carry a tape measure and notepad with the measurements of your doors and units to ensure a perfect fit.
Installing a brand new kitchen is both expensive and full of hassle, likely meaning you loose your kitchen for a good long while. However, simply painting and tidying up your existing units can give a tired kitchen a brand new lease of life!